Showing posts with label Gibson Girls Plate No 2. Show all posts

Friday, 19 April 2019

Paper flag by Titbelsoeur

Hello happy crafters !
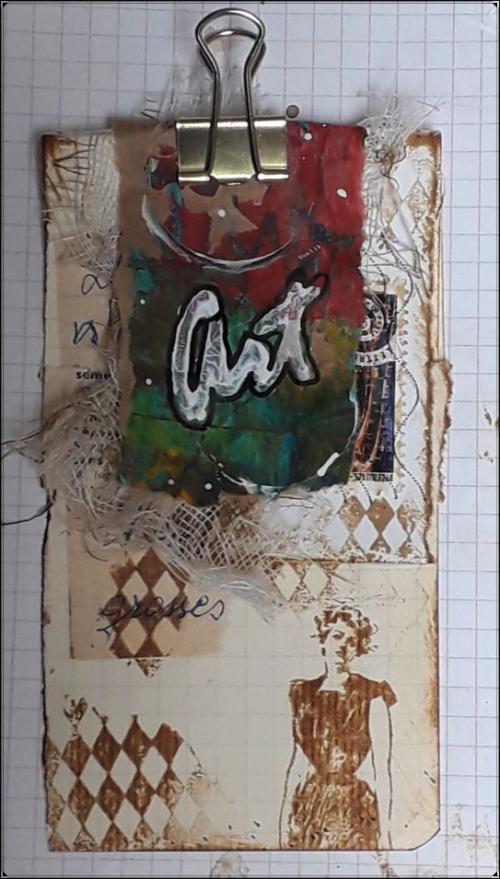
Here is a "paper flag" I have made to be added to a junk journal I taught last weekend. Let me show you how I made it :

First, I took a torn a notebook page and glued a piece of an old letter. Then I stamped the Harlequin stamp from Mini Backgrounds # 2 size A6 with Vintage Photo Distress ink. After taking the picture, I also stamped the head and body of the small girl from Gibson Girls 2 A5  


On top of this, I have added a piece of a stamped envelope I have also distressed, a piece of a compress, and a piece of painted kraft from my stash, I have stamped the word "art" from Journaling Words 3 size A5  with white acrylic paint 


I hope my flag gives you inspiration to participate in our 


for 3 chances to win some of these fabulous Artistic Samper stamps !
Thank you so much for stopping by.
Your comments are very much appreciated here, on my blog
Bye for now and happy creating. 
Titbelsoeur

Wednesday, 6 August 2014

Sardine can by Titbelsoeur

Hello happy Readers !
My project of today is an altered sardine can. I have started stamping a very old envelope with stamps from the Ephemera 1 and Carte Postale plates to make my background


Here are the items I was planning to add to my project, I haven't used all of them. 
I have stamped the Gibson girl from the 2nd plate and colored it with watercolors :


I have sticked it on the top of the can to make volume :


And made a garland with book pages that I glued to the back of the can :


Thank you so much for stopping by, I am looking forward to reading your comments below...
Wishing you a very good summer time !
A tout bientôt !

Sunday, 22 September 2013

Titbelsoeur's cabinet of curiosities

Salut les patouilleuses, c'est Titbelsoeur aux manettes !

I am happy to show you today my big work of the year. Let me first explain the story of this piece. have a seat, take a breath, a warm drink (almost Autumn here, isn't it ?) and let's start !
With 4 messing-up-friends of mine, I have been leading a French forum for about 2 years. In 2013, we have made a series of tutorials to show them how to make a lot of thingamabobs, thingamajigs and other thingummies but never telling them what they would do with... 
They played the game with passion and made more and more creative thingummies.
And now the time has come that we show them what to do with : the intent was to help them make a cabinet of curiosities by themselves, with recycled items only.

Here is how I decorated mine :
first I sprayed diluted Distress ink on kraft paper, and when dried I stamped the image, hid it with a cut out of the same stamped image and stamped the others as a background.


the stamps I used are :
ground floor left : Men’s Plate 001 and Numerical plate
center :  Collage lady Elements
right : Gibson Girls 002Time and Keys and   Numerical plate

1st floor left :  A Stitch in Time and Dressmaking  No. 1
center :Large Bingo Card and  The Open Road 1
right :  Collage Man

attic : Family Values

and here is my happy-messy (literal translation) cabinet, filled with my thingamabobs, thingamajigs and other thingummies (love these words ;-) :


I have already showed you some of the thingamajigs here or there.


Sooo girls and maybe boys, I hope you like my project,

thanks for stopping by, 

I am looking forward to reading your comments! 

A la prochaine !


Wednesday, 4 August 2010

Bathing Belles! By Lucy Edmondson

I hope you will like this little heart shaped album in a heart shaped tin. I love having the aperture so you can see the front page of the album. I have used some gorgeous vintage double sided papers - those were the days, when you didn't have to worry about exposing too much flesh on the beach!


This is what you will need:-

Seaside Plate No 1
Gibson Girls Plate No 2
Distress Inks
White Gesso
Tim Holtz Distress Crackle Paint in Picket Fence
Fibres or Twill

All available from The Artistic Stamper.

You will also need a tin with an aperture - doesn't have to be heart shaped. My tin was red - which was a difficult starting point! I have also used a fish and some shell art moulds, made up with Fimo and Stickles, but you can use real shells or any seaside ephemera, to decorate the top of the tin. I used a selection of the 'On the Boardwalk' Collection of double sided 12 x 12 papers by Graphic 45, but there are such a lot of images on the Seaside Plate that you could use to make your own backgrounds.

I covered the tin with gesso then added Crackle Paint, and sponged on Distress Inks, and sprayed on some shimmer mists. I cut a front and back cover for the album from mountboard, then the pages from the ds paper, doing a bit of jigsawing so I had the images I wanted, where I wanted them. I added a selection of images from the Seaside plate and the Gibson Girls paddling, stamped in Sepia.


I set eyelets in the top left of each heart shaped piece and attached them together with a book ring and some fibres (the twill Jennie sells would work well too):-


Finally, I took one of the die cut border strips from the paper set, which had an index tab on it, and snipped the words 'On the Boardwalk - By the Beautiful Sea' from the name tab at the top of one of the papers, adhered this to the index tab, blended it in with Antique Linen, added brads, and stuck it diagonally across the front of the tin. The words 'Down the Boardwalk She Came' were positioned on the front page to show through the aperture.

Thanks for looking and your comments are greatly appreciated.

Lucy