So...thank you and well done Jack, you truly are awesome. If you want to see what state he actually ended up then go to MY BLOG
Showing posts with label Decay journaling stamps. Show all posts
Tuesday, 4 September 2018
Proud Grandma
Well...today I am introducing you to a new artist on the block......my gorgeous four year old Grandson Jack!!!. We were doing a painting session, and as usual he squirts way too much paint into the palette so he always has loads left over, well I hate waste, and especially when it comes to wasting craft products!!!, so I grabbed him one of the circular stamps from the DECAY JOURNAL PLATE and got him to dip it in the excess paint and stamp onto some card, and look at that gorgeous background that he created!!!...proud Grandma moment!!!...I just finished it off with some words and a butterfly from the INSECTS AND BUTTERFLIES set. On reflection tho, I wish I had put "My love for my Grandson is like a circle".
Monday, 22 January 2018
The Dragonfly
Hi all you gorgeous crafty folk out there in blogging crafty heaven!!!. I'm here again to share one of my makes, that actually just happened!!!, I was just messing about with the circles from the DECAY JOURNAL PLATE, and thought hmmmmmmm..."yes I like that"...so I added the DRAGONFLY WORDS, then thought...ooops...I've not taken photos of each step, oh well...there is only the dragonfly from the INSECTS AND BUTTERFLIES stamp set, sooooo....no point taking photos now it's nearly finished!!!. Something tells me I'm gonna be making this mistake a lot, cos I rarely have a specific idea in mind, and when I do, it never actually works out, soooo....just a lot of playing around. Like I say to my friends, crafting for me is 99.9% faffing...and 0.1% card making!!!!
Anyway, I hope you like my card, I do love butterflies and dragonflies so something tells me I'm gonna be using this stamp set a lot. I'm really loving seeing your entries in our "Anything Goes" challenge, and I look forward to seeing more of your fabulous makes. Have a good crafty day. JANE x
Friday, 19 January 2018
Greeting cards by Titbelsoeur
Hello Happy Stampers !
To make these greeting cards, I have first glued some pieces of books or magazines to a drawing paper. A slight coat of gesso with a credit card, and I added acrylic paint with my fingers :
I stamped dots and circles from Decay Journaling Stamps #1 , Decay Swirl Background and Borders A5 2 with white acrylic, Calligraphic Mat 1 and Calligraphic Mat 13 with black Archival ink :
I cut the paper in pieces to fit my black cards and added "Season's Greetings" from Christmas Greetings # 1 and "Happy New Year" from Christmas Greetings # 2 . I highlighted the first one with a white pen, and the second one with white acrylic on the top to figure snow and black on the bottom to highlight.
Do not forget that you can win these fabulous stamps, just participating in our challenge
January Challenge- Anything Goes
for 3 chances to win !
Thank you so much for stopping by.
Your comments are very much appreciated here, on my blog
Bye for now and happy creating.
Titbelsoeur
Sunday, 7 January 2018
Greetings envelopes by Titbelsoeur
Happy new year, dear stampfans !
Want to send your greetings in a distressed envelope ? Very easy !
Just always have blank envelopes around on your table when using your gelli plate, to clean up your brayer, your stamps, your stencils. And your background is already done !
Then, stamp these wonderful Artistic Stamper stamps on the top of it, and your envelope is ready to be sent.
New year greetings mood, here are the stamps I used :
Modern Christmas # 1 A5Christmas Greetings # 2 A5Decay Journaling Stamps #1 Size A5
Saturday, 7 October 2017
Antique sardine can by Titbelsoeur
Hello there, how are you doing ?
Today, let's go back to the very very old times... To do so, I have stamped a statue from Architecture 3 058 A4 on Bristol paper and lightly colored it with watercolors.
Then I sticked the background to the back of a sardine can, cut out the statue and sticked it on the edge of the can to make depth, and added a few jewels from my stash.
Today, let's go back to the very very old times... To do so, I have stamped a statue from Architecture 3 058 A4 on Bristol paper and lightly colored it with watercolors.
The background is made with the mini Harlequin from Mini Backgrounds # 2 size A6 and the big circle from Decay Journaling Stamps #1 Size A5 that I have stamped on a small gelli plate before printing.
In details :Then I sticked the background to the back of a sardine can, cut out the statue and sticked it on the edge of the can to make depth, and added a few jewels from my stash.
Would you like to win these fabulous stamps ? Easy : just participate in our monthly challenge "STEAMPUNKED " for 3 chances to win !
Thank you so much for stopping by.
Your comments are very much appreciated here, on my blog
Titbelsoeur
Tuesday, 7 February 2017
He[art] Journal page by Ttibelsoeur
Hello happy Journalers, how are you doing ?
It was great to use these Artistic Stamper stamps to make a new art journal page.
The page was not blank in first place : I have gathered many monoprinted pages to make a new art journal. Hence the first layer, gelliprinted with Bamboo Open Texture Mat C156 © CaroLines
The second layer was made with the new Mini background stamps and assorted Distress inks. Then I stamped Decay forms and steampunk border from Borders A5 2 on the edges with black Archival ink. Some white marks made with white acrylic paint on bottle caps, and the background was done.
Then I stamped the 2 Inspiration Jars with black Archival Ink on a separate drawing paper, already colored with Distress Ink Pads (Mustard seed, Spiced Marmalade and Broken China), I added the new Mini Heart © Neil Walker on the blank jar, highlighted some details with a white pen, cut both out and glued both on my page.
I was just missing a title 😅... easy peasy, found it in the Journaling section !
Thank you so much for stopping by,
your comments are very much appreciated,
here, on my blog, or on the Artistic Stamper's Facebook page.
Do not forget to participate in our monthly challenge
to win some fabulous Artistic Stamper stamps.
Titbelsoeur
Monday, 29 August 2016
So much Green Journal page by Gemma
Hello Everyone
I have a journal page to share with you all today. I have been struggling, creatively for a bit, So I went back to basics I had learnt when I started art journaling. Keeping my background colours within the same colour family with a contrast colour over the top. I also stamped the words 'Play', 'experience' and 'learn' in the circles as that is what I constantly have to remind myself to do with my Craft/Art supplies.
I started by covering the page with Gesso.Then using an old key card I scrapped Vibrant Turquoise, Fresh Lime and Cut Grass Dylusion paints over the whole page, allowing a small amount of drying time between layers.
I then sponged some Cut Grass Dylusions paints through the Sequin Waste mask, moving the mask to different areas of the page.
I also sponged paint through the Random Dots mask before using Squeezed Orange Dylusion paint to stamp the circle from the decay journaling stamps three times. I then mixed a small amount of the Squeezed Orange panit with water and allowed it to drip down the page from the bottom of the circles and allong the side of the page.
To finish the page off I added circles using lids and black and white inks. I then doddle a little with black and white paint pens
Thank yoy for reading
Gemma
Friday, 26 February 2016
Heart Journal page Tutorial by Shilpa
Hello Everyone,
Today, I am sharing with you an art journal page and its tutorial.
I've used many Artistic stamper Decay stamps to create the background on this page!
here are the step by step photos...
I stamped squares and rectangles from Decay Journaling Stamp set #2 with Jet blck archival ink. Fussy cut them and adhered them on surface to my satisfaction.
I applied mustered seed distress paint and spritzed water to spread it. I dried it with heat tool. And next I used decay numbers stamps with black archival ink to get more texture.
I also used Calligraphy Mat 3 stamp for text on my background.
For more texture I used stencil and gold embossing paste.
I cut out heart and stamped on it with heart background stamp and Calligraphy mat #13 and Coffee archival ink. Applied Fired brick distress paint on it and spritzed water. Let it dry.
I attached the heart on the texture background and my page was ready? Are you liking it !
You have 4 more days to participate in our this month's challenge - "Theme- Heart"
Thanks so much for stopping by.
Products used from Artistic Stamper:
Decay stamps
Calligraphy Mat 3 stamp
Calligraphy Mat #13
Heart Background stamp
Distress Paints- Mustred seed, Fired brick
Ranger Archival inks - Coffee, Jet black
Wednesday, 7 October 2015
Art Journal page by Titbelsoeur
Hello happy art journalers !
Today let me show you a new art journal page.
To make the background, I have glued paper squares on to my page, coloured it with yellow and stamped Decay Swirl Background and Swirl Background Open from Backgrounds with Distress ink to have a smooth background.
Then I stamped Decay Journaling Stamps #1 and Decay Alphabet from Journaling, text from Time and Keys in Time and the butterfly from Butterflies #2 in Butterflies & Birds, all with black Archival
The Blossom stamp from Debbie Cotton I stamped on to a cardboard and scraped it, then coloured it with Promarkers and sticked it to the background :
and here is my page :
Thanks so much for stopping by,
your comments are very much appreciated,
here, on my blog, or on the Artistic Stamper's Facebook page.
I hope that my page did inspire you and that
you will participate in our October challenge
to win some fabulous Artistic Stamper stamps.
Titbelsoeur
Thursday, 10 September 2015
Life is like.... by Debs
Hi All
Today I have done an altered book page for you. One of the benefits of living reasonably close to the shop is being able to go to Jennie's classes and one of my regular classes is the altered book club. I would not have dreamt of altering a book before, but its so much fun!
Here is a brief how to
take a book and open it up - that bit always helps!
Randomly paint (using a dry brush) a dark colour i used Dylusions post box red paint
added some squeezed orange and then some lemon zest and a bit more red
Then some white, all done very randomly - the more random the better
I added on a couple of pieces of corrugated cardboard that were laying on my desk, one of which was nicely shaped for a corner. Stamped a butterfly from Butterflies #2 in Black Soot Distress ink and embossed with Wow clear sparkle embossing powder and painted once cooled.
Stamped the words using the Decay letters onto a piece of card and painted using the same colours. Added some background stamping to the page using the new background Fabric 2 stamp set using Archival black ink and the Calligraphic Mat 11 using Dylusions White Linen paint The Shadow effect around the butterfly and words was created using a charcoal pencil.
There have been some amazing entries so far for this months challenge so please do keep them coming we really do enjoy looking at all your creations.
Debs
Friday, 4 September 2015
Mystical Bird Part 2 By Dee
Hi Everyone Dee here with the second part of The Birdz
wall plaque. I hope you are all well! and ready to
join in with us here at the Artistic stamper for our
monthly challenge, which is
' Things With Wings'
& on that note!
join in with us here at the Artistic stamper for our
monthly challenge, which is
' Things With Wings'
& on that note!
For this last plaque I used the second
Rust board from my previous post
I triple embossed the mechanical bird from
Neil Walkers birdz plate.
I coloured the bird with the same alcohol inks
as the previous post.
Next I used Pins and jump rings to attach the two
plaques together.
More photo's
and some more,
I used items from my stash to join it all together.
I hope you have enjoyed this two part project and like the end result.
please feel free to let me know what you think!
take care see you soon.
Dee x
Products Used
- Artistic Stamper stamps used Neil Walkers Birdz Set A6 , Decay Journaling Stamps #1.
- Deco Art Products used Quinacridone Gold, Quinacrodine Burnt Orange, Prussian Blue Hue, Cerulean Blue, Cobalt Tourquoise Hue, Transparent Yellow Iron Oxide. Texture sand paste and crackle paste.
- Ranger crackle accents, Alcohol inks Terracotta,Stream, Ginger & Butterscotch.
- Inka Gold Gold.
Tuesday, 4 August 2015
Small Art
Hi everyone I hope you are all having an amazing summer.
I have a piece for you today that uses the Neil Walker
Birdz stamp, Fantasy 2 background & the new
decay journaling stamps.
A few stencils
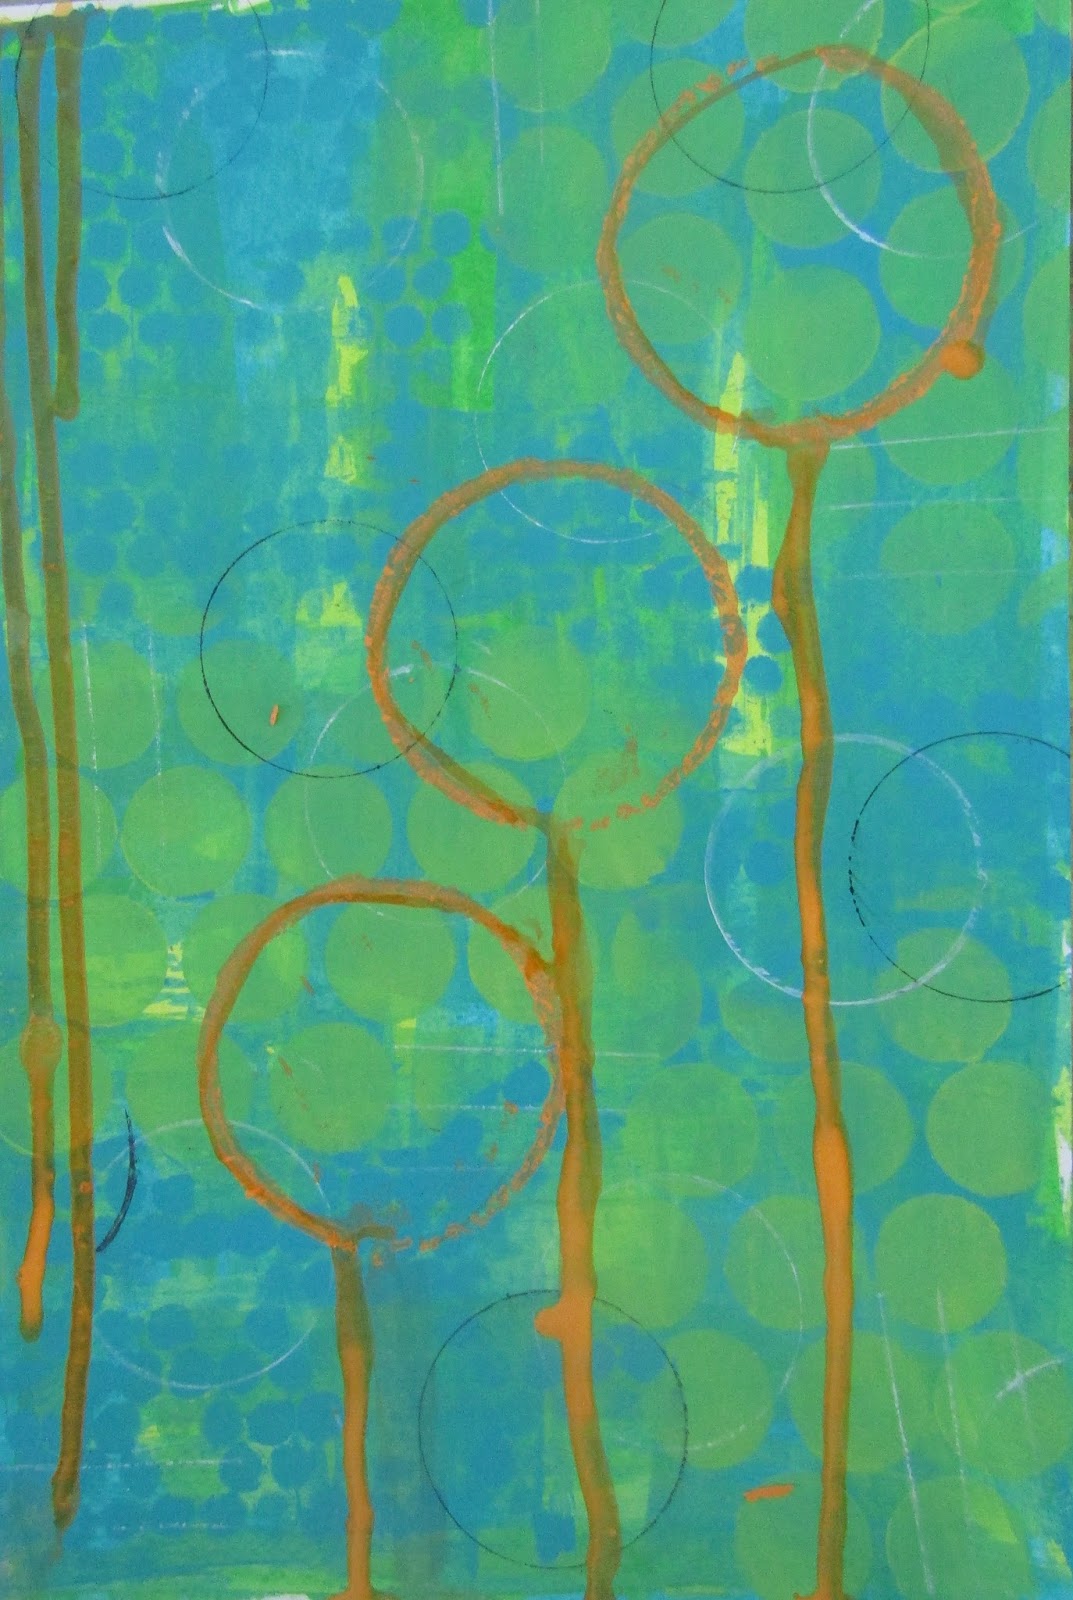
Firstly I used distress paints and a brayer to create the background
card that would be the base of the
bird and the matt card.
Next I inked or I should say painted up the Fantasy stamp
with fresco finish paint and stamped randomly over
the background.
Next i used versa fine ink and gold embossing powder and stamped
randomly with both the fantasy and decay stamp. I stamped the
bird onto the painted background and embossed with clear,
also the swirl from the decay stamp was embossed with gold.
I used some mop up card that was on my desk I think it was distress stains
that I had used. I used a dot stencil with grunge paste
put through on the dots I put embossing powder
on and heat set. Next I ripped two strips off and
attached it on to a rectangle of grey board.
The base board had grunge paste through a stencil applied and dried.
next this was painted with
Fresco finish paints.
To finish it off I used some brass pieces from my stash and
mounted it all up.
I hope you enjoyed my post.
Please feel free to let me know what you think.
PRODUCTS USED
- Artistic Stamper Neil Walker Fantasy 2 & Birdz stamps, The swirl of the decay journaling plate.
- Distress paints in Aged Mahogany, Wild Honey, Barn Door.
- Fresco Finish space cadet, Smurf and snowflake (also used to highlight the bird).
- Gold & Clear embossing powder,
- Grunge paste.
Saturday, 4 July 2015
Art Board by Dee
Hi everyone hope you are all well I have a board for you today
using a mix of Paperartsy Fesco finish paint and
lots of lovely Artistic Stamper Stamps.
Firstly I used Vanila and stone Fresco Finish paint to coat the board.
I used Brown Shed mixed with Blood Orange, Smoked Paprika,
Mocha Mouse, and Bora Bora.
Black texture paste colour grunge paste with paint.
Put it through the Artistic stamper mask.
When wet drop in the small watch parts.
Stamp all the other stamps in black and coffee Archival ink.
pour gold embossing powder down the dry board so it just catches the ink
in places.
Stamp the houses onto similar coloured card and emboss. Well that's it for today
a very simple project but with great results. I tend to use my fingers when
painting as I find that I can get the paint where I want it and its easier
to blend.As always please feel free to ask any questions and let
me know what you think.
Cheers Dee x
Products used
- Artistic Stamper Stamps Decay Journaling Stamps, Lace background C75, Boarders A6 lace, Home sweet HomeStamps.
- Fresco Finish acrylic paint Vanila, Mocha Mouse, Stone, Bora Bora, Brown Shed/Blood orange and smoked paprika.
- Distress crackle paint picket fence.
- Black & Coffee Archival Ink.
- Gold embossing powder.
Subscribe to:
Comments (Atom)


