Tuesday, 10 July 2012

Fly Away by Emma

Hello everyone...Emma here and I'm back with my first piece of July. For this piece I decided to make a mini canvas and I hope you like it!!!
Here's a list of products I used:
And this is what I did:
First of all I covered a mini canvas with Adirondack Paint Dabbers. I then applied Snow Cap paint to the dots stamp and randomly stamped onto the canvas. Next, I overstamped the dots with black Archival Ink and the circle stamp. I then added more Snow Cap paint through the Letter Jumble Stencil over areas of the canvas. I also stamped the edges of the canvas using one of the stamps from the Borders #2 stamp plate.
I used the Raspberry Paint dabber to cover some Grungepaper before stamping the outline of the butterfly onto it. I then carefully cut round the outline and added them to my canvas with a Game Spinner in the centre of their bodies.
I finally added the Chit Chat Stickers and a Curio Knob to my canvas!

So, that's it from me for this time and I'm really looking forward to reading all your comments!! Thank you so much for taking the time to have a look at my little creative piece and don't forget that we still have our Circles challenge running until the end of the month and we'd love you to join us...

See you all again soon and bye for now!
Emma x

Monday, 9 July 2012

Textured Frame by Alison

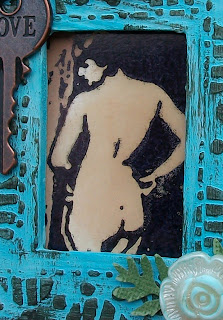
Hello Stampers! I've got a little textured frame to share with you today.


I used a little wooden frame, The Artistic Stamper has similar ones HERE. I started by applying Studio gesso all over the frame, as this helps the texture paste stick to it. I applied Viva Ferro through the Dylusion Diamond of a Border stencil, using a palette knife. 

Once this was dry, I painted over the whole frame. I used Cloudy Blue Paint Dabber, with a little London Blue Dylusion Ink Spray mixed in. Once the paint was dry, I lightly sponged Expresso Paint Dabber over the raised pattern, and on the edges of the frame. I was going for a distressed look, so I didn't worry too much about the paint going where it shouldn't, and I love how it picked up some of the rough wood texture too.


I stamped one of the Nudes onto glossy card, using Jet Black Archival Ink, then coloured her with Vintage Photo and Walnut Stain Distress Ink. I cut the image to fit inside the frame.

I dabbed a little Cloudy Blue Paint onto a button from Tim's Fanciful Accroutrements, cut the back loop off with my Tim Holtz Scissors, then attached it to the bottom of the frame. I punched a couple of leaves from green Co'oredinations paper, sanded them carefully with a Sanding Grip, then tucked them behind the button.

To finish, I coloured some white ribbon with Antique Linen Distress Stain, then threaded it through the 'Love' Ideaology Key, tied a bow, & added it to the top right of my frame.

Thanks for looking,
Alison xox 

Sunday, 8 July 2012

A summer book by Titbelsoeur

Coucou les amies,

Today I want to show you a(nother) summer book... yes, I have made 2... Don't know yet how I will manage both without any schizophrenia, but... let's wait and see... the tutorial was so nice, that I couldn't resist !
I used 5 scrapbooking sheets that were still remaining in my cabinet (ugly, then)... let me tell you : you fold in 2 on one side and in 4 on the other side. Then you cut the fold of 2 on 3 from the 4 lengths (hey, still here ?) and fold side to side the 4th length, then you make an accordion with both sides... uh... something like that... anyway, once folded and stuck together, here is how it looks like :
Now I just have to collect a lot of papers, sheets, tickets, etc... to hide the ugly paper !

I have made the cover so that every one knows this is a SUMMER BOOK !
I will show it to you when it is done... don't actually know how it will look like, but that's the funny thing !

I have used the same technique as for the previous one : wallpaper, gesso, acrylic paint and the so relevant Seaside stamps !!!

I hope you like my project,
thanks for stopping by, 
I am looking forward to reading your comments! 
A la prochaine !
Titbelsoeur

Friday, 6 July 2012

Little travel case: By Zuzu


Hi, Zuzu here again
This weeks project is a little suitcase; they come in a set of two, and I have used the smallest one for this project.

I started by carefully taking off all the straps etc. using a craft knife to assist; this makes it easier to colour it if you are using an ink pad or something. I am a messy worker so it seemed the best plan. I inked up the straps separately. I wanted the case to look old and as if it had been in someone's attic for a while. You know the kind... they get paint splattered on them every time you decorate, so end up stuffed in the attic full of "interesting things you cant throw away but cant really use".  So to get that look, I splatted it with white acrylic paint (from a paint dabber). But I dont cope well with white lol. its too new and clean, so I distressed it down a bit with some brown ink.

Now I reassembled the case, before decorating, using PVA glue.
To make the labels, I used distress inks on crumpled paper, a nice, easy and popular Tim Holtz technique, and stamped out my 'Travelling words', (also in distress ink). I used 'Broken China' and 'Fired Brick'.I added some ribbon and charms to the back.


And of course to make it authentic I filled it with "stuff", including two large distressed maps, made using the Europe map background and more distress inks (broken china, fired brick and vintage photo.)

You can get a nice selection of vintage looking bits from The artistic stamper, including optical lenses similar to the one I have used and the large clock charm is also stocked. I have also used one of the little corked vials from the Idea-ology range. 

See you in a couple of weeks with a new project.
Z x

Thursday, 5 July 2012

Time Tag by Sioux Jenneys

Hello everyone! It's my (Sioux) turn again and I'm here to share a tag :)


1. Stamp the the music and various images from Ephemera 1 plate as a collage in Distress Ink vintage photo and worn lipstick onto a manilla tag. Heat dry before continuing with the next step.


2. Stamp the calligraphy mat 13 in Versamark and heat emboss using clear powder. I think this shows better if you click to enlarge ;)


3. Colourise the tag with Distress Ink shabby shutters and vintage photo and wipe the excess ink off the embossing.


4. I rather liked the card that was packaging I had and decided to use it as a base for the watch from time and keys. I heat embossed it with clear powder and colourised it with Distress Inks tea dye and spiced marmalade and cut out....edging with a black marker. The sentiment from the same plate was stamped in Archival black onto the same card.

6. The word fragments from journaling mini words 1 were coloured with Distress Ink tea dye and everything glued in place with glossy accents.


Thanks for looking today :) See you again soon!
xoxo Sioux

Wednesday, 4 July 2012

Winner of last month's Challenge

Hi!
It's the Chief Stamper here with the winner of the Red, White and Blue challenge set by our wonderful Creative team. Thank you to everyone who joined in. We had some fantastic entries, and I loved them all! However, in true Mr Random.org fashion, there can only be one winner.....so please step up to the podium...


with this delectable piece of art!


Congratulations to you, and please email me so you can choose your stamps :))This month we have Circles as our theme, and the girls have all put their own mark on this one... check them out here and do join in... it would be great to see your creations

Have a creative day
Jennie

Monday, 2 July 2012

Professor Bumbles Magical Travelling Steampunk Suitcase By Carol Fox

Hi, I'm Carol fox, and I am very happy to be your guest on the DT for July. This altered suitcase is the first of three projects that I shall be sharing with you through the month. I really enjoyed making it and I hope you enjoy reading about it.
Professor Bumble is an avid traveller but like most of us he enjoys the arriving, but the journey can be a bit tiresome. So imagine his joy when he stumbled upon this magical travelling suitcase in the back of an old dingy shop. He would now be able to travel around the globe without having to spend to much time away from his beloved Emily.

I used one of these paper mache suitcases as the basis for my project. I started by giving it a couple of coats of Claudine Hellmuth Tan paint, both inside and out, then adding the detailing on the case with the Sable brown. I then randomly stamped the cog images from the Tick Tock Plate over the case using black archival ink. I then edged the case using a Black Acrylic Dabber.

I stamped images from the Labels Plate onto cream paper, inked them and then attached them to the case using multi medium. I stamped and added quotes from the Travelling Words plate in the same way.
I stamped the Slow and Fast image onto coated white card using archival ink, so it was nice and black and stood out well. I attached a game spinner to the centre over the stamped hand for extra detail. I layered this onto the case using sticky fixers.
On the back of the case I used the world image from the Round The World plate, colouring it with blue and brown distress ink.
I made the little wheels using oversized draught pieces from a childrens game, drilling holes in them before glueing Tim Holtz Sprocket gears onto them and adding large oversized brads to their centres.  I cut small round pieces of wooden dowling to act as axels to attach them to the suitcase. The propellor is hand made from metal and layered up with a large spring and a sprocket gear.

I added die cut cogs coloured with inka gold paste to give it a working steampunk appearance. The key is from my personal stash but the Tim Holtz ones in the shop are very similar.
I stamped odd tags and labels from the Ephemera plate and the Labels Plate onto shrink plastic,  colouring them in before shrinking and attaching them to the key and the handle of the suitcase with odd bits of chain and jump rings.
Inside the case attached to the lid for safe keeping is the travelling map by which Professor Bumble chooses his destination. He decided to glue it to the lid for safe keeping, after running into a tornado and nearly getting it ripped from his grasp.
I have used the Map of Europe, stamped using black ink and aged using old paper distress ink, before glueing to the lid.

The most prized possesion that travels with Professor Bumble is his old Phineas Pinchbeck Pocket Watch. He keeps a photo of his beloved Emily tucked into the back of the watch.
I have used the Watches Set stamps and the matching chipboard to make this watch. The white chipboard was too bright so I used Old paper Distress ink to age it before I started. I stamped the main watch image straight onto the chipboard and highlighted the hands and numbers with glossy accents. Then using glossy accents I attached a reclaimed pocket watch glass over the stamped watch face.
I then hinged the two pieces together at the bottom. I cut three pieces of white card to fit the circle area, and ran two through my bigshot with an embossing folder to add texture before colouring them with Inka Gold Paste to give them a lovely metallic finish. I then glued them to the back and the inside of the watch.
Onto the other piece I stamped the larger image from the Gibson Girl sheet and coloured it using distress ink pens on my craft mat picking up the colour with a paintbrush so the shades were faded. I glued this to the inside back of the watch. I coloured the edges with paint from a gold acrylic Dabber. I added a small shrink plastic tag featuring the  Phinease Pinchbeck image.
Professor Bumble never travels without his Moustache oil, carefully packaged into its box for safe keeping. I used the Goose Grease image on my box, masking it off before adding cogs from the Tick Tock Plate as a background. It is coloured with spiced Marmalade, Brick red and Mustard Seed Distress ink.
The small bottle has been covered in Rock candy Distress paint, once this was dry I coloured it using Butterscotch Alcohol ink. The shrink Plastic label was made in the same way as the tags for the suitcase.
Other little bits of ephemera he has collected on his travels include a voucher for 6d of  his favourite trousers, and the advert for them he took from his paper before he left home, along with a tape measure to ensure he gets a good fit and tickets collected on his travels.
These items feature images from the Open Road sheet and the Ephemera sheet, both of which can be found here.

I hope you enjoy my project and I shall be back in a couple of weeks.
Carol x