Showing posts with label PaperArtsy Paints. Show all posts

Tuesday, 28 February 2017

Paint and Hearts Birthday card by Gemma

 I created this 20 x 20 cms card and coordinating gift box and card box, using PaperArtsy paints, stamps and masks from The Artistic Stamper


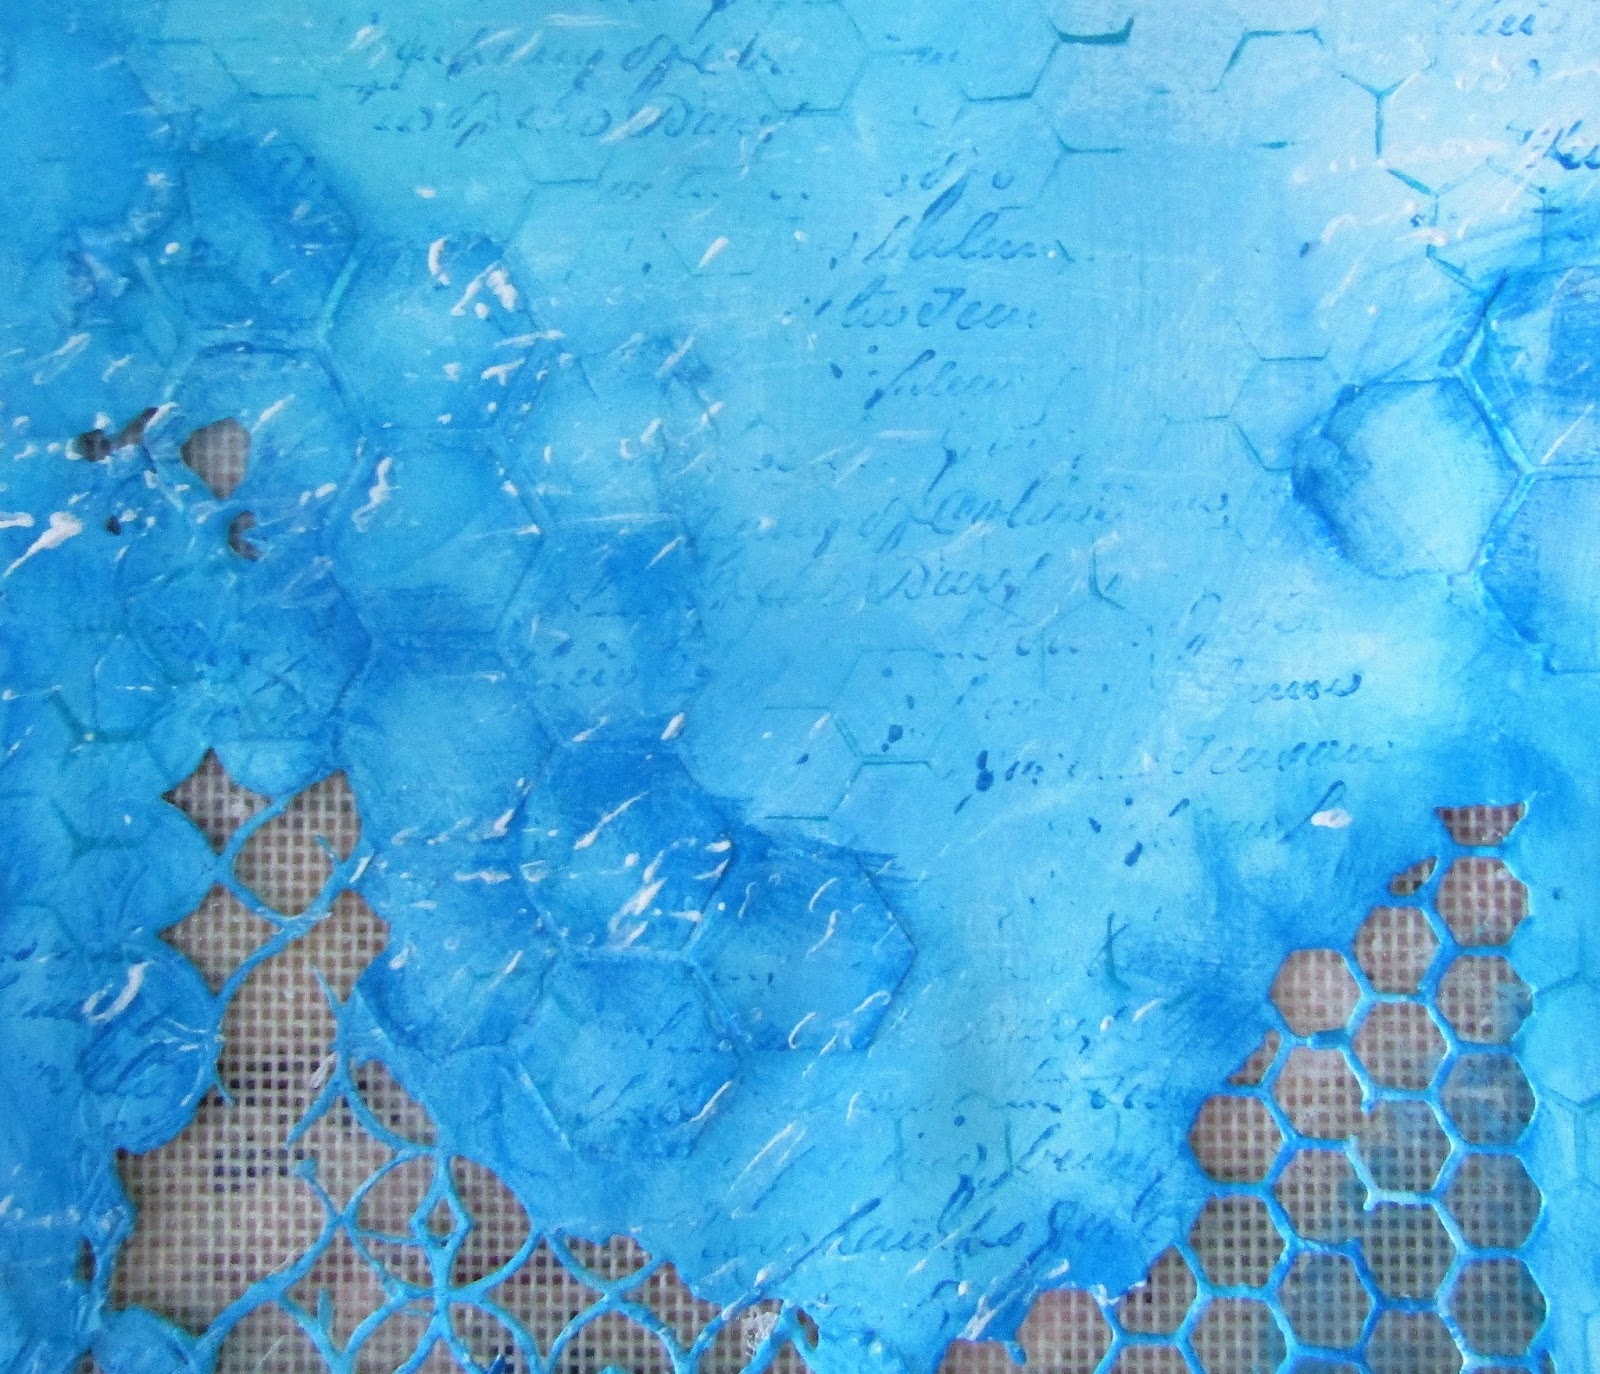
I cut a piece of white card to fit the front of my card blank, which I ran through my cutting machine using mixed media dies. I then applied some texture paste in places through the honeycomb mask.


After coating the card with a layer of Gesso, I added China and Captain Peacock PaperArtsy paints over the top mixing it in with the Gesso. I dry brushed over the top with the same colours to highlight the areas covered with texture paste.


I stamped over the top with different stamps and colours, I used the honeycomb stamp and Tinned Peas paint.  Calligraphy mat 12 with Captin Peacock and Calligraphy Mat 11 and Gesso.


Once I was happy with the background and had glued it to the card front. I started working on and glueing embellishments on top. I took some cardboard hearts from my stash coated then with Tinned Peas paint, stamped over the top with Calligraphy Mat 11 and edged them with gilding wax. 


All of the other embellishments came from my stash they were painted with the same paints with the addition of Haystack and stamped with the same two Calligraphy Mats.


Thanks for stopping by and reading, I have loved seeing all the challenge entries thin months and can not wait to see what you talented bunch create next month.
Gemma 

Friday, 10 February 2017

Love, love, love... by Debs

Hi Everyone

Is it really February already!! Despite the cold air usually associated with February, there is always some warmth around the 14th!!


I love it when Jennie releases new stamps, and i have a rule that i don't put new things away until have used them.  

I started by using the new Seth Apter Paint set from PaperArtsy and just used the four colours in the set Mud Splat, Green Patina, Key Lime and Smoked Paprika, believe it or not the base coat was Mud Splat!

I used the a couple of the new mini background stamps from sets #2 and #3
and randomly stamped with some of the paint 

I stamped the new Neil Walker mini heart onto tissue paper with black archival ink, and used the       6 x 6 word mask to stencil Love on with some of the Green Patina paint.


i shall look forward to seeing all of your lovely projects.

Happy crafting and enjoy
Debs
x


Tuesday, 17 January 2017

Trying something new for the new year


 It's my first post of the new year for The Artistic Stamper Creative Team, and I wanted to try something new. So I had a play with air drying clay. 


 I shaped the skull and upper body from air drying clay. Air drying clay feels very different to normal clay and much closer to paper clay. The biggest difference I found to normal clay was that it was much harder to join pieces together and to make it nice and smooth. It was my first try so with practice I am hoping the joining and smoothing will get easier, as well as my very, very basic sculpting skills. The lower body came from my sofa which unfortunately met with an accident over the Christmas holiday ( I am all for recycling/ upcycling) 


While waiting for that to dry, I laid out several strips of masking tape onto one of my glass mats. After painting a coat of PaperArtsys French Roast over the top, I took the Randon Dots stamps and stamped randomly with Eggplant, and white paints. After that dried I decided to go over the top with the same stamp and black Archival ink.


Once the clay was dry, I painted the body and skull with base layers of eggplant, white and black paint.


I then repainted the skull and body with the same colours, before giving the girl some hair and a hat made from air drying clay.


 I then painted the hair with PaperArtsy French Roast and the hat with eggplant. I also painted white spots on the hat and top with white paint using the end of a paint brush. I used a black paint pen to make dots on the skull.


Once the masking tape was dry I glued them individually to the base using gel medium, I then stamped on the ribbon with Archival ink and the Random Dot stamp before gluing and wrapping the ribbon around the middle section.


I had fun with this, it's great to try something new. If you haven't ever entered the monthly challenge before, maybe that can be your something new for the new year. This month's theme is anything goes, I have loved looking at the entries so far 

Gemma x


Tuesday, 10 May 2016

3D Collage by Debs

Hi All

Debs here with my latest project to tempt you to join in with this months challenge.  The dictionary gives the definition of collage as a piece of art that is made up of fabric and different pieces of paper.  See if you can see how many different types i have used, before you read on.


I took a canvas and flipped it over

I lined inside with a piece of hessian and added some grunge paste through the new stencils from The Artistic Stamper i used the Honeycomb and Random Dots, this helped to cover the staples


I painted the hessian and dried grunge paste with Paper Artsy Fresco Finish in Dusty Teal, Teresa Green and Baltic Blue.  I stamped the Border A6 plate and stamped the dotty border onto a piece of tissue paper, and glued onto the frame/canvas


I used a piece of green felt and die cut Tim Holtz and stamped it over with the cogs border again from the Border A6 set

I stamped the birds from the Small but Beautiful Bird stamps onto a book page

I also stamped the birds onto tissue paper

I stamped Imagine from the Journaling Words 5 plate

I had great fun making this and am looking forward to seeing more of your wonderful projects on here and on the Facebook group.  So get sticking with those bits of paper

Debs


Tuesday, 29 September 2015

Light Bulb Journal Page by Gemma


Hi All

 I love, love ,love the new limited set of PaperArtsy paints, The colours are Captain Peacock, Professor Plum, Granny Smith and Teresa Green. It doesn't hurt that the names are just awesome.


 For this page I used Captain Peacock and Professor Plum. I also some basic Buff Titan acrylic, with the three colours I just covered the pages, there was no method I just did not want to see white any more, once it was dry you could really see the brush marks in the paint, which was great. Using both the Captain Peacock and the Professor Plum I stamped over the top with both the dots and large random dots backgrounds. The paint underneath was still slightly wet, which moved and came up in places revealing the titan buff underneath.


Over this I made the black and white circles using Dylusion Paints and two different sized lids that I keep with the paints just to do this. I stamped out the light bulb on to a scrap bit of paper to use as a mask through which I painted Titan buff and then stamped the dancing girl and the word dance with black archival ink from the dance plate. I also stamped some more dots.


 To finish I stamped the light bulb three time onto acetate, with black ink, cut them out and glued them on top of the painted ones, using a black paint pen I drew around them and also drew lines to the top of the page.


Thanks for reading
Gemma (inkykitty) x

Products used from The Artistic Stamper

Wednesday, 16 September 2015

Journal Banner Dress by Gemma


Hi All

Its all about journal pages for me at the moment, they give me a freedom and a relaxed way to play, that is not present when I am constructing a album.


I started by covering the page with Gesso. Then using an old plastic card I scrapped Fresco Finish Granny Smith and Teresa Green over the whole page.Then using what is still a favourite of mine, good old Distress inks (Shabby Shutter and Pealed Paint) , I stamped over the top with Chevron Elements and Harlequin


Then out came the Geli plate, I have been a very naughty girl and cut mine up into smaller pieces, but anyway, using more of the new limited addition Fresco Finish paints (all four colours this time). I used the Gelli plate as a stamp and applied paint in sections, layering it up with stamps from Borders #1. Once dry I stamped out the bunting stamp from the same set five times and cut them out. 


On a separate sheet of card I drew a body and added some titan buff, and tan Acrylic paint, unfortunately, faces and heads are still a work in progress, I completely messed this one up, so off it came and I stamped one out from an old Dylusions set, I glued one of the borders across the top of the page, and cut the others down more to form the dress. I then stamped and glued some words from an old stamp set.


 I could not have her floating so I drew in some grass under her feet, and cut and glued small flowers from the left over bits of paper, I also added some wings that I paint with Professor Plum and stamped on with Calligraphy mat 11. To finish off I went around everything with a black paint pen and added some white with a paint pen to areas on the dress and chevrons.

Thanks for reading
Gemma (inkykitty)

Products used from The Artistic Stamper 


Friday, 14 March 2014

Creating Journaling by Linda Cain

Hi everyone! Linda Cain here again! I thought I'd take you through a Journal Page today using a bunch of  The Artistic Stamper's amazing stamps....sounds like a plan!
  
 
 I start with the large Dylusions Journal.  Here we're only doing one side. 
 
 I sprayed several colors of Dylusions sprays in a random pattern. Don't be concerned if there are a few areas not covered.

 
Next I added water with a spritzer bottle to a couple of areas using the masks. Let the water sit for a few seconds, and then blot with a kitchen towel roll. The pattern will show up where the water removes the color. Thank you Dylan for this great technique!

 
This shows the page after I add more color with Distress Inks. You can see the Picked Raspberry really brightened up the one area, Ripe Persimmon in the center, and Broken China and Peacock Feathers in the blue areas. This is how I fill the page with color.

 
I sprayed water into my hands and dropped it in large drops around the page. Then I tilted the page up and let the water run around.  Let it stand a moment, and blot with a paper towel.  
 
I also used a mask and black archival ink in the lower right area of the page.  
 
I used the Harlequin, Chickenwire, and Chevron background stamps with Honey Dew and Snowflake Fresco Paints to start the layering.
 
I'd decided to use 2 stamps as a focal point with CREATING and JOURNALING. I stamped the words using black archival ink, and added more stamps to form a frame around them.
 
I laid out the Moth and Butterflies on the page to see where I wanted them.  
 
Some people may want to stop here, but I like to fill it all in. It's all a matter of choice. It's YOUR page!

The black Ultra-Fine Point pen by Sharpie is used to highlight stamped areas as well as the Extra-Fine Point White Poster Paint Pen. I added Coffee Archival Ink to the Calligraphic Mat stamp to fill in spaces.
 
The Moth and Butterflies were stamped with Versafine Imperial Purple for a bit more color. Highlights were added to them, too.

 
The ART stamp and Dragonfly were stamped with archival inks, and the Bubbles and Splat Borders were stamped with paint. 


This shows how the fine black pen is used to highlight the previouslystamped and stencilled backgrounds. The Chevron stamp is used 3 times to add borders.
 
 
The final step is to add dots to the lettering and outlines to some of the stamps, and one last Flourish Border stamp to the side as filler.
 
That's it for today. If you have any questions, I'm glad to try to answer them. There's one more posting coming from me, so watch this space. And as always, let us know what you think!
 
Your Friend in ART,
 
Linda
 
The Artistic Stamper Stamps and Masks:
Border Stamps - Borders A5#2, Swirls, Splats and Dots A4
Background Stamps -  Chicken Wire Background A6, C349 Harlequin, Calligraphic Mat 9
Chevron Stamps - Chevron Elements
Words & Sayings Stamps - Journaling Words #5, Words Set "Collage"
Butterflies and Birds - Insects and Butterflies
Masks -  Chevron, Large Dots, Splats and Swirls
Katy Fox Stamps - Numerical plate size A5
 
Other Products :
Dylusions - Dyan's "perfect" Journal, Sprays - London Blue, Calypso Teal, Pure Sunshine, Fresh Lime, Bubblegum Pink
Ranger Distress Inks - Picked Raspberry, Broken China, Ripe Persimmon, Shabby Shutters, Peacock Feathers
Sharpie  - Sharpie White extra fine poster paint pen, Black Ultra-Fine tip pen
PaperArtsy Fresco Finish Paints - Honey Dew, Snowflake
Ranger Archival Inks - Jet Black, Coffee
Versafine Ink - Imperial Purple

Sunday, 2 March 2014

Phineas Pinchbeck Steampunk Shrine with Linda Cain

Hi, Linda Cain here for a fun time on the Artistic Stamper's Blog with a little tutorial using a Steampunk Shrine Kit. I was really thrilled when Jennie asked me to be a Guest Designer. So let's get started!

 
I LOVE the Fresco Chalk Paints from PaperArtsy, so that's what I use here. 
 
 
These kits are from Masonite and so I lay the pieces out and base coat with Stone paint. The great part is you can paint and stamp on a flat surface, then glue it together! Pretty cool!

 
The next layer is with Pumpkin Soup, Tango, Autumn Fire and Blood Orange. Just a touch of Brown Shed is tapped here and there.

 
I used Mermaid, Bora Bora, Beach Hut and Inky Pool on the other sides that will become the outside surfaces. I added a bit of Guacamole on the edges. Don't be too picky as your backgrounds are going to be covered up with LOTS of STAMPS! 
 
Now comes my favorite part! I get really excited when I see how awesome the Jet Black Archival Ink shows up on the colorful backgrounds!!! The tiny gears from the Borders fill in the spots, and Numbers go on the sides.
  
I'm all about Numbers...they just do something for me.
 
 
 I flipped the pieces over and stamped the outside pieces. I absolutely LOVE this Sequin Waste stamp with Goose Grease! Another Border stamp fills in the edges around the Winged Wheel.
  
Using small stamps from the Numerical Plate on the propeller and a 45 in the gear will add some interest. The Calligraphic Map is stamped on the top piece of the Shrine and white pen marks are added for more contrast.
 
 
After you glue this together with a small amount of glue, you can see how cool the stamping is on the back.
 
I added a Screw Eye to the side and 3 Gears hanging with Jump rings.
 
 
I glued vintage labels to 2 Apothecary Bottles with Glue-n-Seal.  A Label Clip fit perfectly on the front, and the Clock Key looks good in the middle of the gear stamp. I used a Dremmel to drill the hole for the key.
 
 
White pen marks along the edges make the colors pop.
 
So, that's it for me for today. I'll be back again later in the month with another project using these wonderful stamps from
The Artistic Stamper!
 
Your Friend in ART,
Linda
 
 
Artistic Stamper stamps:
Numerical Plate A5 - Katy Fox
 
Other Products:
Crafter's Pick The Ultimate White Glue