Showing posts with label Collage Lady Elements. Show all posts

Friday, 18 October 2013

"Thinking of you...." Tag By Zuzu.

 
Hello... Zuzu here:
Well as I got my first ever die cutting machine (BigShot) at the beginning of this month, I HAD to do something that involved cutting out with my one and only die (so far). So I have made a tag that features a large flower and leaves.

Firstly I inked a large buff tag using distress stains and inks. I used Antique linen, vintage photo, peeled paint and worn lipstick. I applied the ink randomly using a blending tool. then i stamped on the Katy Fox  "postcard" stamp in black archival ink. next i used the new  Leaf background stamp. I used peeled paint distress ink and stamped over the full tag.

I cut out my "Tattered floral" flowers out of card and used the large broad petalled flower. I inked them with worn lipstick, fired brick and vintage photo . I cut out four of them, cutting sections out of the inner layers to make them easier to fold in to a cone shape... Tim Holtz has a tutorial on his blog that shows you what to do (his example is with a different die cut but the principal is the same.) you can find his step by step HERE.  once it was assembled i sprayed over it with Heirloom Gold perfect pearls mist. I also cut out some leaves (Astrid was visiting and had brought lots of dies for me to try out) and inked them.
Next i inked some plain card using worn lipstick, fired brick and vintage photo on enough card to stamp out my words "Thinking of you" and to make a backing mat for the main image... and I also inked a piece of card with just a light touch of peeled paint and vintage photo to print out my collage lady stamp... I used my paper distresser tool on all the edges (including the tag), then assembled all the pieces. The ribbon is a bit of calico i ripped off and inked with "pesto" alcohol ink. you dont need much if you add it to a touch of blending solution in a saucer and dip the fabric in to it till it soaks it up.
See you in a couple of weeks. 
Z x

Sunday, 22 September 2013

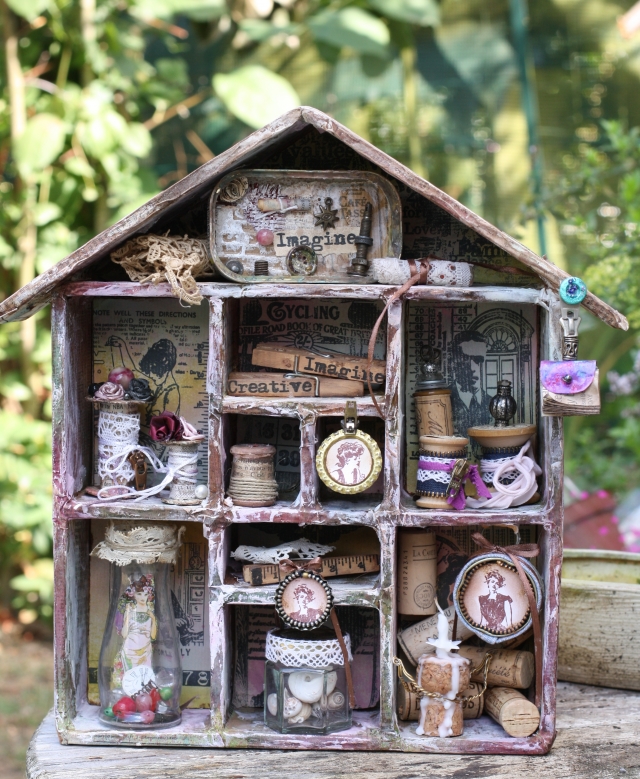
Titbelsoeur's cabinet of curiosities

Salut les patouilleuses, c'est Titbelsoeur aux manettes !

I am happy to show you today my big work of the year. Let me first explain the story of this piece. have a seat, take a breath, a warm drink (almost Autumn here, isn't it ?) and let's start !
With 4 messing-up-friends of mine, I have been leading a French forum for about 2 years. In 2013, we have made a series of tutorials to show them how to make a lot of thingamabobs, thingamajigs and other thingummies but never telling them what they would do with... 
They played the game with passion and made more and more creative thingummies.
And now the time has come that we show them what to do with : the intent was to help them make a cabinet of curiosities by themselves, with recycled items only.

Here is how I decorated mine :
first I sprayed diluted Distress ink on kraft paper, and when dried I stamped the image, hid it with a cut out of the same stamped image and stamped the others as a background.


the stamps I used are :
ground floor left : Men’s Plate 001 and Numerical plate
center :  Collage lady Elements
right : Gibson Girls 002 ,  Time and Keys and   Numerical plate

1st floor left :  A Stitch in Time and Dressmaking  No. 1
center :Large Bingo Card and  The Open Road 1
right :  Collage Man

attic : Family Values

and here is my happy-messy (literal translation) cabinet, filled with my thingamabobs, thingamajigs and other thingummies (love these words ;-) :


I have already showed you some of the thingamajigs here or there.


Sooo girls and maybe boys, I hope you like my project,

thanks for stopping by, 

I am looking forward to reading your comments! 

A la prochaine !


Sunday, 9 June 2013

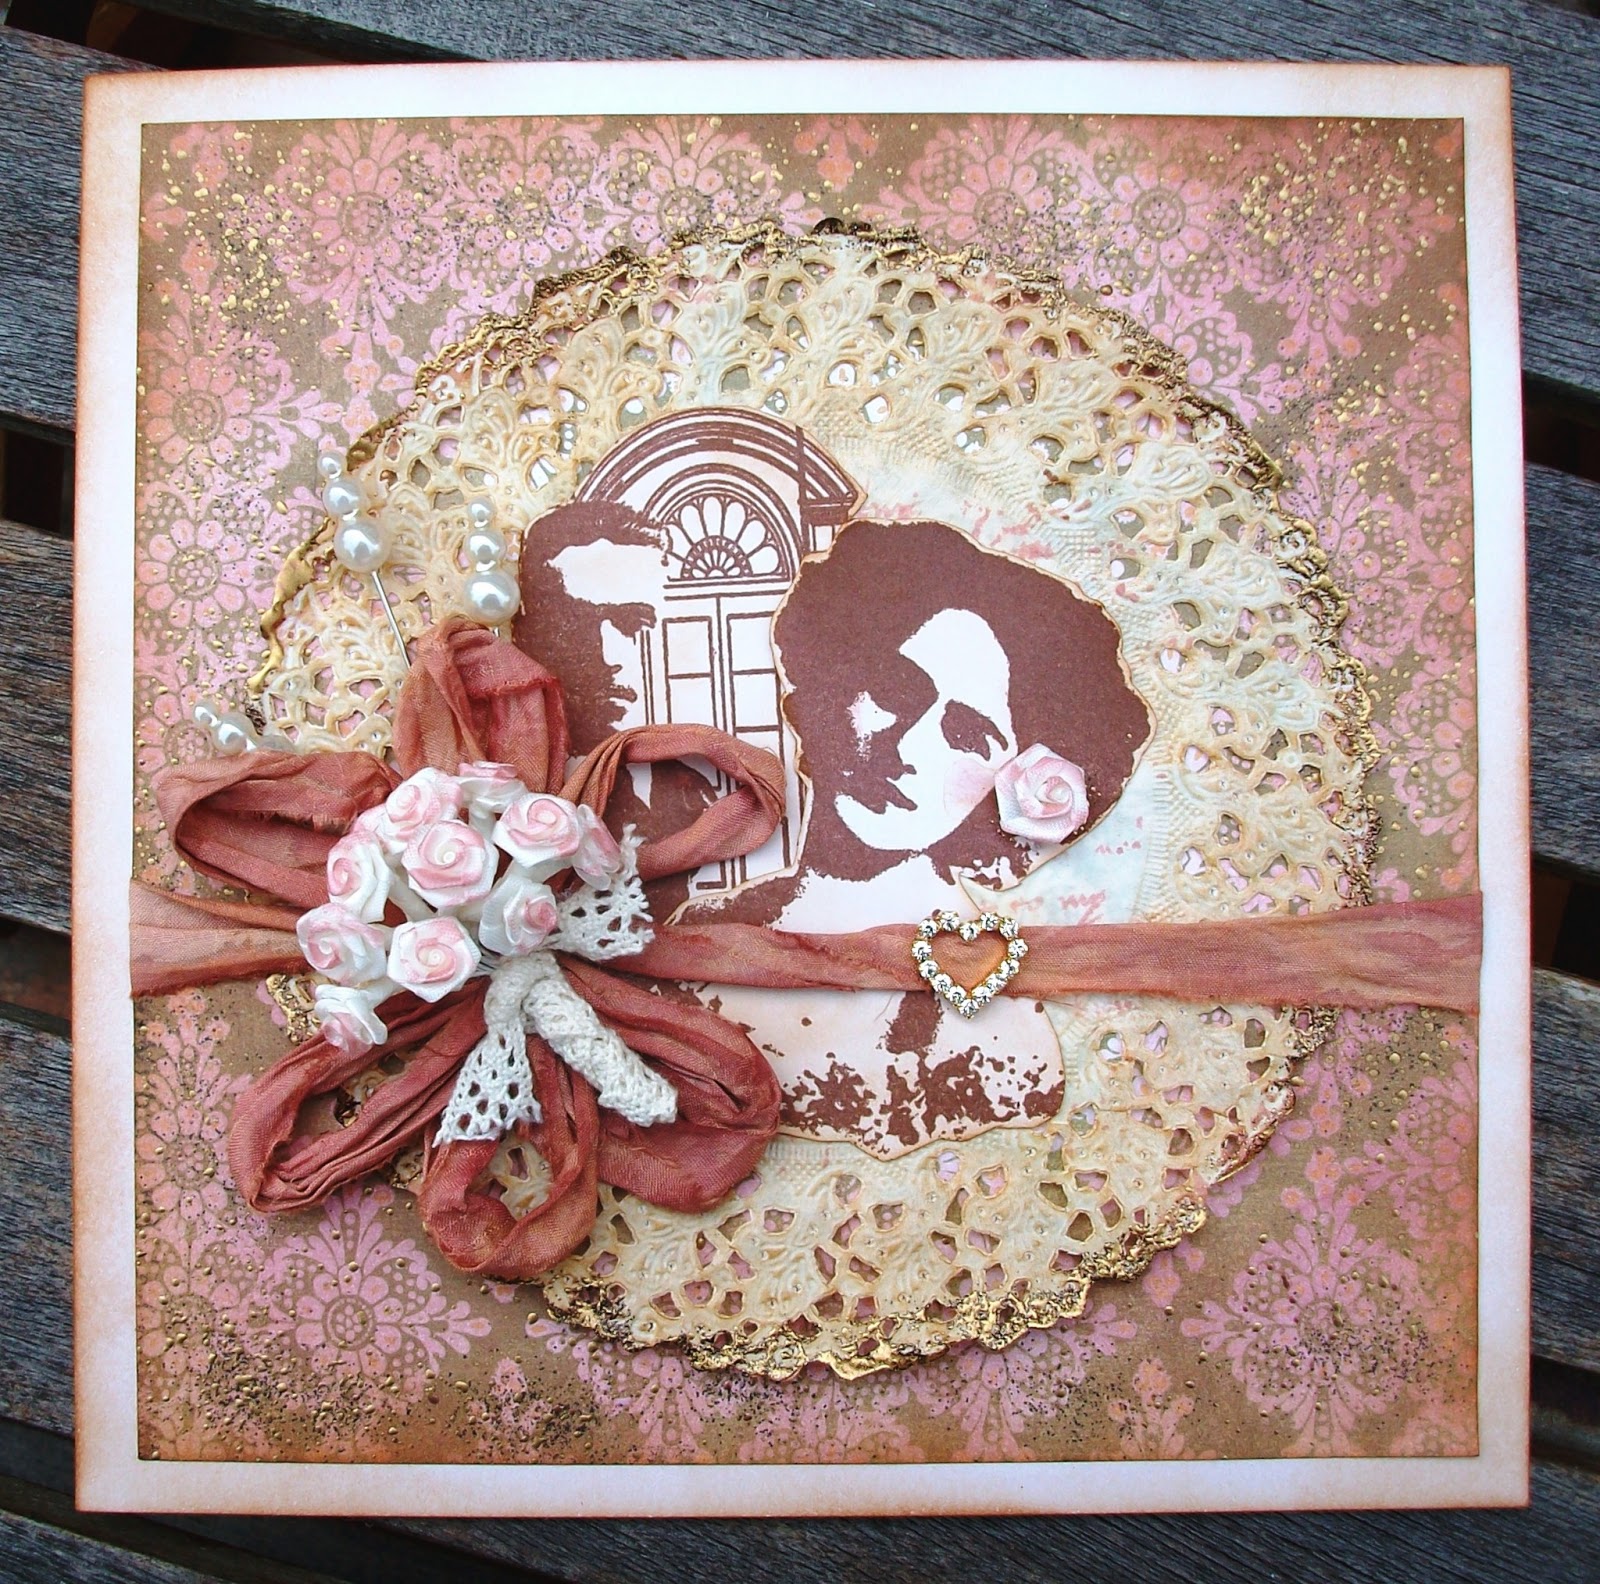
June Wedding by Alison (Craftytrog)

Hello Stampers! It's Craftytrog here! As the wedding season is upon us, I thought I would share a vintage style wedding card with you today. 


Here's how I made my card...

Stamp the man & woman from Collage Art 1 with Coffee Archival Ink, cut around the images, & ink them with Vintage Photo Distress Ink (DI). Add a little Victorian Velvet DI to the woman's cheeks.
Ink a paper doily with Vintage Photo DI, stamp some Script (Calligraphic Mat 15) in the centre with Victorian Velvet DI, then use gold embossing powder to emboss the edges.
Ink a square piece of patterned paper with Victorian Velvet DI, then add some Vintage Photo DI to the edges. Sprinkle some Gold Embossing Powder around the edges, & use a heat gun to melt it.
Use Victorian Velvet Distress Stain (DS) to colour some ribbon. I used plain sari ribbon, but you could also use seam binding. Make a flower by wrapping the ribbon around your four fingers in a figure of 8 three times, then tying it in the middle.


Assemble the patterned paper, doily & stamped images as shown, then glue the ribbon flower across the front, adding three pearl pins & a heart ribbon slide. Glue the ribbon ends behind the patterned paper.
Ink the edges of an 8x8 inch square card with Vintage Photo DI, then attach the assembled artwork to it.
Ink a posy of white paper flowers with Victorian Velvet DS, wrap it with some lace, then use a glue gun to attach it to the centre of the ribbon flower.
To finish, add an inked paper flower to the lady's hair.

I'll see you later in the month, with my second piece of art,
thanks for looking,
Alison xxx

Tuesday, 9 April 2013

Queen For A Day by Alison (Craftytrog)

Hello Stampers! I have a feminine little wall hanging to share with you today.


Here's how I made my wall hanging. 

The base is a piece of corrugated packaging that I first spritzed with Dylusions White Linen Spray. I then spritzed with Heirloom Gold Perfect Pearl Mist. So difficult to get a good photo of the sparkle, but take it from me, it looks amazing! Next, I rubbed a Walnut Stain Distress Ink Pad over the 'mountains' of the card, &, as the ink stays wet, I added gold embossing powder to it, then heat set it.


I used the Sizzix Baroque die to cut a plaque from mountboard. I first painted a layer of Weathered Wood Crackle paint, then once this was dry, I inked with Walnut Stain Distress Ink. Next, I took a floral stencil, & used a palette knife to stencil a layer of Vintage Photo Crackle Paint. Once this was dry, I added a coating of Glue & Seal. I randomly sprinkled some Gold embossing powder around the edge, & heat set it.

I stamped the lady from the Collage Lady Elements Plate onto some blank vintage book paper, using Coffee Archival ink. I cut out the image, glued it to the plaque, then glued a strip of crochet lace to look like to top of the lady's dress.


I used the Sizzix Tattered Florals Die to cut flowers from vintage music sheet. I spritzed each flower with water, then inked the alternate sizes with Vintage Photo & Weathered Wood Distress Stain. I scrunched up the flowers & allowed them to dry naturally. Once they were dry, I  very carefully opened out each flower, then glued them together with Glossy Accents, adding a pearl button to the top.


I took a Glittery White Crown & inked it with a mixture of Gold Mixative & Blue Alcohol Ink. I added some tiny gold brads through the holes

I glued all the pieces together, as shown in my first photo, & finally, punched some holes with a Cropadile, & added some crochet lace to hang my art.

I hope you are inspired by my little wall hanging,
thanks for looking,
Alison xxx

Friday, 17 August 2012

Zuzu's Anniversary give-away post: Part 2 "wooden frame"


 By now, you cant have failed to notice, it's the 2nd anniversary of  "The Artistic Stamper Creative Team" blog this month, and to celebrate Jennie is giving away some stamps to some lucky followers.
Here is a reminder of what to do and how it works...

Each Team member has chosen which stamps they would like to work with this month and those are the stamps you could win.
For example: I  Have chosen to work with the 'collage art 1' sheet shown here...
 To win this set you must leave a comment on one of my posts this month (either here or over on the creative team blog which you can find HERE )

At the end of the month , I will use a random number generator to pick out a winner from the comments on MY posts.. and that person wins the stamps.

The other members of the team also have stamps to give away and its the same process.. leave a comment on their posts and you can win the stamps they are giving away.

This is my second post for this month and your last chance to comment for a chance to win the above stamp set:
I have decorated a wooden frame and used the lady from the stamp sheet, as the focal point. I have also stamped out the word "collage", from the sheet,  on to tissue paper and added that to the frame. Please remember, it is only the collage stamp sheet that you can win. (the additional stamps I have used are not part of my give-away.)


Supplies used from the Artistic stamper:

Collage art 1 stamp sheet... HERE
wooden frame HERE
chit chat stickers HERE
lacy border stamp HERE
text stamp (calligraphic mat 13) HERE (scroll down)


Sunday, 9 January 2011

Beauty by Alison Hall

Hello everyone! I was so thrilled to be invited onto this wonderful team of Artistic Stampers!

Here is my first piece of artwork, a card featuring that lovely lady from the Collage Art 1 stamp plate.


1. Stamp the lady onto a piece of beige patterned paper from Tim Holtz's Vintage Shabby stack, using brown ink. Ink the edges with vintage photo distress ink, then rough them up with the distress tool. Ink the edges with walnut stain DI.
2. Emboss a rectangle of white card with the Tim Holtz Regal texture fade. I inked one side of the texture fade with vintage photo DI, before embossing. Ink the embossed card all over with more vintage photo DI, edge with walnut stain, then rub vintage photo distress stickles all over it.


3. Cut a 6"x6" piece of blue paper from the vintage shabby stack, ink the edges with vintage photo & walnut stain DI, then attach it to a square card blank.

4. Attach the embossed card, then layer the image on top. Punch three circles of blue patterned paper, scrunch them and ink them with vintage photo DI, then attach them to your card with pearl brads.


5. Finally, stamp the word Beauty from the Nudes plate onto the bottom right hand corner of your card.

I hope you understood all that! Thanks for looking!
Alison xx

Friday, 17 September 2010

Such Organisation! by Sarah Anderson


For a long time I've wanted to personalise my filofax. I've just got a new, smaller one, and although the red cover reflects my personality, I was determined to make it more 'me' inside too.


I resisted the use of the sewing machine as that would have made for a lumpy surface for writing on, and went for simple collages. I love the combination of white and cream so limited myself to this palette. I may add some colourful inserts at a later date though.


I adore this bird cage from the 'Free as a Bird' plate, it's so Victorian, and a great size! I combined it with images from the Ephemera 1 plate, which I note is on offer at the minute - and it has a British post card image [Something tells me 'post card' may be a popular image to use in the near future!]


I love how the numbers from the tape measure image look inside the clock face. There's a postmark in there too! I just masked the outside of the clock and stamped the images in the middle.


The 'post card' image seemed rather appropriate for the first of my address dividers! The butterflies and dragonfly feature on the 'Insects' plate.


My filofax is starting to come together, and certainly reflects some of the images I love :)

Wednesday, 11 August 2010

Gibson and his Girls! by Lucy Edmondson


Charles Dana Gibson was a pen and ink illustrator at the turn of the 20th century whose models epitomized his ideal of female beauty, with long hair, tiny waists, and long slender necks. They became known as the Gibson Girls! I have had the two full size sets for a long time now and they are great favourites, so I was delighted when the tiny images came out last week, and I have combined them with some other old favourites for Minxy's 'Something Old, Something New' challenge. I love the flexibility you get with The Artistic Stamper stamps that enables you to mix and match.


Well, the first bit of the 'pocket Art History' was true, but I now get a bit fanciful so humour me! I decided that Collage Man would be Gibson, standing by the door outside his smart studio, where inside await his models, ready to be sketched. I think in reality he was a bit fatter than this distinguished gent, but if he can dream then so can I!


What you will need:-

Artistic Stamper stamps: Collage Man, Collage Lady Elements, Artist's Plate No 1, Words Set Nudes,
Small but Beautiful Gibson Girls
Distress Inks: Tattered Rose or Spun Sugar, Vintage Photo, Shabby Shutters, Dried Marigold, Tumbled Glass
Distress Crackle Paint - a pale/neutral colour such as Tatteered Rose or Picket Fence, etc
Crafty Notions Spray in Co-Ordinating Colour
2 Hinges
Pen Nib
Black Archival Ink Pad
Inkssentials White Opaque Pen - Optional

Brad or Tiny Button or similar for the door knob

You can get everything you need except the tray from Jennie, but if you don't have anything similar (sometimes embellishments come in them), you might like to use four small matchbox drawers glued together. You will need a small piece of strong card, approx 7.5 cm by 9 cm ( ins).

What I did:-

1. Brush a neutral shade of Crackle Paint around the inner edges of each of the compartments in the tray and set aside to dry.

2. Stamp the Collage Man in black onto the strong card, and cut it into a rectangle to fit your compartment tray (mine was a little smaller than the stamp). Turn it over and stamp the poem from Collage Lady to cover the piece. Sponge both sides with the Distress Inks, using the Tattered Rose or Spun Sugar for Gibson's face, and either leaving the collar bare or filling it in with the white pen. Edge both pieces with Vintage Photo to frame, and flick some water at the pieces with your fingers.

3. Stamp three of the Gibson Girls onto white card, and the ink bottle from the Artist Plate, and cut to fit the compartments then colour as above.

4. Stamp a pen nib from the Artist Plate and the Woman, Mystery, Passion, Beauty words onto white card and ink up. Cut out a continuous strip of words to go around the outside edge of the tray, and cut a rectangle around one of each of the words for the back of the door. Edge with Vintage Photo and stick in position as shown.

5. Once the crackle paint is dry, sponge with Distress Inks and spray with mica sprays. Stick the four tiny images into the compartments and add the pen nib.

6. To finish, stick the hinges in place with strong glue, allowing plenty of drying time. Add a brad head or tiny button as a door knob, as shown.

I do hope you have enjoyed this project and it would be great if you gave it a go! Do tell me what you think as I would love to hear! Thanks for looking.

Lucy