Showing posts with label Time & Keys. Show all posts

Monday, 19 October 2020

Travel tag by Titbelsoeur

 Hello there, Titbelsoeur with you today.

This is a tag I have made with corrugated cardboard painted with Gesso and blue acrylic paint. I glued on it a piece of monoprinted paper I had stamped a clock on. And I stamped, water-coloured and cut out the Beetle from the plate I designed, and sticked it with 3D sticks. I also cut out the word "memories"


The stamps I used come from the following plates :

Travel © Tit Belsoeur

Time and Keys

Framed Words

Thank you so much for visiting, I hope I have given you some inspiration to 
participate in our 
Happy creating and thank you for your comments,

Titbelsoeur


Friday, 7 February 2020

Time card by Titbelsoeur

Hello everybody !
To meet our February challenge, I have made a card. Watercoloured the background with my 3 favourite colours blended, Prussian Blue, Azo yellow and Quinadocrine Rose.
When dry, I have stamped the sentiment with Archival Inkpad - Black ink and hidden it with a paper to stamp the clock with Archival Inkpad-Cobalt

Step-by-step pictures on my blog 


Stamps from the following plates :

Time and Keys


Hope it gives you inspiration to participate in our 

for 3 chances to win some of these fabulous
Artistic Samper stamps !
AND
 an opportunity to join our Creative Team for a month, and get to use The Artistic Stamper stamps, and be posted on this blog, and on social media.

Thank you so much for stopping by.
You may visit my folder : 
I will be happy to read your comments about it !
Your comments are very much appreciated here, on my blog
Bye for now and happy creating. 
Titbelsoeur

Saturday, 19 September 2015

Titbelsoeur, yes YOU can !

Hello everybody,
Still using sardine cans, this one is rectangular.


Some beads from earrings, an English bus lucky charm, and... stamped images :

on to tissue paper : clock from Time and Keys on Time
on to cardboard : lady from 20's Ladies Plate 4 on  Costume


and on the top of the can, a perfume top, and  wings from Crowning Glory on Steampunk to meet the September Challenge.
And a light spot to sit the can :


And here it is !


Thanks so much for stopping by,
your comments are very much appreciated, 
here, on my blog, or on the Artistic Stamper's Facebook page.
I hope that my can did inspire you and that
you will participate in our September challenge
 to win some fabulous Artistic Stamper stamps.


Titbelsoeur

Wednesday, 19 August 2015

Headaches by Titbelsoeur

Hello happy stampers !
Today I am sharing a journal page with you.
To make it, I started coloring the background with pastel acrylics, then I sprayed ink throught the Petals from Artistic Stamper Masks.
Then I started stamping...
Europe Map @ Backgrounds
Time and Keys and Tick Tock  Time
Gibson Girl 3 @Gibson girls
Journaling Words #5 and Grungy Greetings #2 @  Words and sayings

Some doodles on the edges, and that was it... 
and here was my page :

And then...
I wanted to add "just" a word...
and the new Decay Stamps were on my table... and here is my final page with a new layer !


Thanks so much for stopping by,
your comments are very much appreciated, 
here, on my blog, or on the Artistic Stamper's Facebook page.
I hope that my page did inspire you and that
you will participate in our August challenge
 to win some fabulous Artistic Stamper stamps.


Titbelsoeur

Monday, 10 November 2014

Time's Up!

Hello all!  Alison (butterfly) here, and delighted to be back after a break.  I'm so grateful to Jennie for letting me take a sabbatical while I was busy with theatrical life in New York.  And I'm sorry that my first post back is a few hours late - computer troubles I'm afraid.  But (fingers crossed) it all seems okay, so I'm here with a timely tag!


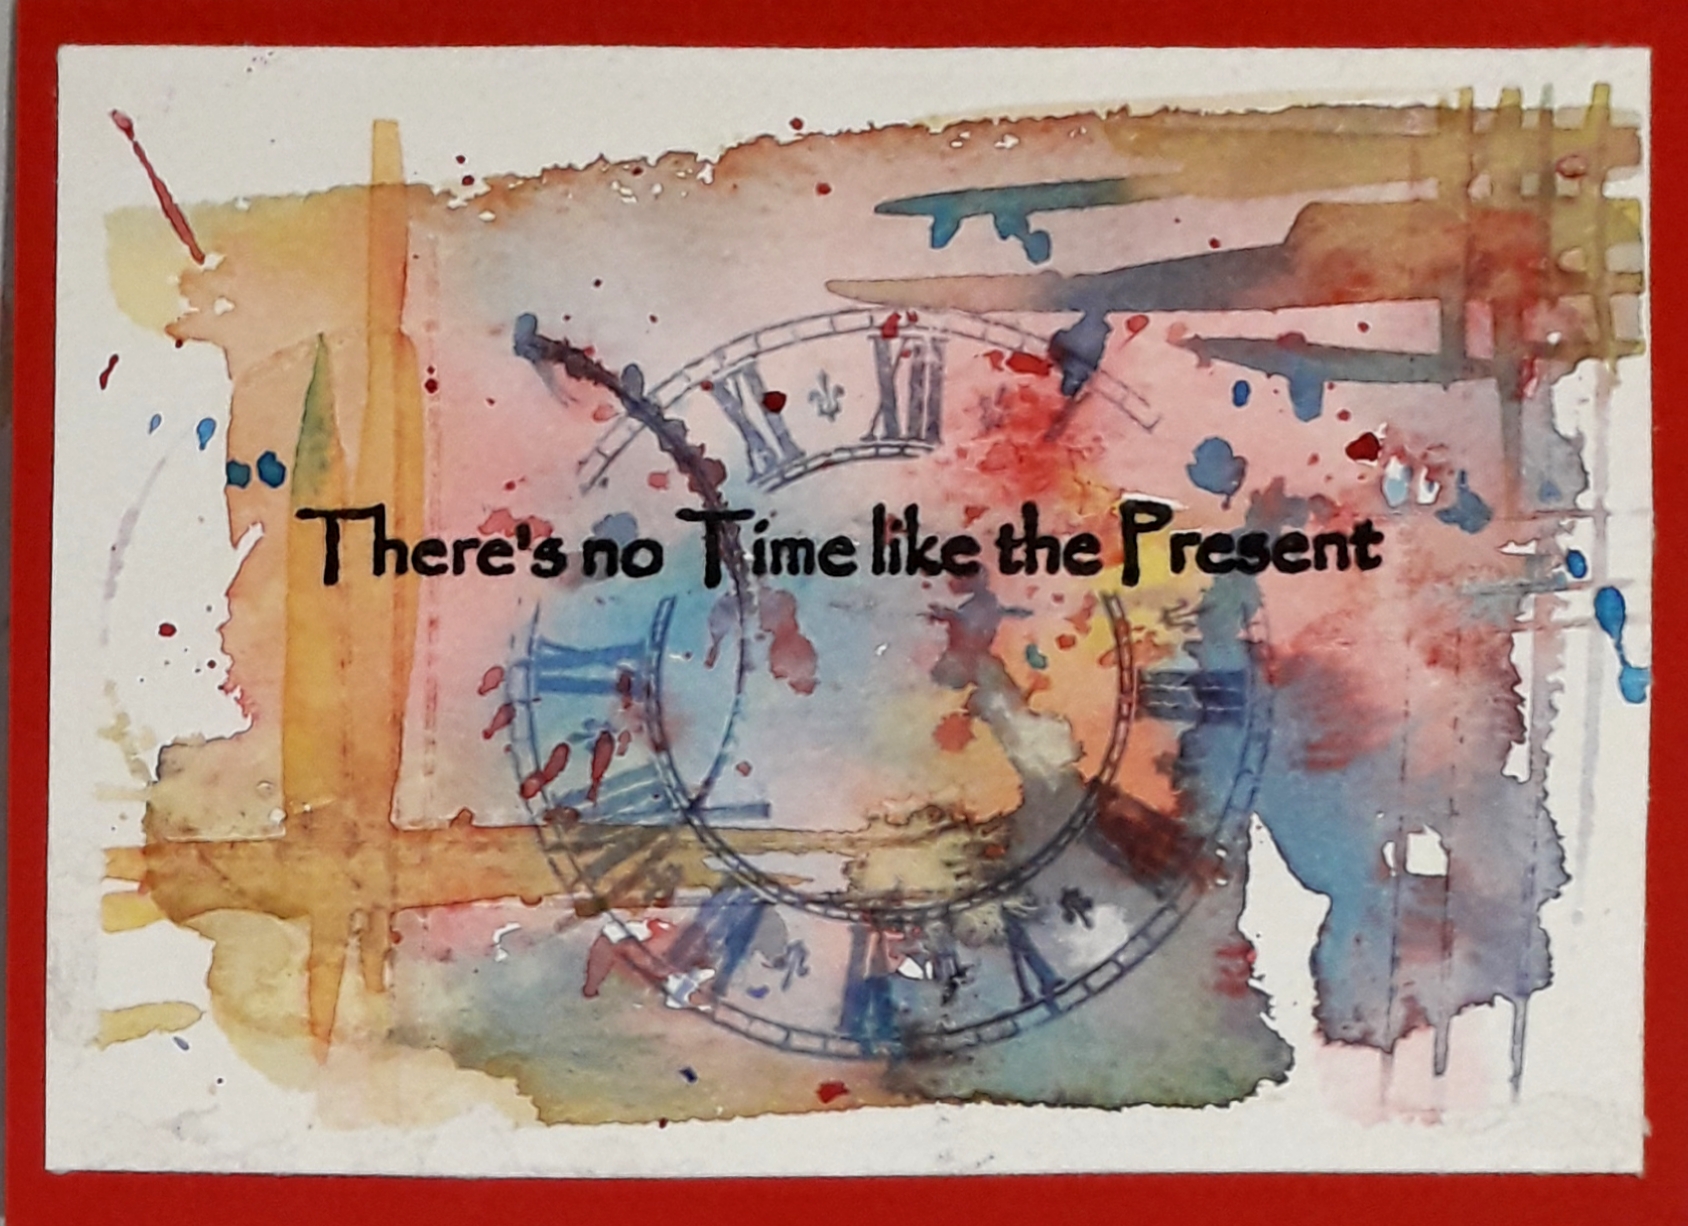
I'm going to keep it quick today so as to get as close to the deadline as possible!  I created this using the fantastic Time and Keys plate and a tag background which had been floating around on my table for months.


I put texture paste (this was the new Ranger Texture Paste if I remember rightly) through the Tim Holtz Gothic stencil and then used Distress Stains in some of my favourite blues and greens to tint the whole thing.


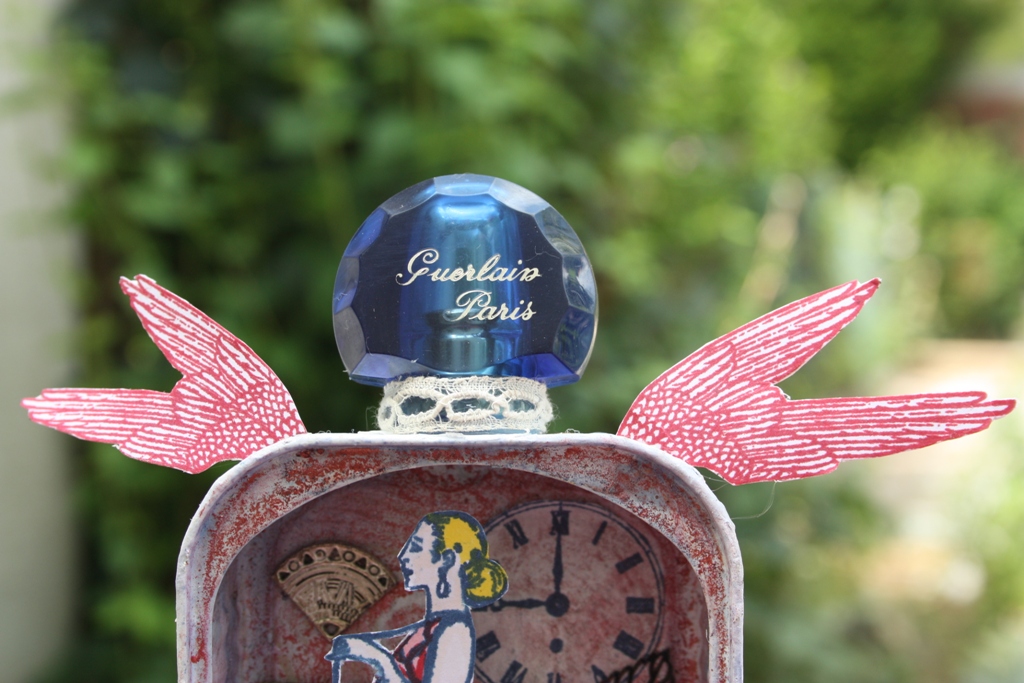
I was inspired to create my platinum watch case by some fabulous pocket watch pendants I found at a street market in New York.  I stamped the back of the watch case in embossing ink and used platinum embossing powder to create a vintage sheen.  I blended over some Walnut Stain and Black Soot Distress Inks to highlight the intricate detailing.


For the watch face I stamped the front twice - once to create the platinum frame, and another version where I used fine detail black embossing powder for the numbers and clock hands.


I cut and layered them together and then mounted the front and the back on layers of padded tape to give extra dimension.


The quote was also embossed using the fine detail black powder, and I inked the edges with Pumice Stone and Frayed Burlap.


I layered the whole thing onto one of the pre-printed Prima tags as it seemed to need a bit of a frame.


Some satiny ribbon from my stash tops the whole thing off.


I'm pretty pleased with my vintage pocket watch - and I can only apologise that it doesn't keep better time!  Still, I'm only a couple of hours late, so I hope you'll forgive me.

Thanks so much for stopping by.  I hope you'll find time to join in with our Christmas Is Coming challenge this month.  You don't have to use Artistic Stamper stamps, but if you do you get two entries to the prize draw, so come and play along.

Ingredients used:
Artistic Stamper stamps: Time and Keys
Tim Holtz Layering Stencils - Gothic
Texture Paste
Distress Inks - Pumice Stone, Walnut Stain, Black Soot, Frayed Burlap
Distress Stains - Evergreen Bough, Faded Jeans, Stormy Sky, Iced Spruce
Embossing Powders - Ebony Superfine and Platinum
Versamark Ink
Treasure Gold, Ribbon and printed tag from my stash

Sunday, 6 July 2014

Do you know stamp kissing ?

Hello happy crafters !
This is Titbelsoeur today showing you the very last technique I found out on the internet : stamp kissing !
What is this about ? very simple : you have some plain stamps, like the Artistic Stamper's butterflies :

 and textured ones... you ink each of them with different colors, and make them have a kiss.... 

 so that your butterflies have clock wings if they have a kiss with 


 Fantasy ones if they are in love with


or steampunk wings if they kiss cogs :


Isn't it a funny technique ? and the results are really stunning, aren't they ?

I did make some, just to have a try, then cut them out and sticked them on to a card I had made the background with the fabulous Europe map and the Journey sentiment.


On the other side, you make nice stampings with the structured one :


Cogs background
Time and keys
Fantasy background
Flutterby
Europe Map background
A journey
Distress inks
Versafine inks

Thank you so much for stopping by, 
I hope you like this technique,and will quickly have a try :-)
I am looking forward to reading your comments !
A tout bientôt !

Sunday, 22 September 2013

Titbelsoeur's cabinet of curiosities

Salut les patouilleuses, c'est Titbelsoeur aux manettes !

I am happy to show you today my big work of the year. Let me first explain the story of this piece. have a seat, take a breath, a warm drink (almost Autumn here, isn't it ?) and let's start !
With 4 messing-up-friends of mine, I have been leading a French forum for about 2 years. In 2013, we have made a series of tutorials to show them how to make a lot of thingamabobs, thingamajigs and other thingummies but never telling them what they would do with... 
They played the game with passion and made more and more creative thingummies.
And now the time has come that we show them what to do with : the intent was to help them make a cabinet of curiosities by themselves, with recycled items only.

Here is how I decorated mine :
first I sprayed diluted Distress ink on kraft paper, and when dried I stamped the image, hid it with a cut out of the same stamped image and stamped the others as a background.


the stamps I used are :
ground floor left : Men’s Plate 001 and Numerical plate
center :  Collage lady Elements
right : Gibson Girls 002Time and Keys and   Numerical plate

1st floor left :  A Stitch in Time and Dressmaking  No. 1
center :Large Bingo Card and  The Open Road 1
right :  Collage Man

attic : Family Values

and here is my happy-messy (literal translation) cabinet, filled with my thingamabobs, thingamajigs and other thingummies (love these words ;-) :


I have already showed you some of the thingamajigs here or there.


Sooo girls and maybe boys, I hope you like my project,

thanks for stopping by, 

I am looking forward to reading your comments! 

A la prochaine !


Friday, 28 June 2013

Up Up & Away One Last Time! By Anita Houston

Hello Artistic Stampers! Anita Houston of the Artful Maven, here one last time to bring you my last whimsical steampunkish canvas using these amazing red rubber stamps! I really have had the best time creating these three pieces (Project 1, Project 2), and have enjoyed reading all the comments and emails about them, as well as bribes to attain them ;0) !!! I do hope you didn't find them monotonous as they are very much alike, but each one has different motivational and inspirational intonations, and not only would they look well together but also apart.
I just love the quote on this sentiment stamp. It really has so much truth to it, and time flies so fast that sometimes we fail to realize the importance of the here and now.
I started by stamped the Marbled Background in Sepia Archival and heat embossing it in Ranger's Clear Embossing Powder, and did the same with the clock image from the Tick Tock  Set, except in Jet Black.
Using the swirl from the Tick Tock Set, I stamped it Snow Cap Paint Dabber, so it would resist the Ink Sprays that would soon come. I stamped the phrase from the Journaling Words 3 Set.
I sprayed a piece of tissue paper in Melted Chocolate, Pure Sunshine, and Black Marble Dylusions, then stamped the clock from the Time & Keys Set in Copper Paint Dabber. I cut it out.
I adhered the the clock face to the center of the clock, to be the sun's face.
I stamped the two smaller watch faces from the Time & Keys Set in Copper and Silver Paint Dabbers, and the larger watch face from the Watches Set in Gold Paint Dabber, all on Specialty Stamping Paper.
I gave the faces the same Dylusions treatment, and then cut them out.
I added a little bit of Wendy Vecchi's Embossing Paste to bits of corrugated kraft, that I cut to look like balloon baskets. I adhered the words "yesterday", "present", and "tomorrow" to each stamped on tissue paper, from the same sentiment stamp. I added the metal bits and chain pieces.
I die cut the butterflies from Tim's Sizzix Alterations Movers & Shapers Mini Butterflies Set, and colored each with the metallic dabbers. I adhered the gears and attached them to the watch faces.
These number paper clips were more purchases from Liberty of London, but they were a little too bright for my project, so it was metallic Alcohol Ink to the rescue. They acted as my anchors to attach the chains to the ballons and then to the baskets, each with it's respective number of importance...in my opinion.
I stamped the key from the Time & Keys Set in Gold Paint Dabber onto the corrugated kraft paper, as well as the makeshift ribbon from the Border A5 Set using Jet Black, and cut them out. Every thing got a good inking using Black Soot Distress Ink.


Thank you all so much again, and huge thanks to Jennie and Emma for having me this month! It has been an honor to say the least!

Friday, 14 June 2013

Up Up & Away Again! By Anita Houston

I'm back! Sounds a little scary, huh? The Artful Maven, Anita Houston here again, and I am thrilled to be back to show you my second installment using these amazing stamps from The Artistic Stamper!
I hope you caught a glimpse of my first project, but if not check out my Project #1, so you will see the theme I have going on here for Project #2. 
This is another 8x10 inch canvas, and I used eight stamps as well for this one. I've had so much fun making these inspirational canvases, and this is the first time I've ever made a family of canvas pieces, that would not only look well together but also apart. I really love how these stamped images can easily go together.
I began by stamping the European Map Background in Sepia Archival Ink and then heat embossing it in Ranger's Clear Powder. I also did the same with the clock that I stamped in Jet Black, and I used Snow Cap Paint Dabber to stamp the swirls. Both of these are from the Tick Tock plate.
I stamped both the Cogs Background and Small Cogs onto tissue paper using all three of the metallic Paint Dabbers.
I played around with some Dylusions Ink Sprays and came up with a nice looking rusty background for the cogs and gears using first Melted Chocolate, then Pure Sunshine, then bits of Black Marble.
I cut out some of the cogs and adhered them to the center of the sun. I stamped some of the words on the Journaling Words 2 set in Jet Black for the sentiment and heat embossed them as well. Then using a few pieces of scrap to mask off some of the canvas, I began misting with Dylusions, and my painted and embossed parts resisted the ink of course...love that!
Using silver cardstock and more metallic paint, I stamped the lightbulbs from the Inspiration Light Bulb set, the diamond border from Borders A5 #1, and the key from Time & Keys, and I cut them all out.
I added more cut out cogs to the lightbulb, some Distress Ink, and metal bits and gears.
Using the Sizzix Layered Wings Die, I die cut silver cardstock and white tissue paper for lots of layers.
When I was in London, I purchased these wonderful paperclips at Liberty of London. I colored them with Alcohol Ink to give a little foliage look.


I'll be back in a few weeks with the last of my canvases. Thank you for looking, and for all the wonderful comments!