Showing posts with label A stitch in time plate. Show all posts

Monday, 21 July 2014

My little sewing box

Salut les patouilleur-se-s !!
This is Titbelsoeur talking to you today.
I wish you a good Summer time and hope the weather is hot and sunny wherever you are !

My piece for today is a tin can (I'm not floating on though) I have covered with a very old song paper and in which I have put some sewing tools :

thread spools (authentic or not ;)
 

a button card (card is stamped and buttons are period ones) :


a pin card :


and a spool label :


a tiny pair of scissors, some "hand made" and tailor's tape ribbons, and tadammm

here it is :


All these stamps come from the A Stitch in Time plate.

Thank you so much for stopping by, 
I hope you like my sewing can, and am looking forward to reading your comments !
A tout bientôt !


Tuesday, 8 October 2013

Vintage canvas by Titbelsoeur

Salut les Patouilleuses, c'est Titbelsoeur qui vous parle !

I do not often make canvas like the one I am showing you today... I tried to get out of my comfort zone with colors and style I am not used to... YOU will tell me whether it was a good idea !
I am sorry I forgot to take step by step pictures, I always start taking some, then I add this and that, and at the end I realize I have not taken other pics ! 
Anyway, I will try to explain a bit the way I made it, not really difficult actually...

I first glued some thin tissue on the canvas to make texture, gessoed it and added some paint with my fingers. I darkened a book page I had first folded here and there and wiped my gessoed fingers on to, with Vintage photo Distress ink on a piece of cut n'dry (not sure my explanation is really clear ?).


From the  A Stitch in Time plate, I stamped the thread card on kraft paper and the tape measure on drawing paper :


And this Gibson Girl I love so much on drawing paper as well, edges distressed :


I then glued lace, buttons and flowers among other stuff, and tadaaaaam, here it is :


Sooo boyz'n'gals, I hope you like my canvas,

thanks for stopping by, 

I am looking forward to reading your comments! 

A la prochaine !


Sunday, 22 September 2013

Titbelsoeur's cabinet of curiosities

Salut les patouilleuses, c'est Titbelsoeur aux manettes !

I am happy to show you today my big work of the year. Let me first explain the story of this piece. have a seat, take a breath, a warm drink (almost Autumn here, isn't it ?) and let's start !
With 4 messing-up-friends of mine, I have been leading a French forum for about 2 years. In 2013, we have made a series of tutorials to show them how to make a lot of thingamabobs, thingamajigs and other thingummies but never telling them what they would do with... 
They played the game with passion and made more and more creative thingummies.
And now the time has come that we show them what to do with : the intent was to help them make a cabinet of curiosities by themselves, with recycled items only.

Here is how I decorated mine :
first I sprayed diluted Distress ink on kraft paper, and when dried I stamped the image, hid it with a cut out of the same stamped image and stamped the others as a background.


the stamps I used are :
ground floor left : Men’s Plate 001 and Numerical plate
center :  Collage lady Elements
right : Gibson Girls 002Time and Keys and   Numerical plate

1st floor left :  A Stitch in Time and Dressmaking  No. 1
center :Large Bingo Card and  The Open Road 1
right :  Collage Man

attic : Family Values

and here is my happy-messy (literal translation) cabinet, filled with my thingamabobs, thingamajigs and other thingummies (love these words ;-) :


I have already showed you some of the thingamajigs here or there.


Sooo girls and maybe boys, I hope you like my project,

thanks for stopping by, 

I am looking forward to reading your comments! 

A la prochaine !


Sunday, 8 September 2013

It's only a tin full of people - by Titbelsoeur

Hey there, this is Titbelsoeur on board !

I definitely loooove this medium ! 
The tin is nice, I leave it as it is... otherwise I cover it with a coat of Gesso and paint or ink it...
This one was beautiful, goldy, shiny, so I didn't paint it.

I used a piece of kraft paper to cover the background, stamped it with A Stitch in Time and glued a piece of pattern on it.


I then filled the tin with stuff connected with this pretty woman from Dressmaking
and here it is :


I hope you like this tin full of sewing stuff !

Thanks for stopping by, I am really looking forward to reading your comments !

A tout bientôt !


Monday, 2 September 2013

Sewing Lady by Sue Carrington

Hello! It's Sue here and very excited to be guest designer for September, thank you Jennie and Emma ! For my first project I wanted to use the gorgeous stamp of the lady sewing from the Dressmaking 001 set.


I've used a piece of grey board and started by spreading Grunge Paste over the Art is stencil in random areas on the board.


Once this was dry I then painted the whole board with Vintage Lace Fresco Finish paint. Then I used Cut 'n' Dry foam and sponged more Fresco Finish paint around the edge and over the embossed text to highlight it.


I then used the Spinning Top stencil and the Swirly Vines stencil, again using Fresco Finish paint. I've added some text using the stamp from the Carte Postale set and Coffee Archival ink. I then brushed some Treasure Gold around the edge and rubbed some over the raised, embossed text.


I stamped the beautiful sewing lady onto some Specialitiy Stamping paper and blended some Victorian Velvet Distress Ink around the edge. I've mounted her onto some card that I've stamped with a stamp from the Stitch in Time set using Coffee Archival ink.


The cotton reels and thimble have been stamped onto pieces of paper from a book that have been stuck onto Grunge paper. The tape measure has been made using the stamp from the Stitch in Time set and I've blended Vintage Photo and Walnut Stain Distress Inks over it. The little paper roses are from my stash and I've rubbed Victorian Velvet Distress Ink over them. For the dress form I've stuck some more paper from an old book on to some Grunge Paper and die cut the shape. The sentiment is from the Stitch in Time set and I've cut it into separate pieces so it would fit on the design.


The little bird cage has been painted with Fresco Finish paint, once it was dry I added a coat of Crackle Glaze and then a further coat of Fresco Finish paint. To finish I added some buttons and some lace from my stash.

I hope you've enjoyed my first project and I'll be back later in the month with my next one !

Sue
x


Monday, 22 July 2013

Ladies album part 1 by Titbelsoeur

Salut les patouilleuses, c'est Titbelsoeur qui vous parle aujourd'hui !

I have been wanting to make fabric books for a long long time... And a friend of mine launched the challenge last month, which was a great opportunity for me to have a try, finally !

I made it with 3 pieces of jeans and 3 pieces of an old sheet. I have randomly sewed small pieces of fabric and lace on each "page", except on the insides of the front and back cover that I am showing you today :
On the front one, I have stamped the whole   A Stitch in Time plate with purple archival ink :


And on the back one, I have stamped   The Open Road 1 :


My next post will be about the inside pages, but I can't help but show you the cover, giving a quick preview of what the inside pages are made of :


I first stamped the Gibson Girl, masked it and stamped some  A Stitch in Time over it.


I had real fun making this fabric album for you, and I hope you like this first glimpse,

see you on the 8th of August for the 2nd part ! 


Thanks for stopping by, I am like always looking forward to reading your comments !


A tout bientôt !


Sunday, 26 May 2013

For the love of sewing

Hello everyone, Astrid here with my second project for May. Those of you that follow my own blog know that one of the things I love doing is decorating gift bags. Well, I have a friend who loves sewing and I thought it would be nice to bring her a little gift wrapped in a bag with a sewing theme.

To decorate the bag I used a large Manila #10 tag I inked it with three colours of Distress Inks, Weathered Wood, Stormy Sky and Victorian Velvet. Next I cut a piece of Manila Paper with one of my dies, coloured it with the same three Distress Inks, stamped the Calligraphic Mat 12 stamp over it in Stormy Sky and added it to the top of the tag. Next I stamped the postcard stamp from the Katie Fox Carte Postale set on a bit of scrapbook paper with Cobalt Blue Archival Ink, distressed the edges and adhered it to the tag. Now for the sewing elements, they came from the Katie Fox A Stitch in Time set and the Tim Holtz Attic Treasures set. All elements were stamped in Cobalt Blue Archival Ink again on various bits of scrapbook paper, cut out and adhered to the tag as shown with some flowers, cheesecloth and a bit of lace..

 The little buttons at the top came from my stash, but you can find very similar once here


After doing the front, and adhering it to the bag, I decided to do another tag for the back, using the same stamp sets:
The little banner was created with the help of the great Scrabble and Tags set and everything was finished with another button, some ribbon and a little rose.

Here you can see both sides together:
I inked around the edges  of the bag with some Vintage Photo, punched holes at the top for some string and the gift bag was complete.

Hope you liked it and have found some inspiration, and if you have not done so yet there is still a chance to play in our challenge. All you need to do is use words somewhere on your project.

Friday, 26 April 2013

A Stitch in Time

Hello everyone and thank you for visiting. Astrid here with my second project for April.

Well, before seeing Emma's project two days ago I decided to share a cover of an album I created, using the wonderful new stamp sets by Katie Fox. So, yet another album I'm afraid......

 Here is a list of all the products I used:
Katie Fox Stamps Stitch in Time & Carte Postale
Distress Paints in Bundled Sage, Salty Ocean and Chipped Sapphire
Distress InksVintage Photo, Antique Linen
Archival Ink Jet Black
Graphics 45 French Country Collection 8 x 8 papers
and from my stash: Vintage lace, corrugated card, Kraft Card, flowers and ribbon, Sissix Alterations Tattered Banners die, Book rings.

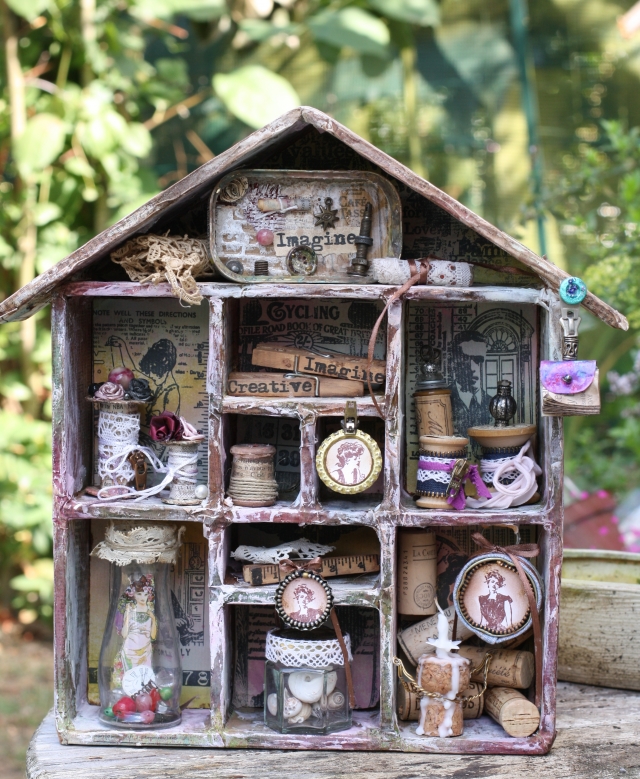
The background to the cover of this little album was created with Distress Paints liberally spritzst with water to mix the colours. The edges were darkened with Vintage Photo Distress Ink. Next I stamped the elements I wanted to use either on white card (the postcard stamp) or on one of the Graphics 45 papers (the various elements from the Stitch in Time set) in Jet Black Archival Ink and cut them out. The Sentiment was stamped on part of a Tattered Banners die. I wound some vintage lace around the little bobbin and added a little flower. I also fussy cut some elements from the G 45 papers to decorate further.
Here are some close ups:


The back cover was created in pretty much the same way, just without the stamped images. The inside pages are Kraft card and I lined the covers with some papers left from a previous project. As you can see I punched holes in each of the pages and used book rings to hold it all together.
The whole book has 12 pages and the plan is to create pockets for each of the pages and store cards for each month of the year.....


Well, hope you like it and see you next time!

Monday, 8 April 2013

Bookmark by Titbelsoeur

Hello there, c'est Titbelsoeur en régie !

The bookmark I am showing you today is made with a mix of Artistic Stamper plates.
I have made the background spraying paint and ink on various Crafter's workshop stencils
And I have stamped, on an old pattern, the dressmaker first, then hid her under another herself, using the same technique as in my previous post (see here) and used the new stamps from the amazing A stitch in time plate. Then I glued the stamped pattern on the background with mod podge and glued the lace on the border as well.


 Here is a larger view :


I hope you like my bookmark,
Thanks for stopping by, I am really looking forward to reading your comments !
A tout bientôt !