Showing posts with label Collage Man. Show all posts

Monday, 19 September 2016

Steampunk sardine can by Titbelsoeur

Hi there !
Playing with sardine cans this time, I have decided to make another one with this wonderful vintage stamp from the Collage Art 1 A5 plate. 
I have stamped it with Brown Archival ink on to a kraft piece of paper, and glued some cogs, screws, watch pieces and a cork. A washer at the bottom to have the can stable and a nut at the top :


Do you remember the one I made 3 years ago ? you will see it here : Don't think I eat nothing but sardines....by Titbelsoeur

Do not forget to participe in our
 to win some fabulous Artistic Stamper stamps !

Titbelsoeur

Saturday, 7 May 2016

Butterflies and dragonfly by Titbelsoeur


Hello everyone !
To meet our monthly challenge about collage, I have made this tag which is made with 3 layers of collage.
Here is how I made it :
First cut the cardboard as a tag, then peel it here and there and add gesso there and here :)
When dry, glue paper on it, such as dictionary, map, book or phone book scraps, this is the 1st layer.
As a second layer, glue template scraps, stamped tea bags (Collage tag in Collage & Retro)...
And the third layer gives volume to my tag, as I stick butterflies and dragonfly from Butterflies & Birds


Thanks so much for stopping by,
your comments are very much appreciated, 
here, on my blog, or on the Artistic Stamper's Facebook page

Did my project inspire you to participe in our
 to win some fabulous Artistic Stamper stamps.

Titbelsoeur

Sunday, 22 September 2013

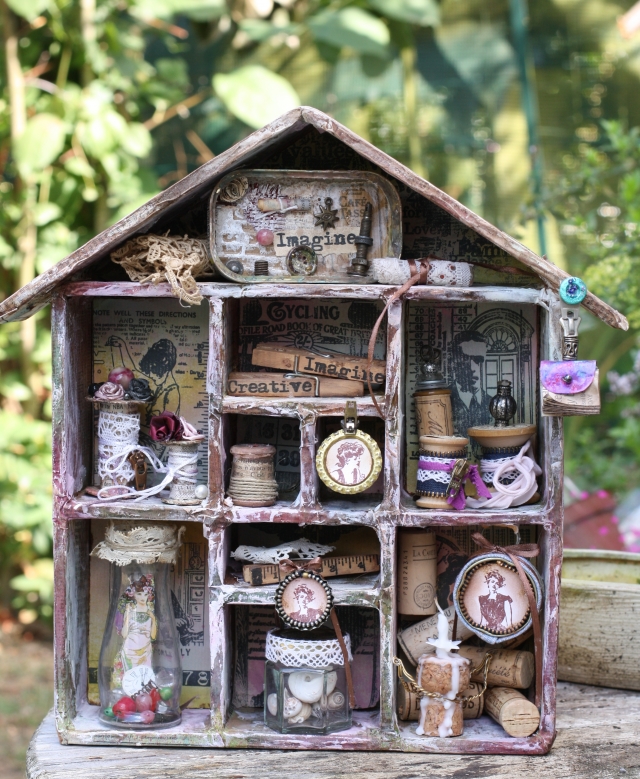
Titbelsoeur's cabinet of curiosities

Salut les patouilleuses, c'est Titbelsoeur aux manettes !

I am happy to show you today my big work of the year. Let me first explain the story of this piece. have a seat, take a breath, a warm drink (almost Autumn here, isn't it ?) and let's start !
With 4 messing-up-friends of mine, I have been leading a French forum for about 2 years. In 2013, we have made a series of tutorials to show them how to make a lot of thingamabobs, thingamajigs and other thingummies but never telling them what they would do with... 
They played the game with passion and made more and more creative thingummies.
And now the time has come that we show them what to do with : the intent was to help them make a cabinet of curiosities by themselves, with recycled items only.

Here is how I decorated mine :
first I sprayed diluted Distress ink on kraft paper, and when dried I stamped the image, hid it with a cut out of the same stamped image and stamped the others as a background.


the stamps I used are :
ground floor left : Men’s Plate 001 and Numerical plate
center :  Collage lady Elements
right : Gibson Girls 002 ,  Time and Keys and   Numerical plate

1st floor left :  A Stitch in Time and Dressmaking  No. 1
center :Large Bingo Card and  The Open Road 1
right :  Collage Man

attic : Family Values

and here is my happy-messy (literal translation) cabinet, filled with my thingamabobs, thingamajigs and other thingummies (love these words ;-) :


I have already showed you some of the thingamajigs here or there.


Sooo girls and maybe boys, I hope you like my project,

thanks for stopping by, 

I am looking forward to reading your comments! 

A la prochaine !


Sunday, 9 June 2013

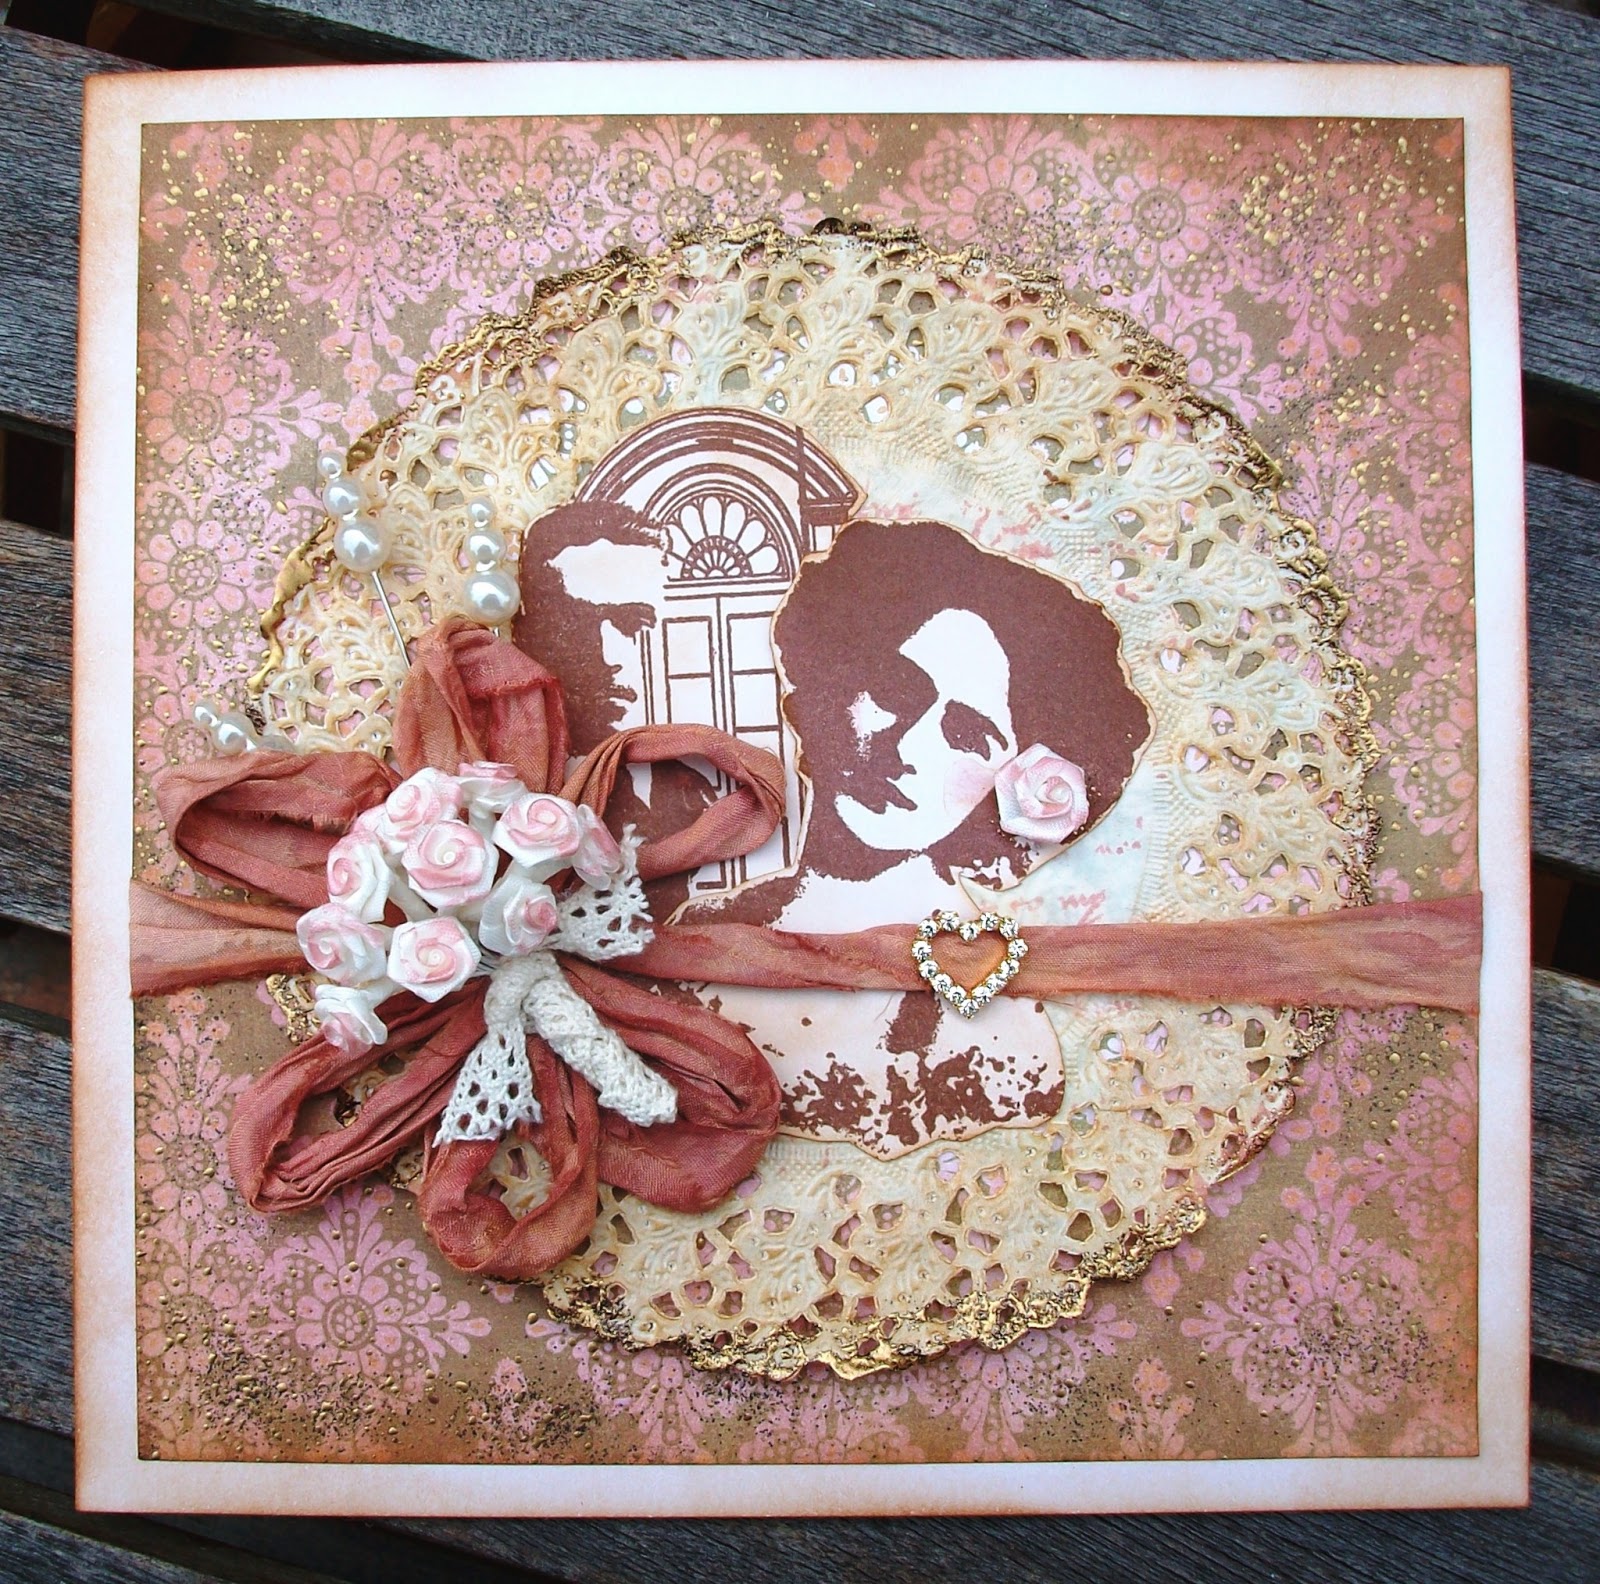
June Wedding by Alison (Craftytrog)

Hello Stampers! It's Craftytrog here! As the wedding season is upon us, I thought I would share a vintage style wedding card with you today. 


Here's how I made my card...

Stamp the man & woman from Collage Art 1 with Coffee Archival Ink, cut around the images, & ink them with Vintage Photo Distress Ink (DI). Add a little Victorian Velvet DI to the woman's cheeks.
Ink a paper doily with Vintage Photo DI, stamp some Script (Calligraphic Mat 15) in the centre with Victorian Velvet DI, then use gold embossing powder to emboss the edges.
Ink a square piece of patterned paper with Victorian Velvet DI, then add some Vintage Photo DI to the edges. Sprinkle some Gold Embossing Powder around the edges, & use a heat gun to melt it.
Use Victorian Velvet Distress Stain (DS) to colour some ribbon. I used plain sari ribbon, but you could also use seam binding. Make a flower by wrapping the ribbon around your four fingers in a figure of 8 three times, then tying it in the middle.


Assemble the patterned paper, doily & stamped images as shown, then glue the ribbon flower across the front, adding three pearl pins & a heart ribbon slide. Glue the ribbon ends behind the patterned paper.
Ink the edges of an 8x8 inch square card with Vintage Photo DI, then attach the assembled artwork to it.
Ink a posy of white paper flowers with Victorian Velvet DS, wrap it with some lace, then use a glue gun to attach it to the centre of the ribbon flower.
To finish, add an inked paper flower to the lady's hair.

I'll see you later in the month, with my second piece of art,
thanks for looking,
Alison xxx

Monday, 22 April 2013

Don't think I eat nothing but sardines....by Titbelsoeur

... I sometimes eat tuna !

But today this is a sardine tin I will show you (one more !)
I must admit I love making things out of sardine tins. It is the exact size to make a mini-album with cards, and the same size as the Collage Art stamps !


I have stamped it on a kraft sheet I glued on the back, then I added some stuff from my stash : a fridge lamp, a big screw, a champagne cap, a washer and a cork. On the top I glued an old cabinet hinge, and a nut under the bottom.

Then I stamped the label on a kraft envelope, stuck a real stamp on it and stamped with Katy Fox's and others from my stash.


I had real fun making this tin for you, and I hope you like it,
Thanks for stopping by, I am really looking forward to reading your comments !

A tout bientôt !


Monday, 17 September 2012

Simply alter the original.... by zuzu.


Hi again.
So here i am back with more messed up, scruffy, distressed, aged, vintage looking stuff. I dont manage clean, colourful or stylish very well lol.
Its a little canvas... I think it measures abut 4 inches across and six inches high... roughly.

I have been obsessed with tearing bits of paper out and revealing text or something underneath for about 6 years.. i really must move on LOL. but i do like it. it reminds me of peeling old wallpaper that shows the last tenants wallpaper underneath.

i have used the man from the collage stamp set as the centre piece.
I covered the canvas in book pages first, then layered some scrapbook paper over the top (tearing some peeled wallpaper type tears as i went). the next step is sort of inspired by two folks; one is Trish Latimer who made a gorgeous layout a few weeks back and the other is Ali Ferguson, a textile artist who i did a class with in the summer. inspired by, but looking nothing like .. lol... i didnt have soft enough colours in my box of sprays or my scrapbook papers, so mine is yet again dark and dingy.
I glued on lace and fabric and embellishments and once they were dry a slapped a load of gesso over everything. when the gesso was dry i sprayed some spray mists over the whole thing (before adding my stamped image).
my finishing touches were added by using brown ink and gold gilt paste around the edges to add that vintage look.

AS Supplies Used:

collage stamp HERE

embellishments HERE
multi medium and gesso HERE
Chit chat stickers HERE

Monday, 6 August 2012

Zuzu's Anniversary give-away post: part 1....

As you know by now, it is the 2nd anniversary of  "The Artistic Stamper Creative Team" blog this month, and to celebrate, Jennie is giving away stamps to some lucky followers.
Here is a reminder on how to win these stamps...

Each Team member has chosen which stamps they would like to work with this month and those are the stamps you could win.
For example: I  Have chosen to work with the 'collage art 1' sheet shown here...
 To win this set you must leave a comment on one of my posts this month (either here or over on my personal blogblog which you can find HERE )

At the end of the month , I will use a random number generator to pick out a winner from the comments on MY posts.. and that person wins the stamps.

The other members of the team also have stamps to give away and its the same process.. leave a comment on their posts and you can win the stamps they are giving away.

 My first example, featuring this stamp sheet, is a gentelmans personality test in a box.  Its a pretty simple gadget, spin the spinner and see what personality trait it stops at....


Supplies used that you can find at the artistic stamper:

Collage stamp sheet HERE
Medium wooden box HERE
Game spinners and time piece  HERE
Chit chat stickers HERE
black stazon ink HERE

Thursday, 16 June 2011

Grungy Man by Alison Hall

Morning Stampers. For my post this week, I created a grungy hanging featuring the man from the Collage Art 1 plate.


First, I cut a piece of recycled corrugated card, & then tore the top fairly straight, & the bottom at an angle. I ripped most of the top layer of paper off, leaving somewhere I could stamp at the bottom right.

I sponged the card with gesso, spritzed with red perfect pearls mist, then inked with walnut stain distress ink. I wasn't completely happy with the colour, so I spritzed with gold perfect pearls to get the depth of colour & effect I wanted.

Putting my corrugated base aside, I took a couple of pieces of patterned paper from the Retro Grunge stack, both roughly the same size (4.5 x 3.5 "). I painted a thin layer of gesso onto one piece, dried it, then stamped the Collaged Man using coffee archival ink. I set the ink with a heat gun, then tore around the image, roughly 1/2". I inked the edges with distress ink, then layered the image on the other piece of patterned paper. I distressed the edges of this with my Tonic paper distresser tool, inked it with DI, then stapled it to the corrugated base, using Tim's tiny attacher.

I stamped the word 'Man' from the Collage Art 1 plate, using black pigment ink, then embossed with clear embossing powder.


Next, I took three mini cog die-cuts, & embossed them with one layer of platinum UTEE. I spritzed them with Crafty Notions black matte spray, for a distressed look, then attached them with pewter brads. I used my Tim Holtz texture hammer to distress the brads.

I inked the bottom edge of the corrugated base with embossing ink, then embossed it with one layer of platinum UTEE.

Finally, I attached a piece of lace chain, using a couple of pewter brads, to hang my piece.

Thanks for looking!
Alison x


Wednesday, 9 March 2011

Man of Numbers by Alison Hall

Hi! Alison here again. This time I decided to have a play with my alcohol inks & a papier mache square frame.


First of all, I painted a base coat of gesso all over the frame, then painted over that with Expresso Acrylic Dabber. When that was dry, I glued some some numbers, which were diecut, using the Sissix Vintage Market Alpha die, around the frame. Then I used strips of sticky back aluminium foil to cover the frame. I used a paper stump to burnish down the foil, & around the numbers.
Next I added a good drop of alcohol inks, pesto, oregano, red pepper & terra cotta to some felt on an applicator, then dabbed this all over the foil, until I had the effect I liked. I used a sanding tool to remove most of the ink from the numbers, to highlight them. Don't worry if you remove a little ink from around the numbers, as this adds to the distressed look of the frame.
I stamped the collaged man twice on a piece of green paper from the Retro Grunge Paper Stack. I cut around one image to fit it inside the recess of the frame, then spritzed this with Kiwi Perfect Pearls Mist. I cut around the man's head & shoulders, then added this to the dried, spritzed image using foam squares. I glued the image inside the frame, then used glossy accents to add a piece of string around it.
Finally, I stamped the collaged man again, onto some orange paper from the stack, cut a small piece that had numbers on it, then rolled it up, & inserted it into one of Tim's new glass vials. I added a small game spinner with some string, then glued the little vial inside the frame, using some matt medium.
Thanks for looking!
Alison xx

Wednesday, 11 August 2010

Gibson and his Girls! by Lucy Edmondson


Charles Dana Gibson was a pen and ink illustrator at the turn of the 20th century whose models epitomized his ideal of female beauty, with long hair, tiny waists, and long slender necks. They became known as the Gibson Girls! I have had the two full size sets for a long time now and they are great favourites, so I was delighted when the tiny images came out last week, and I have combined them with some other old favourites for Minxy's 'Something Old, Something New' challenge. I love the flexibility you get with The Artistic Stamper stamps that enables you to mix and match.


Well, the first bit of the 'pocket Art History' was true, but I now get a bit fanciful so humour me! I decided that Collage Man would be Gibson, standing by the door outside his smart studio, where inside await his models, ready to be sketched. I think in reality he was a bit fatter than this distinguished gent, but if he can dream then so can I!


What you will need:-

Artistic Stamper stamps: Collage Man, Collage Lady Elements, Artist's Plate No 1, Words Set Nudes,
Small but Beautiful Gibson Girls
Distress Inks: Tattered Rose or Spun Sugar, Vintage Photo, Shabby Shutters, Dried Marigold, Tumbled Glass
Distress Crackle Paint - a pale/neutral colour such as Tatteered Rose or Picket Fence, etc
Crafty Notions Spray in Co-Ordinating Colour
2 Hinges
Pen Nib
Black Archival Ink Pad
Inkssentials White Opaque Pen - Optional

Brad or Tiny Button or similar for the door knob

You can get everything you need except the tray from Jennie, but if you don't have anything similar (sometimes embellishments come in them), you might like to use four small matchbox drawers glued together. You will need a small piece of strong card, approx 7.5 cm by 9 cm ( ins).

What I did:-

1. Brush a neutral shade of Crackle Paint around the inner edges of each of the compartments in the tray and set aside to dry.

2. Stamp the Collage Man in black onto the strong card, and cut it into a rectangle to fit your compartment tray (mine was a little smaller than the stamp). Turn it over and stamp the poem from Collage Lady to cover the piece. Sponge both sides with the Distress Inks, using the Tattered Rose or Spun Sugar for Gibson's face, and either leaving the collar bare or filling it in with the white pen. Edge both pieces with Vintage Photo to frame, and flick some water at the pieces with your fingers.

3. Stamp three of the Gibson Girls onto white card, and the ink bottle from the Artist Plate, and cut to fit the compartments then colour as above.

4. Stamp a pen nib from the Artist Plate and the Woman, Mystery, Passion, Beauty words onto white card and ink up. Cut out a continuous strip of words to go around the outside edge of the tray, and cut a rectangle around one of each of the words for the back of the door. Edge with Vintage Photo and stick in position as shown.

5. Once the crackle paint is dry, sponge with Distress Inks and spray with mica sprays. Stick the four tiny images into the compartments and add the pen nib.

6. To finish, stick the hinges in place with strong glue, allowing plenty of drying time. Add a brad head or tiny button as a door knob, as shown.

I do hope you have enjoyed this project and it would be great if you gave it a go! Do tell me what you think as I would love to hear! Thanks for looking.

Lucy