Showing posts with label Grunge Paste. Show all posts

Friday, 24 June 2016

Inspiration using red yellow and blue by Debs

Hi Everyone

Hope you are enjoying the challenge this month.  Such great colours!
Here is my latest piece of 'inspiration' for you 


I used a journal but this technique would work well on a card or on a canvas
I started by stamping some text using mini calligraphic mat 20 and calligraphic mat 11 with black archival

Then ripped up the text and stuck randomly onto the page and covered in white gesso

Next i added some grunge paste through the A4 Swirl Mask and then is started spraying


Nice and bright you might think!

This is exactly the same page after the ink has dried, dylusions reacts beautifully with gesso and immediately lightens the inks, giving you a much more subtle tone.


I stamped some of the shells from the Shells mat onto white tissue with brown archival and once glued in place i used a charcoal pencil to outline.  I then stamped inspiration from the Journaling words 3 mat

To finish i added a touch more gesso down the middle of the page

I shall look forward to looking through all of your project for this month and don't forget you still have a bit more time to still enter both on the blog or on the Facebook page


Friday, 22 January 2016

Photo Frame by Debs

Hi All

Debs here!  With something a little different for me.  I picked up a plain photo frame from The Artistic Stamper and decided to transform it! Let me know what you think I would love to hear your views on what you think.


Sorry the picture isn't great it was a bit wet outside today and the light inside wasn't great either!

Take one blank frame


Add some grunge paste through the swirls stencil

Get a Jamboree bag from The Artistic Stamper and adhere bits and pieces around the frame, the jamboree bags are full of hidden treasure

Using My Melt pot i mixed up some UTEE and poured it onto a heat proof craft mat and using a cog from the Tick Tock stamp set inked up with versa mark I stamped into the melted UTEE


then made a smaller one


I used the cooled down UTEE as a mild and using paper clay made some solid cogs

Trimmed down

I also cut out the middle of the large cog

Added the large cog over the top of the bits in the bottom left corner 

Added the smaller one on top

I had also used another stamp in the UTEE which was Smile from the journaling words 4 which unfortunately you can't really see in this photo but its in the top right hand corner.  Once all the elements were stuck down i covered everything in black gesso.

Then I mixed some blue and green mica powders with gel medium and then covered the whole thing using the coloured gel medium as a paint!

Once that had dried I then got out some sliver gilding wax and just rubbed on the raised surfaces just to give it all a highlight

Here it is all complete and standing upright with its stand attached.  Now you can see the Smile.  Everything used in this project is available in the shop and online.

Do let me know what you think either on here or on the Facebook page.
Take Care Debs


Friday, 10 July 2015

Make me live tag by Debs

Hi All

I had a bit of fun with sprays and stencils on this tag.


I started with a large craft tag and covered it with gesso

Then out came the ink sprays, I used Dylusions and Distress ink sprays and stencils.  I started by putting a layer of just ink down, waited for that to dry off and then sprayed more ink through stencils until I was happy with the background.  Whilst I waited for it all to dry I stamped one of the Gibson girls onto plain white card with brown archival and coloured her in with distress markers.


Once the ink was dry, I then stamped the swirly stamp from the Decay Journaling stamp set in Peacock Feathers and Salty Ocean, after these were dry i also did a couple in Archival black.  The words were stamped as a block onto white card with Archival and then cut out the words that I wanted.  I used grunge paste with the swirls and splodges stencil, one of the nice things about grunge paste is its ability to soak up the ink that is underneath it, meaning in. This instance I didn't need to colour it.  I made a large paper flower with a die, some book pages and stuck a wooden bead in the middle.  Then re-arranged the words and stuck them down.

Hope you are all enjoying this months challenge.  See you all soon

Debs

Products used

Artistic stamper Masks


Wednesday, 24 June 2015

Not Just An Ordinary Jam Jar by Debs

Hi All

Hope you are all enjoying the sun.  I thought I would show you a stamped and decorated Jam Jar for this post


I started by pouring some Fresco Finish paint into the jam jar, i used two colours (vanilla and tangerine) and swilled it around until the inside was completely covered. With the paint that was left over after tipping out the excess.  I painted the lid and two journal pages - think I may have put a tad too much in!!

Once the jar was dry inside, I inked up The Artistic Stamper swirls stamp with Teal Stazon.  I then  rolled the jar across the stamp,  rather than stamping onto the jar, this way it eliminated any slippage.  Whilst Stazon does dry quickly I did leave it to dry properly, so that it wouldn't smudge.  When it was dry I then took The Artistic Stamper daisy stencil and wrapped it around the jar, holding it as tightly as I could, I pushed grunge paste through and left it to dry.  Whilst waiting for it to dry I stamped butterflies from the butterfly set that was recently released onto shrink plastic with teal Stazon. I stamped four different ones for the middle and then three all of the same for the lid, coloured them in, cut them out and then heated the shrink plastic with heat gun to shrink.


To get the butterflies to stick together on the lid once they were coloured and shrunk I re-heated the edges and once warmed up added glossy accents and held until they fused together.  Whilst waiting for the butterflies to fuse I painted the grunge paste daisies orange around the jar and on the lid. 
 
Close up of lid
 
Thanks for joining in the fun and don't forget there is still a few days left to show us your creations.  We really would love to see them.

Thanks for looking
Debs
notationsofacrafter-debs.blogspot.co.uk

Products used


Wednesday, 22 April 2015

Gothic Arch's By Dee

Hi everyone hope you are all well and having a crafty time. I have a plaque 
for you today using the new stencils from The artistic Stamper,
and some Artistic stamper stamps.


Firstly I brayered on the fresco paint till it resembled old stone.


I then used a pallet knife to apply the grunge paste to the top left
I applied this quite thickly so it would resembled old stone 
once I had stamped into it using the circular column toppers
of the architecture plate.


I inked up the stained glass window off the architecture plate
stamped it twice with black stazon once onto the background
and once onto spare card. This was then cut out and
 stuck into the frame of the main image of the arch.


I used the Artistic Stamper lace background stamp & inked it up with stazon black ink 
This resembles peeled paint if you used the right area's. Stamp around the 
Arch window.


I put texture paste through the Artistic Stamper flourish stencil, I then
sprinkled a mix of pale blue and gold embossing powder and dried 
with a heat gun.


I used the Framelits die and glued this up the side after I had sprayed it with spiced
 marmalade and rusty hinge distress spray stains.


I wasn't keen on the colour although it did look like an old Gothic 
building I wanted it to look vibrant and highlight the swirl
texture.


I stamped the calligraphy mat 4 on distress treated paper which had
been swiped with old page and stained walnut.


I used the distress stain sprays to spray the entire piece to make it more vibrant.


I highlighted in area's with gilding wax. I applied a three
embellishments to look like old rusty bolts.


I must admit looking at it it reminds me of Rapunzel maybe the swirl is her hair
That's it for today as always let me know what you think remember look
at your stamps and see what other patterns they can create.
Cheers Dee x

Products used

  1. The following Artistic Stamper Stamps Architecture Plate, Caligraphy Mat 4 & Lace background stamp.
  2. Fresco finish paint  Chalk, Slate and Blue Oyster.
  3. Distress Stain Spray's in the following colours Rusty Hinge, spiced Marmalade & Salty Ocean.
  4. Grunge paste
  5. Texture paste
  6. Sizzix Thinlets mixed media die
  7. Embossing powders.


Saturday, 10 May 2014

How to write a letter...

Hello all, 
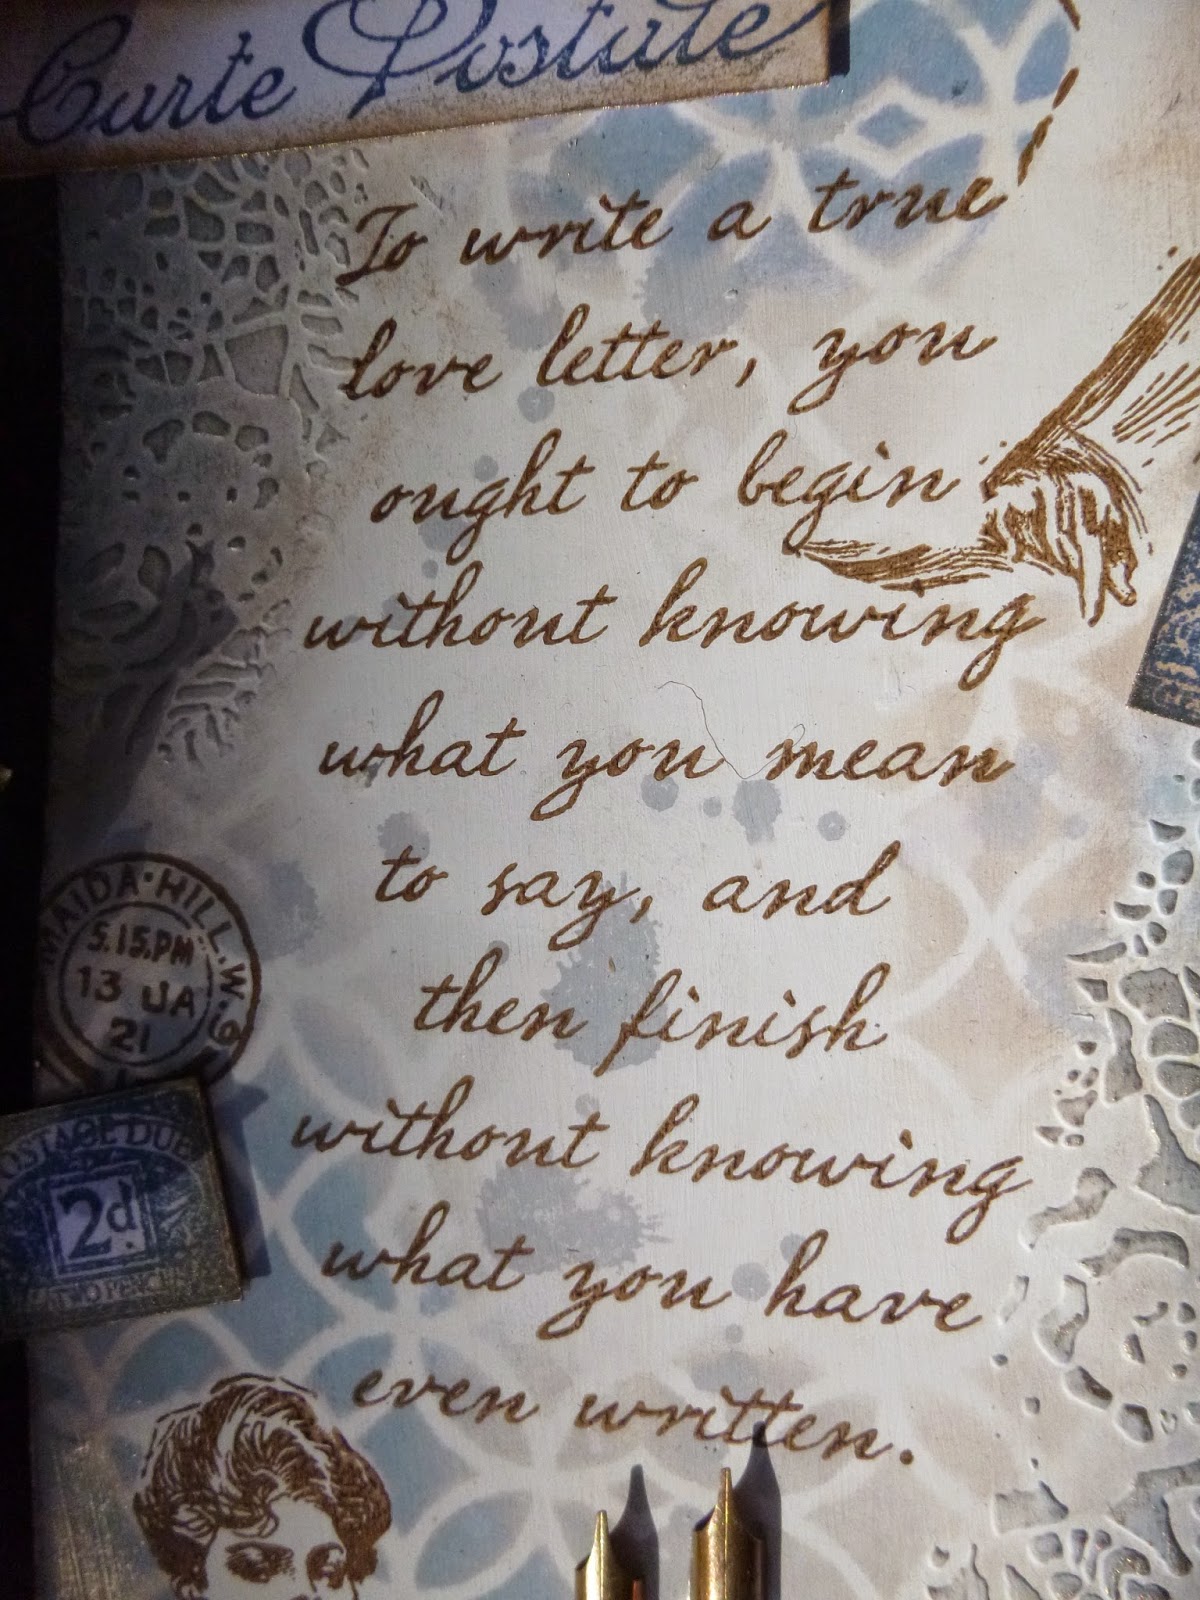
Alison (butterfly) here with a romantic tag for you.  I've loved the Jean-Jacques Rousseau quote about how to write a love letter for years, so I was delighted when it appeared amongst the new Tim Holtz releases.  And who else but the Gibson Girls could possibly fit so well with those words?!


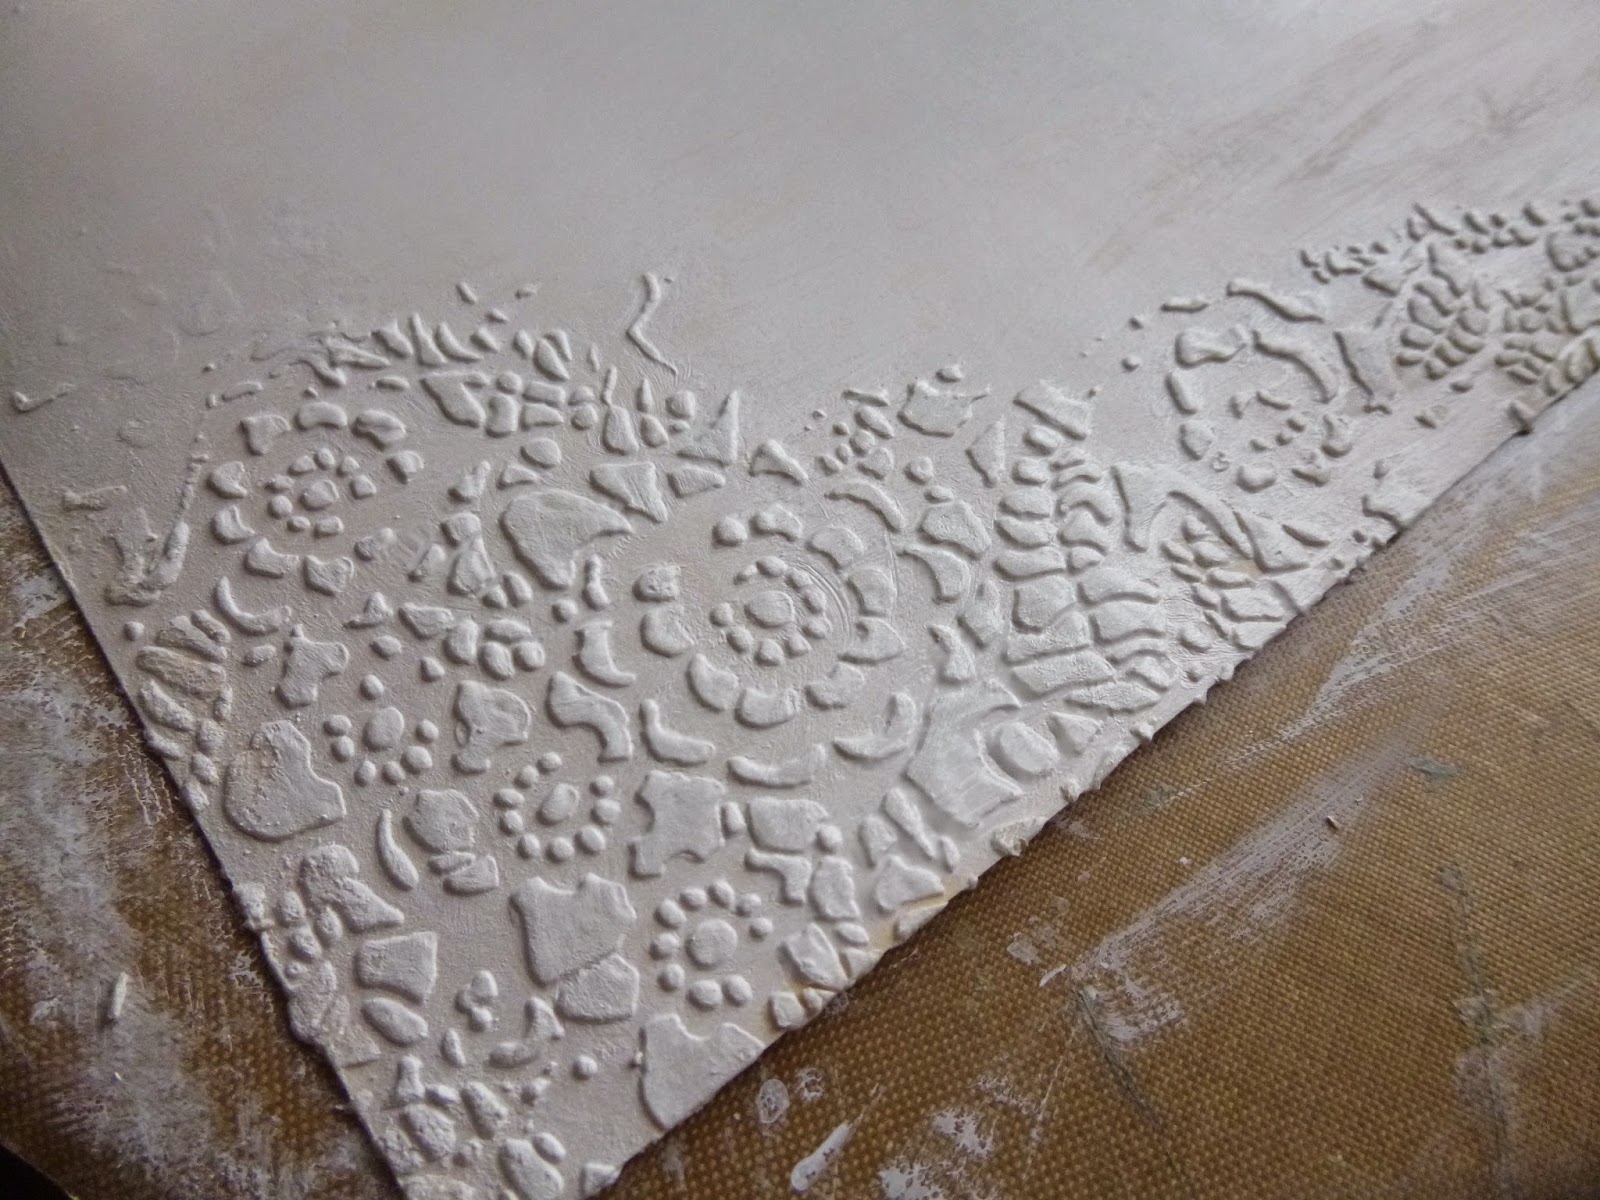
I started by adding Grunge Paste to a large tag through the Tim Holtz doily stencil.


Once that was dry, I painted over the whole tag and texture with gesso.


I hadn't at that point planned what I'd be stamping, so it was pure luck that the two women and the quote all fitted (just!) between the textured areas!


I have some Gibson Girls masks ready cut (from the very first time I used them) and stored with the stamp set so I grabbed those and my go-to stencil at the moment, the TH Latticework.  In the first image, she seems to be struggling slightly to free her mind to just write... maybe she's falling out of love?


I used Stormy Sky, Faded Jeans and Chipped Sapphire Distress Inks.  Because they're going over gesso, all the colours end up quite muted, but that was fine for me with this tag.  In this second image, I think she's just reading a love letter she's received, and is pausing to let the thoughts sink in... good or bad news?


I added postage accents using Carte Postale by Katy Leitch (formerly Katy Fox).  There are the stamps and postmarks...


... stamped in Cobalt Archival and mounted on padded tape.


And the lovely Carte Postale stamp itself...


... as well as these fabulous postal ephemera labels.


I altered an Idea-ology Muse Token with some paint and White Fire Treasure Gold.


And then there's the quote itself, in such delicate handwriting.


And I've got some blotches from Katy Leitch's Messy Art, stamped in Pumice Stone.  Ink blots, or perhaps tear drops?

There's a shimmer of White Fire across the doily texture and on the edges of all the embellishments.


I couldn't do a tag all about letter-writing without adding a couple of pen nibs, also gilded with the White Fire.


And the whole thing is topped off with some very feminine lacy ribbon tied with delicate twine.


I don't know.... I must have been having a girly day!


Thanks so much for stopping by.  Do come and play along with this month's challenge In the Garden.  We'd love to see you there.  Happy Crafting all!


Ingredients:
Artistic Stamper stamps:  The Gibson Girls Plate #1; Katy Leitch sets - Carte Postale, Messy Art
Stampers Anonymous stamps: Random Quotes
Distress Inks: Stormy Sky, Faded Jeans, Chipped Sapphire, Pumice Stone
Archival Inks: Coffee, Cobalt
Tim Holtz Layering Stencils: Doily
Idea-ology Muse Token
Grunge Paste
Gesso
Twine
Size #10 Manila Tag
From my stash: Treasure Gold, lacy ribbon