Showing posts with label Claudine Hellmuth Studio Paint. Show all posts

Saturday, 18 January 2014

Resolutions Tile by Alison (Craftytrog)

Hello Stampers!
I love playing around with my Gelli Plate, & thought it would be fun to try using it on a bisque tile for a change.
Here's what I came up with...
I like to use bubble wrap & interesting textured vegetable packaging to create patterns with the Gelli Plate, so I combined these with a few colours of Claudine Hellmuth Studio Paint. I did a few layers of printing, using only one colour at a time.
When the paint was dry, I stamped Neil Walker's Kiki, together with phrases from the Be Creative Plate. I used Jet Black Stazon ink for this, and added some ink to the edges of the tile also.
I finished off by sealing the tile with DecoArt triple thick brilliant gloss glaze. 
I hope that 2014 will be happy, creative & artful for you all!
Thanks for visiting,
Alison xxx

Friday, 24 May 2013

A place for keepsakes...

Hello everyone, Alison (butterfly) here again to share an altered box with you today.  I had a lovely time with this one, then hit a complete stall and then, with one risky piece of bold stamping, leapt over the block to end up with something which I really love!
It certainly started out somewhere completely different... as a cheapy gift box from Kik (sort of the Czech equivalent of Woolworths crossed with a pound store).  They were less than 50p each, and in a number of shapes and sizes, so I picked up quite a few.
I started with layers of paint, using a Claudine Hellmuth acrylic (Blank Canvas, so basically white!) for the first time - what great coverage!  I stuck ripped up pieces of Tim Holtz tissue wrap quite randomly onto the still wet paint and left the whole thing to dry.
Out with the Grunge Paste next... another first time for me, and I LOVE it!  I smeared on lots of lovely Harlequin diamonds - very happy with the ease of application (and the smell!).
Then some inking to start adding colour to the piece... layering up Faded Jeans, Chipped Sapphire, Frayed Burlap and Walnut Stain.
I used Cobalt Archival to stamp the delicious tiny polka dots as well as the butterfly from Katy Fox's Encyclopaedia Botanica set.
The little beetle is from the same set, and he's stamped in Coffee Archival, as is the tiny handwritten script from Katy's Carte Postale plate.
I used Distress Paints to alter some metal Idea-ology embellishments: one of the Bookplates, and some Foliage flowers and leaves.
The Chipped Sapphire paint has a slightly more purple-y hue than the ink, so I added some paint to the box edges too, so that the embellishments would tone in better with the whole piece.
The lovely Idea-ology word band added a much-needed horizontal element to the arrangement, but somehow I still wasn't happy with the whole thing.
It was all very pretty, but it was missing something.  I wish I had a photo of that stage to show you - as I think one could easily have stopped there... but I just couldn't quite leave it.  I tried adding some ribbon (various ribbons in fact)... no good.  And then, finally, taking a deep breath, I took the large, beautiful flower stamp from the Encyclopedia Botanica plate and stamped it right on the very top of the box.
Thankfully, it works beautifully (I think!)... a really bold statement against the delicate layers of the background.
Some old, discoloured tracing paper was the perfect colour to sit within the bookplate, and I used my Hero Arts letters to stamp the word k-e-e-p-s-a-k-e-s on it - making my altered box into somewhere precious to keep precious things.
Thank you so much for stopping by today.  I'd love to hear what you think... and don't forget there's still time to play along with our Words challenge here at The Artistic Stamper.  See you there!

Happy Crafting!
Alison x

Ingredients used:
Stamps: Artistic Stamper - Encyclopaedia BotanicaCarte PostaleDots
Distress Inks - Chipped Sapphire, Faded Jeans, Frayed Burlap, Walnut Stain
Distress Paints - Picket Fence, Chipped Sapphire
Claudine Hellmuth Studio Paints - Blank Canvas
PaperArtsy Grunge Paste
Crafter's Workshop stencil - Harlequin 6x6
Idea-ology Findings - Ornate Plates, Foliage, Word Bands
Idea-ology Fastenings - Long Fasteners
Ranger Archival Ink - Coffee, Cobalt
Idea-ology Tissue Wrap - Terminology

Thursday, 9 May 2013

A Dash of Fun by Alison (Craftytrog)

Hello Stampers! I have a colourful coaster to share with you today.


Before I share how I made this, let me show you what inspired it...


Yes, this gorgeous hairclip caught my eye in the local chemist the other day, it was only £1, so of course, I had to have it! Lol!

And, here's how I made my coaster...

Take the large tile from Tim Holtz's Clear Fragment Tiles, and cut a piece of white card slightly larger. 
Ink the card with Mowed Lawn Distress Ink, using a Blending Tool, flick water on the background, blot, and dry with a heat gun. Use the Mowed Lawn ink to stamp one of Neil Walker's Mini Backgrounds. Don't use a block, as this enables you to stamp just bits of the background randomly. Use Crushed Olive Distress Ink to stamp the script from Calligraphic Mat 11.

Water down some Claudine Hellmuth Dash of Red Studio Paint, then use a silicone pastry brush to flick the paint onto the green background. Dry with a heat gun, then stamp the flourish from Swirls, Splats & Dots A5 around the edge, with Jet Black Archival Ink.

Make another green background on a scrap of white card, omitting the script & red paint splatters. Stamp the phrase 'Into each day', with the Archival Ink, cut out, & edge with the watery red paint. Dry, then glue onto the green background. 

Attach the large Fragment Tile over the top using a thin line of Glossy Accents around the very edge. Trim the card around the coaster, then attach some sticky back cork to the base. I got a large roll of cork from a well-known high street art & bookshop ;-)

I hope this inspires you as much as that pretty hairclip inspired me!

Thanks for looking,
Alison xxx

Wednesday, 20 March 2013

My Journal by Craftytrog

Hello Stampers! We've had a few journal pages lately, so today I'm sharing how I decorated the cover of my very first journal, that I started at the beginning of the year. I was inspired by a gel medium resist technique that Dina Wakley shared in her book, Art Journal Freedom, which you can buy from The Artistic Stamper HERE.


To begin, I cut two pieces of Claudine Hellmuth sticky back canvas, to fit the front & back of my journal. I peeled off the backing paper, & stuck the canvas to a Craft Sheet, then used the gel medium resist technique from Dina's book, Art Journal Freedom, with one of  Andy Skinner's new stencils. When the Gel Medium was completely dry, I spritzed the canvas with water, before adding Dylusion Spray inks in London Blue, Calypso Teal & Squeezed Orange. Whilst the inks were still wet, I blotted them in my journal, to create a colourful background for a new page. I hate to waste good ink, & I love this background!


When the inks on the canvas were dry, I stamped the Ink Blot background, using Spiced Marmalade & Chipped Sapphire Distress Inks. I attached the canvas pieces to the front & back of my journal, then used my finger to smear black Studio Paint around the edges.
Next, I stamped Neil Walker's Kiki on some cream card, cut her out, & inked around the edges with Walnut Stain Distress Ink. I smooshed some Picked Raspberry Distress Ink on my Craft Sheet, & used a water brush to colour Kiki's lips & gloves.


Next, I stamped my book title on a small kraft luggage tag, using stamps from Scrabble & Tags, Journaling Words 4, & Katy Fox's Numerical Plate. I used the Picked Raspberry Distress Ink to add some colour, then inked the edges with Walnut Stain Distress Ink. I layered the tag over a torn piece of page from an old London A to Z, and attached both to the canvas background on the front of my journal. I then attached Kiki over-lapping the tag.


I randomly stamped the number column from Katy Fox's Numerical Plate with Walnut Stain Distress Ink, then I finished off my journal cover by adding some black & white Studio paint accents, using an old credit card & a couple of small lids.

Thanks for looking,
Alison xxx

Thursday, 20 December 2012

Merrie Xmas from Alison

Hello Stampers! It's my last post of the year, & I have a last minute Christmas card to share with you today.
I took a size 10 manila tag (8.5 x 4.125 inches), and ripped about 2.5 inches off the end.
I used a Ranger craft scraper to swipe sky blue Studio paint randomly on my tag, then spritzed some Dylusion inks, crushed grape & squeezed orange, through a couple of Crafter's Workshop stencils.
I stamped some script (Calligraphic Mat 11) with manganese blue Archival ink, & snowflakes (Christmas Greetings 2) with deep purple Archival, then edged the tag with the deep purple ink.
I stamped the little girl image from Victorian Christmas 1 on my tag, then on the leftover piece of my manila tag, I stamped the image again. I cut out the little girl & fireplace, then used the Dylusion Inks & a waterbrush to watercolour, before attaching it over the top of the image on the tag.
I coloured some white ribbon with the crushed grape Dylusion ink, tied it to the tag, added a couple of silver charms, then matted the tag on a kraft card to finish.
I'd like to thank everyone for the wonderful support & comments I have received over the year.
Wishing you all a magical Christmas & a very happy new year!
Alison xxx

Thursday, 20 September 2012

Bedtime Stories by Candlelight...by Emma


Hi everyone! It's already time for me to share my second piece of this month and for this piece, I've created this little candle, together with a candle holder for it to stand on. As always, I hope you like it...
To begin with, I stamped the Mabel Lucie Attwell, Time For Bed image onto tissue paper and coloured it with alcohol pens. I then cut around the outside of the image and positioned it onto my candle. Wrap a piece of waxed paper around the entire candle and then very carefully, using a heat gun, melt the tissue paper image into the wax. You will be able to see through the waxed paper as to when the image is entirely transferred to the candle.

Next, I took an old CD and coloured it with Sailboat Blue and Lettuce Alcohol Inks. I then took an empty ribbon spool that I had in my stash of "things that might come in useful to craft with ~ lol" and painted it using Claudine Hellmuth paints. I then applied a layer of Rock Candy Crackle Paint over the top and allowed to dry before blending Antique Linen over to accentuate the crackles.

Finally, I dyed some neutral seam binding using Tumbled Glass Distress Stain and tied it into bows, added it to my base together with a little banner that I made and stamped with the "Imagine" stamp.
Thanks for taking the time to come and have a look at my little creation and for all your lovely comments.

Hope you have a lovely creative day and see you soon.
Emma x

Sunday, 9 September 2012

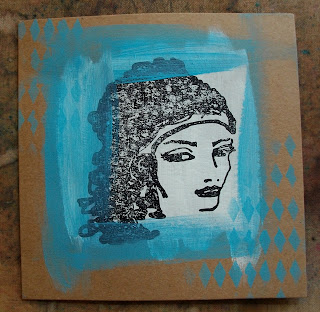
Those Who Wish To Sing by Alison

Hello Stampers. Today I have a card to share with you, featuring one of the new images by Donna Rodgers.


I started off by painting a patch of Blank Canvas Studio Paint onto a square kraft card.


Next, I stamped the image from Donna's Songbird 2 plate, using jet black Archival ink.
I painted a rough frame, using Sky Blue Studio Paint
I used the Dylusion diamond mask, to stencil in two corners with the blue Studio paint, then moved the mask a little & added Landscape Green over the top. (Oops, the green isn't shown on my next photo, I'm not very good at the step by steps yet! Lol!)


I stamped the phrase in the bottom right corner next, & a couple of the tiny background images.
I then painted the lady's hairband with the blue Studio paint, added some cream lace & part of an old necklace to finish.
Here's another look at the finished card...


Thanks for looking,
Alison xxx