Showing posts with label Distress Stain. Show all posts

Thursday, 13 August 2015

Youth is a Gift- Art Journal Page by Shilpa

Hello Everyone,
Shilpa here,
I've a face art journal page to share with you ..


I've used Artistic stamper 'Age' stamp, Gelli Plate, Small Tattered flower Sizzix die  and new distress ink colors.

I've created the background for this page with  Gelli Plate, here is small tutorial..


I took out Gel medium from the box with my palette knife on Gelli plate, as it is very sticky. Rolled it with my brayer.


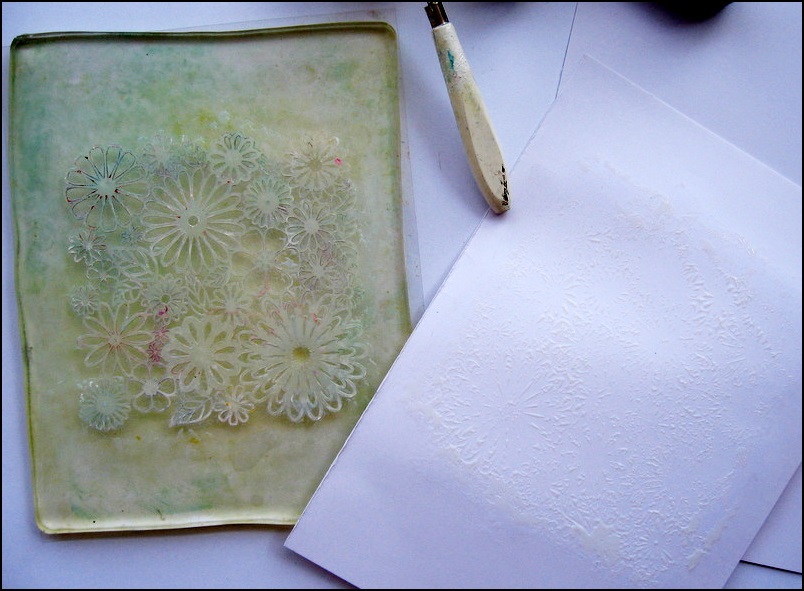
I kept flower stencil on it, on that paper and took the Gel Medium print.
You need to wash your stencil immediately or it will get spoil. Or keep them in water until you finish your project.


 I applied Mowed lawn distress stain with its dauber. Its very easy to color big surfaces with distress stains. I like to add Picket fence distress stain in my other color to get color variations on the surface.


I cut out my standard size (6*6) for face journal page from that Gelli print . 


In this closeup view, you will find texture stamping and stenciling with Hickory smoke and Mermaid Lagoon distress inks.


And these cute little flowers are made with Sizzix Tiny Tattered flowers. If you are interested to how I made them...here is the link to Anna Karin's Video tutorial.


I stamped face with Wendy Vecchi Forget me not Archival ink.
Finally I adhered them all together on my small page.
hope you liked my today's project.
For more art journal pages... pls visit my blog Neon Diary.

Thanks so much for stopping by.


Wednesday, 13 May 2015

Butterfly Hanging

Hello Everyone,
Shilpa  here,
I've small,easy and cute project to share with you today. 


This can be a wall/door hanging which I made with Artistic stamper Neil walker butterfly stamp.

Here is the step by step process:
1. Cut out the Ornamental shape/ any desired shape out of chipboard and watercolor paper. Attach them together.
2. Through any design stencil apply Picket fence distress paint. Let it dry completely.
3. On craft Mat apply Spun sugar, Tumbled glass and  shabby shutters distress stains, spritzed water and smoosh  our base paper into that. It will bring beautiful pastel colors and resist picket fence distress paint.
4. Apply Tumbled glass distress ink at all edges.
5. On Ranger stamping paper stamp butterfly with Archival Forget Me not ink, fussy cut it and stick on the background.
6. Add flowers and all other embellishments.

Hope you liked it, 
Thanks so much for stopping by.

Products used from Artistic stamper:


Monday, 4 May 2015

Time Birdz

Hi everyone I have for you today Neil Walkers Birdz stamp Steampunked up. 
I started with an old page from a book unfortunately it is a medical
journal (so some of the text is a bit weird).


I started by stamping the birdz stamp onto the page and the clock at the bottom.
Next I painted the inside of the bird and the clock's with 
cream/buff acrylic paint. 


I then touched up the base of the beak with Quinacridone Gold and a bit of grey/blue
on the top of the head and wing. I then did a wash around the entire image 
with the blue/grey.


I then followed up with a wash of very diluted Prussian blue. For the base of the main clock I used a
 technique that was used by Jennie Atkinson on this blog back in 
may 2012 click here to go to it > Time Flies . 


I assembled it all together gave a final wash of really watered down red/brown
a coat of matt varnish to seal it all.


Around the edges I used the blending technique of a craft mat with
Vintage photo and Walnut stain.


A close up of the clocks the lower one was stamped onto grunge paper
I would use card/grey board next time as I found 
grunge paper buckles.


I added a fuse and four bolts plus the clock die cut this was painted with
burnt umber then while wet sprinkled with UTEE then heat set. 
Final touch a bit of gilding wax.
Products Used
  1. The following Artistic stamper stamps Neil Walker Birdz, Tick Tock plate.
  2. Distress inks Vintage photo & Walnut Stain.
  3. Distress stain spray in wild honey
  4. UTEE
  5. Deco Art Media fluid acrylic Titan Buff, Prussian Blue, Quinacridone Gold, Burnt umber & Paynes grey.
  6. Gilding wax.

That's it for today folks! let me know what you think.
Cheers Dee x

Saturday, 4 April 2015

A Vintage Motor

Hi everyone hope you are all well!  & enjoying the Easter weekend. 
I have a vintage piece for you today. 


I started with swiping distress paint vintage photo, gathered twigs 
& walnut stain onto a craft mat and sprayed with
water from a mini mister.


I swiped my card through and paint and sprayed with the mini mister as I dried
it so the paints blended together. I sealed it all with a matt 
medium.


I inked up the Debbie Cotton car stamp Earls Automotive with 
Black onyx versafine & clear embossed it. Next I painted 
the entire card bar the car with cream acrylic paint.


I used blended distress inks in the following colours vintage photo,
walnut stain & scattered straw to colour spare card stock. 


Onto this I stamped images from the following stamps winged wheel &
 numerical plate. The numbers were stamped in 
archival ink cornflower blue.


The clock was an old one I had done previously from the 
Time & keys plate that had been covered in glossy 
accents and a curtain ring was attached.


I used ripped pages & glued them to the main image. I used two die cuts
which I stamped with the ruler stamp of the Empemera plate 
and I used this to frame the project.


I backed it all onto ripped cardboard that I had swiped walnut stain
paint. Please let me know what you think.
Cheers Dee x

Products used
  1. Distress paints Walnut Stain, Gathered Twigs & Vintage Photo
  2. Distress ink in Scattered Straw, Vintage Photo & Walnut Stain.
  3. Inks:- Black Oynx Versafine, Cornflower Blue & Black Archival.
  4. Artistic Stamper Stamps:- Debbie Cottons Earls Automotive, Numerical plate, winged wheel, ephemera & time & Keys.
  5. Rangers Glossy Accents.