Monday, 10 June 2013

Inevitable Dusk

Hello all.  Alison (butterfly) here, with something that - for me - is a little different.  In fact, when I saw the new texture stamps, I wasn't sure that they were for me - very geometric - but I thought I should stretch myself.

I'm not entirely sure about the end result but, I have to say, I had huge fun layering them up to create the background textures in these pages.  You'll find all the ingredients at the foot of the post.  (Don't forget you can click the pictures for a larger view.)


There are some things I'm really pleased with about this, and some that I might do differently another time...  I really like the texture on the main brother and sister image.  


I mixed some drops of Chipped Sapphire and Salty Ocean re-inkers into texture paste on my craft mat, and then smeared it through Andy Skinner's brilliant Children mask.  I'm also really pleased with the highlighting, done with white acrylic paint, and some pencilling.  And I made sure to give them some solid "ground" to stand on.


I started out by gessoing some pages in my Concise Encyclopaedia (same book as my previous layout) and used Dylusions sprays to lay down the first layer of colour.


I started to layer in the texture stamps using Archival inks, Distress Inks, Distress Paints and Picket Fence Distress Stain.


It was at this point that I forgot to take any more process photos - sorry! - but I'm really pleased with the effects of layering the products.  


You get some resist effects from the paints, so there are areas of translucence and great textures.  


Obviously there's some inking for definition of the resist and shading at the edges of the pages, as well as to create the twilight path for the siblings.  The quote is by Susan Scarf Merrell.  


It's stamped onto watercolour paper and inked with Chipped Sapphire.  


Certain words got a touch of Salty Ocean too to highlight them. 


As with some of the background chevrons, I used a white pencil to add some texture and help embed the words into the page.  


I'm also really happy with the twilit path leading to the smaller sibling pair, travelling off to who-knows-where... 


... though I'm not sure I didn't go a layer too far with the pair themselves.  I liked them better one step earlier - but I haven't got a photo of that, so you'll just never know!


So there you have it... To me it feels as though it has a different flavour from normal, but I don't know.  Is it typically "butterfly" after all?  I'm curious to know what you think!


Don't forget that the June challenge - Makes for Men - is up and running... why not come and play along?  Thanks so much for taking the time to stop by, and I'll see you soon.

Ingredients used:
Artistic Stamper stamps: 
Andy Skinner's Children mask set
Dylusions Sprays - Dirty Martini, Cut Grass, Fresh Lime, Pure Sunshine
Distress Inks - Chipped Sapphire, Broken China, Peeled Paint
Distress Re-inkers - Chipped Sapphire, Salty Ocean
Distress Paints - Picket Fence, Peeled Paint, Broken China
Distress Stains - Picket Fence
Archival Ink - Olive, Cobalt
White pencil and alphabet stamps from my stash

Sunday, 9 June 2013

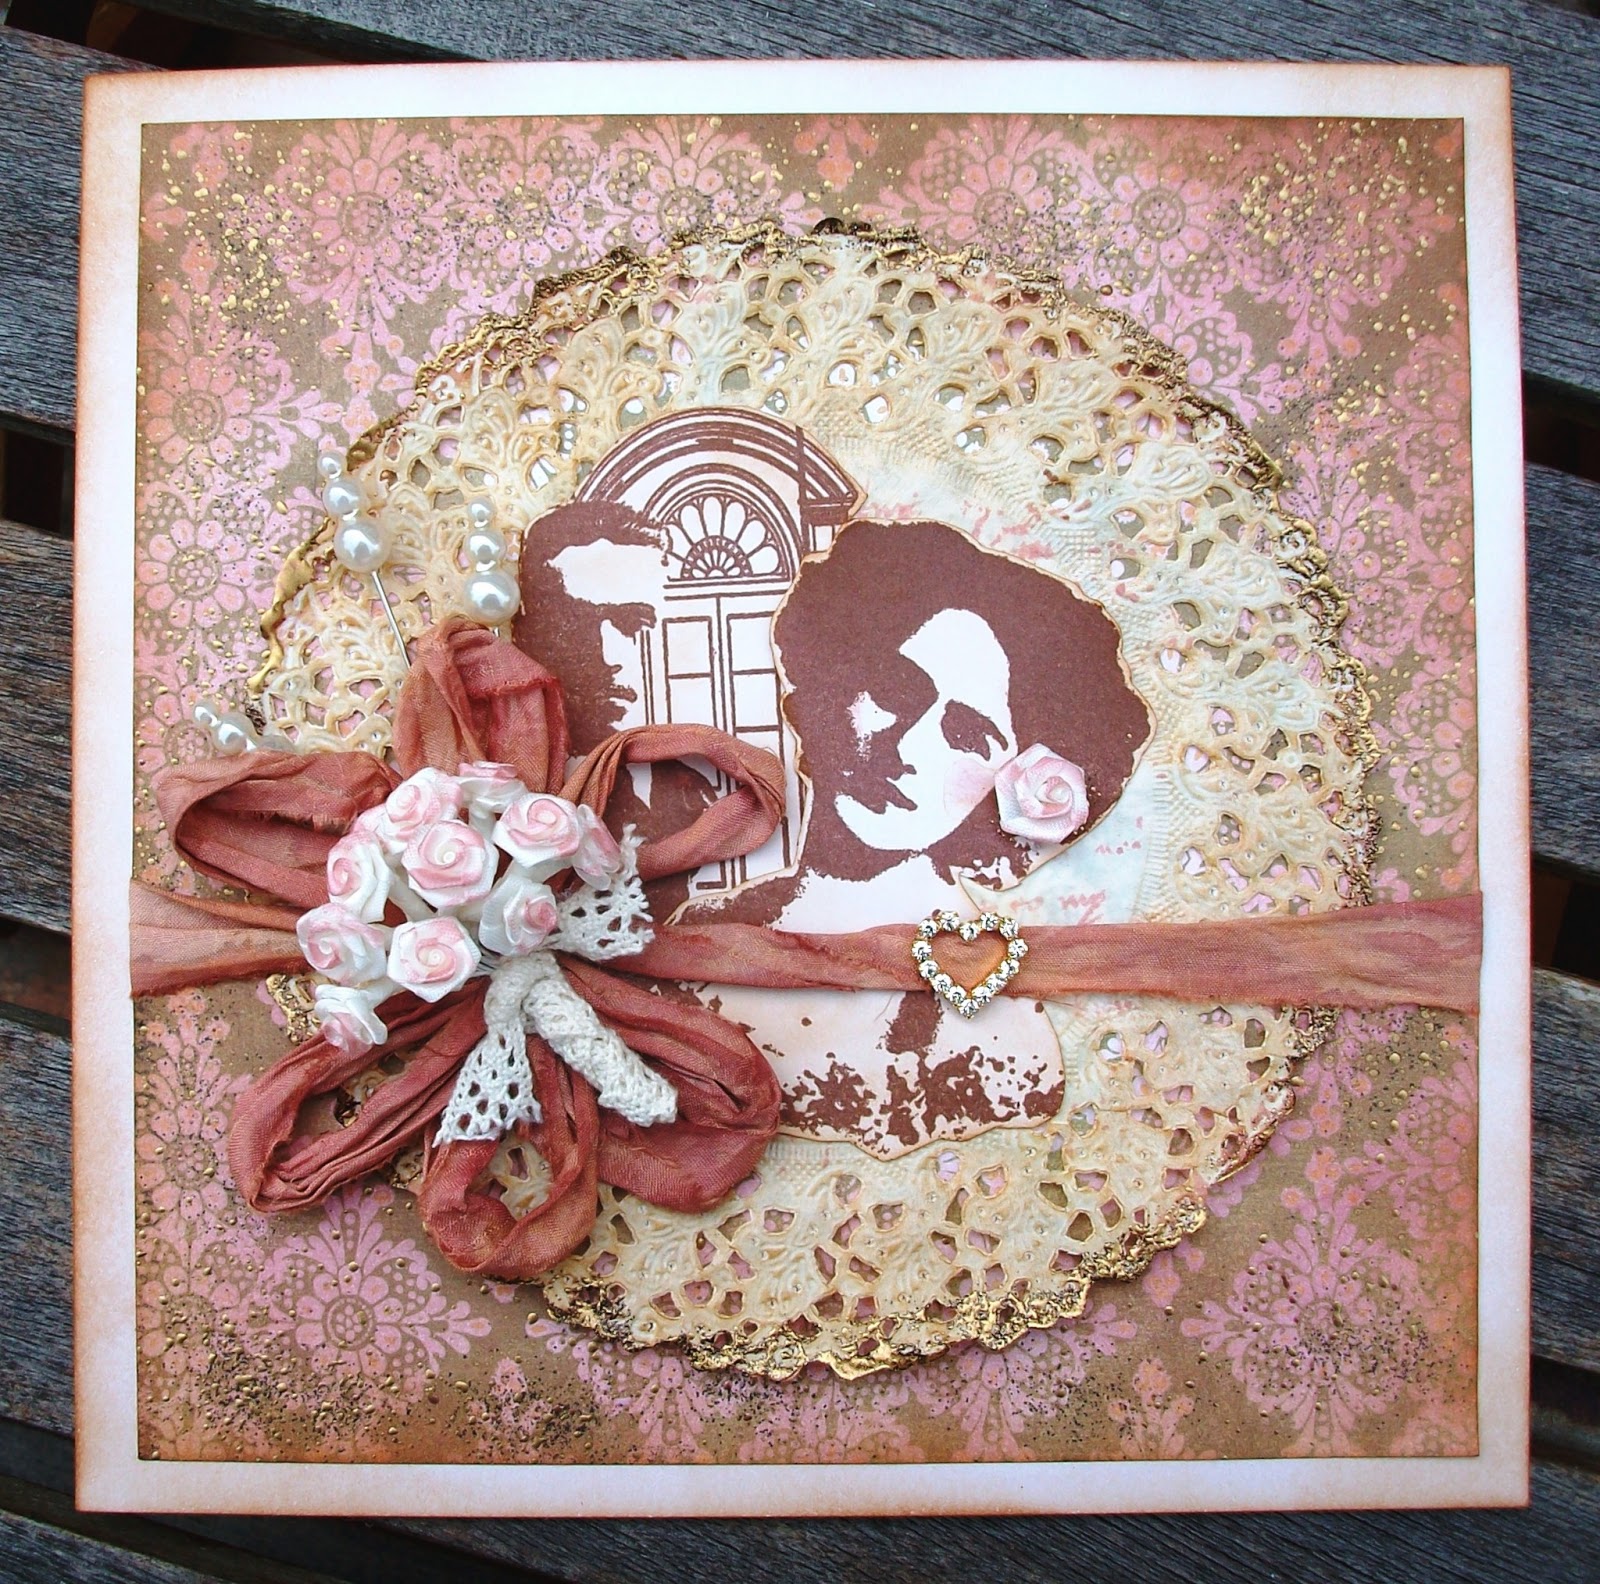
June Wedding by Alison (Craftytrog)

Hello Stampers! It's Craftytrog here! As the wedding season is upon us, I thought I would share a vintage style wedding card with you today. 


Here's how I made my card...

Stamp the man & woman from Collage Art 1 with Coffee Archival Ink, cut around the images, & ink them with Vintage Photo Distress Ink (DI). Add a little Victorian Velvet DI to the woman's cheeks.
Ink a paper doily with Vintage Photo DI, stamp some Script (Calligraphic Mat 15) in the centre with Victorian Velvet DI, then use gold embossing powder to emboss the edges.
Ink a square piece of patterned paper with Victorian Velvet DI, then add some Vintage Photo DI to the edges. Sprinkle some Gold Embossing Powder around the edges, & use a heat gun to melt it.
Use Victorian Velvet Distress Stain (DS) to colour some ribbon. I used plain sari ribbon, but you could also use seam binding. Make a flower by wrapping the ribbon around your four fingers in a figure of 8 three times, then tying it in the middle.


Assemble the patterned paper, doily & stamped images as shown, then glue the ribbon flower across the front, adding three pearl pins & a heart ribbon slide. Glue the ribbon ends behind the patterned paper.
Ink the edges of an 8x8 inch square card with Vintage Photo DI, then attach the assembled artwork to it.
Ink a posy of white paper flowers with Victorian Velvet DS, wrap it with some lace, then use a glue gun to attach it to the centre of the ribbon flower.
To finish, add an inked paper flower to the lady's hair.

I'll see you later in the month, with my second piece of art,
thanks for looking,
Alison xxx

Saturday, 8 June 2013

A card by Titbelsoeur

Hi there, c'est Titbelsoeur qui vous parle !

I have sprayed Distress and Dylusion inks through various stencils to make a colored background, and stamped chicken wire and polka dots
On a blank watercolor paper, I have stamped Encyclopaedia Botanica flower, butterflies and fig. codes, cut them out and glued them on the background. Added some watercolor here and there.

And here it is :


I had a good time making this card for you, and I hope you like it,

Thanks for stopping by, I am really looking forward to reading your comments !

A tout bientôt !


Wednesday, 5 June 2013

Time Card by Sioux Jenneys

Wow! Time flies when you are having fun!! :)

It has soon come round to my turn again and I'm here to share a card with you...
...it uses very little masking too :)


1. Cut a piece of card slightly smaller than your card base and stamp the crown from Crowning Glory in Archival crimson and mask it...
...then stamp the watch face from Time and Keys in Archival black on top and mask this.

2. Stamp the Mountain background on one half in Distress scattered straw... ...mask the edge at the middle with a scrap piece of paper and stamp the Europe Map background on the other half in Distress bundled sage.

3. Stamp the sentiment "There's no time like the present" from Time and Keys in Archival sepia all around the edges.

5. Scuff up the edges and age with Distress Ink wild honey and a touch of walnut stain. Attach to the card base.


Happy to have made that :) See you again soon!

xoxo Sioux

Tuesday, 4 June 2013

Winner of May's Challenge

Hi! Jennie here again with the winner of last months challenge which was Words. We loved all of the creations and it seems you liked the challenge too, as we had masses of entries. Thank you to everyone who joined in. It is always hard to choose just one, so I set Mr Random.org to work, and he picked no 39! Congratulations to

 
with this stunning creation


Please email me so we can arrange your prize.
This months challenge is Makes for Men, and that is definitely a challenge! We would love to see your creative talents , so please do enter, you never know you may win £15.00 worth of The Artistic Stamper Stamps!

Have a very creative day
Jennie


Sunday, 2 June 2013

Up Up & Away! By Anita Houston

Hello Stampers! I'm Anita Houston, of The Artful Maven. WOW! WOW! WOW! I am thrilled and honored to be the Guest Designer here for the month of June, and it was pure JOY to use these exceptional quality stamps for my three projects! Thank you so much for asking me over Jennie!
Since I had so many wonderful images to work with, I thought it best to do a larger project, so a canvas fit the bill. 
I had a lot of fun making this 8x10 inch whimsical steampunkish canvas. The eight different stamp sets I used from The Artistic Stamper made it super easy.
I stamped the clock face from the Tick Tock set in Ranger's Jet Black Archival and heat embossed it with Clear Embossing Powder. I also heat embossed the Mountain Background after I stamped it with Ranger's Sepia Archival.
I wanted to add some wind to the scene, so I used the swirls from the Tick Tock set and stamped them using Picket Fence Distress Paint.
Dylusions Ink Sprays gave the canvas it's color, and I strategically covered up the spots I wanted to be certain colors so there wouldn't be a lot of blending going on. The Distress Paint and Embossing acted as a resist for the Dylusions, so those parts were not colored.
I had some scrap Metal Foil Tape already adhered to paper lying around, so I used this to stamp the next three images. I stamped the curvy diamond border from the Borders A5 set using Bronze Distress Paint, the key from the Time & Keys set using Jet Black, and the speedometer from the Slow & Fast plate using both the Bronze and Jet Black, which gave this a very dimensional feel.
This little guy was so fun to stamp and emboss. He is from the  Goose & Grease plate.
I used several Distress Paints to color in the Professor, and some Idea-ology bits and a little Glossy Accents to finish out the speedometer.
Using the Sizzix Picture Wheel and Mini Mustache, I die cut some kraft and cardstock to construct the balloon. I coated it with Rock Candy Crackle, added the numbers, inked it, and then added the speedometer, and finally connected it to the now make shift basket with the Professor.  More Idea-ology metal was added, and finally I stamped the sentiment in Jet Black using the Journaling Words 2 and Journaling Words 3 sets.
 
 
Thank you for looking. I shall be back in a few weeks with project #2.

Saturday, 1 June 2013

June Challenge ~ Makes For Men


Hi everyone, and welcome to a new month and a new challenge here on The Artistic Stamper Creative Team blog.

As you all know, during May we had the pleasure of having the lovely Georgina Sweetenham join us as our Guest Designer and on behalf of the team, Jennie and I would like to say a big thank you to Georgina, for all her hard work and for the beautiful cards that she made and shared with us all.

This month, I am so very excited to let you all know that we have the very talented Anita Houston joining us here on the blog and I'm sure you're all looking forward to and can't wait to see Anita's first post, tomorrow.

Before I introduce this month's new challenge, I just wanted to say a huge thank you for all your wonderful entries in our Word Challenge during May. We had so many fabulous creative pieces from you all and it's been such a pleasure seeing them. We will be announcing one very lucky winner in the next few days, so make sure you check back to see if it's you!!

The new challenge for June is all about MAKES FOR MEN. Whether it be your Father's Day projects or something you've created for the special man in your life, the whole team are all looking forward to seeing all the wonderful and varied creations that you submit. To join in with this challenge (and you can join in as many times as you want), is simple; all we would like you to do is, make a piece of artwork, making sure that you include the theme and some rubberstamping. Pop back here to link up using the Froggy at the bottom of this post, so that we can see what you've made and then, leave us a comment to let us know you have joined in with the challenge. As always, there will be candy for one randomly picked entrant - the winner will receive £15 worth of The Artistic Stamper stamps of your choice plus the Kling On to mount them onto. And don't forget....if you use Artistic Stamper stamps on your entry, you will entered into the draw, twice!!!!

If you do need any inspiration to get you started with this challenge, then look no further than below to see our Creative Team's stunning creations.


Sioux used stamps Franswar, the new background stamps "marbled 2" and random background" along with the wording "special delivery" and the crown from "Crowning Glory". Adding some Sizzix die letters to create a card.

 
I made a small Papier Mache hanging that I thought would be perfect for the man in your life :). I painted the whole piece in white Distress paint, and when dry stamped one of the Nudes in Black Distress paint. On the white part of her I used some of Tim Holtz's Remnant Rub Words, making sure I didn't go over the black paint. I also added a couple of words down the side of the hanging to finish it off.


ASTRID

I made a little caddy as a desk tidy for my husband. It is just the perfect size to hold the little envelopes he uses. The caddy was cut from grey board and painted with Distress Paint in Walnut Stain. When dry I stamped all over it with the new Marbled 2 background stamp in Memento Rich Cocoa to give it a sort of wood effect. Next I stamped the gentlemen of the Tim Holtz Warehouse Direct set on a piece of card, coloured it lightly with some Vintage Photo Distress Ink and glued it to the front with a few strips of old book paper. A crackled heart with some rusty wire at the top finished it all off.


We really hope you will join in with this month's challenge and we're so looking forward to seeing your interpretation of our theme and all your amazing creations and artwork. Please, don't forget to add a comment when you post your entry.

I hope you all have a happy and very creative month.
See you soon...
Emma x