Showing posts with label Gibson Girls Plate 1. Show all posts

Monday, 10 October 2016

Patterned ATC's by Debs

Hi everyone


For a complete change today i decided to make some ATC's

Using some watercolour paper and some PaperArtsy Infusions in Violet Storms, Blackcurrant and a Little bit Jaded.  Sprinkled the infusions on the paper and then spritzed with Water.  Dried it all off with a heat gun and then added some stamping 


I used Punk Plaid, Dots, Sequin Waste and calligraphy mat 11 using Potting Soil Archival Ink


I then cut it into ATC's and then used a different stamp on each one


Butterfly from Butterflies 2 with Seize the moment from Journaling words 3


If you would like one of these ATC's just let me know what you think and comment which one you would like.  I will allocate ATC's on a first come first served basis.
Have fun and i look forward to seeing your entries into the pattern challenge.   

Sunday, 10 July 2016

All Things Bright......... And Beautiful Card by Debs

Hi All

Here is my latest creation for this months challenge, I had a bit of fun with this one.  Thought i would put a slightly different take on the theme.


The background is nice and bright and then the subtle black and white of the Gibson Girl stamp from the Gibson Girls plate 1 represents the beautiful.

I covered a sheet of patterned paper with gesso covering pretty much the whole sheet (a great way to use up paper scraps or pages that you don't use for other things.

Then i scribbled some distress crayons over the gesso (they work best over gesso, as they move more freely)  Then i added a tiny a bit of water using my finger and blended the colours together.  Then once happy out came the stencils i used chevrons, random dots and honeycomb and the dylusions paints and with a sponge added stencilling over the top

It doesn't look great here but the more you add the better it looks

I used crushed grape and vibrant turquoise Dyslusion Paint, applying it through the stencil with a sponge  this way you don't get big blobs of paint  I did the same with a smaller piece of card for the backing of the embellished image

Added some white pen to make it all pop, wrapped some fibres around the piece of paper and using foam tape stuck the background to a card and then mounted a piece of black card the extra coloured piece and the stamped image onto the top.

I hope this has given you some inspiration and i shall look forward to seeing your projects added to the blog and Facebook as you do them.

Happy crafting
 Debs


Friday, 10 July 2015

Make me live tag by Debs

Hi All

I had a bit of fun with sprays and stencils on this tag.


I started with a large craft tag and covered it with gesso

Then out came the ink sprays, I used Dylusions and Distress ink sprays and stencils.  I started by putting a layer of just ink down, waited for that to dry off and then sprayed more ink through stencils until I was happy with the background.  Whilst I waited for it all to dry I stamped one of the Gibson girls onto plain white card with brown archival and coloured her in with distress markers.


Once the ink was dry, I then stamped the swirly stamp from the Decay Journaling stamp set in Peacock Feathers and Salty Ocean, after these were dry i also did a couple in Archival black.  The words were stamped as a block onto white card with Archival and then cut out the words that I wanted.  I used grunge paste with the swirls and splodges stencil, one of the nice things about grunge paste is its ability to soak up the ink that is underneath it, meaning in. This instance I didn't need to colour it.  I made a large paper flower with a die, some book pages and stuck a wooden bead in the middle.  Then re-arranged the words and stuck them down.

Hope you are all enjoying this months challenge.  See you all soon

Debs

Products used

Artistic stamper Masks


Monday, 13 April 2015

Altered Matchbox with Gibson Girl

Hello Everyone,
Shilpa here,

Instead of my regular mixed media canvas, I decided to make 3D project with fabulous Artistic stamper stamps....and came up with this cute little Matchbox. 


I've decorated it with Gibson girl stamp image and other Artistic stamper stamps.

Here is step by step...


I created matchbox with Graphic 45 Typography/ Bohemian Bazar papers. Applied Vintage photo distress inks at the edges.


For top layer, I applied rusty hinge, walnut stain, peeled paint  distress stains on craft mat and  smooshed manila ATC paper into that. Dried it completely with Ranger heat tool.


I stamped flowers, text and envelope image with Artistic stamper stamps and Coffee Archival ink. And further started decorating it.


I stamped Gibson girl image on Ranger specialty stamping paper with Jet black Ranger archival ink and colored it with distress inks. I fussy cut the image. The Art tag behind her is from Graphic 45 Typography collection.
I added handmade flowers and mica flakes. And attached the whole panel onto the match box.

Hope you liked my creation and inspired to make your own. When you add small jewelry in it, that will be a  perfect gift for a friend!

supplies used:


Friday, 10 October 2014

Layered Journal cover

Hello Everyone,
Shilpa here,
I got plain Art Journal for myself recently. And when I decided to make cover for that, I  could not think other than my lovely Artistic Stamper stamps. And I used many to create this Vintage Journal cover.


I started with stamping some images


I've used Gibson girl plate # 1stamp, Waches, large Butterfly stamp from Insects and Butterfly N0 1 , my favourite small bird from Birds of Feather set,
I stamped them with black and Coffee Ranger Archival Inks.


I took design paper from Prima Vintage Journey paper pad. Applied gesso and dried it with heat tool. With crafters workshop stencil and Clear Crackle embossing paste I created texture. If you click on this photo you can see beautiful crackles. Then, I spritzed Lindy's stamp gang inks in various blue, red and brown colors, created some drips. They made beautiful layers.


Here also you will see the background texture and layers.


Next on the base I created layers with stamped images, design papers from Graphic 45 couture pad, diecut doily, Tag. I gave these paper vintage look with spraying inks and applying Distress inks - Vintage photo, Broken China, Walnut stain. I distresses edges with Tim Holtz Paper Distresser.


Here you will see cute lil' birdie, vintage charm, wooden button and  flowers as my embellishments.


I am totally in love with these Gibson Girls stamp set. Images are lovely and we can add them on any project. I adhered the stamped image of this girl on diecut frame, which I distressed before with broken china distress ink. Other than flowers, you will see Prima jute trim which is perfected suited here. And colored butterfly is perfect fit in the corner, it has beautiful design on it.


In the middle, I've created tile with floral stamp. I colored it again with distress inks - Peeled paint and Broken china, vintage photo.


And this is the final look of my Journal cover. Do you like it? Let me know in your comments.
The theme of this Month's challenge at Artistic Stamper is 'Memories'. Use your favourite Rubber stamps and Distress Inks to create something beautiful from your memories. 
Thanks so much for your visit today.
Supplies Used:
Artistic Stamper Stamps: 
  Gibson girl plate # 1stamp Waches,  Insects and Butterfly N0 ,  Birds of Feather set,


Tuesday, 8 October 2013

Vintage canvas by Titbelsoeur

Salut les Patouilleuses, c'est Titbelsoeur qui vous parle !

I do not often make canvas like the one I am showing you today... I tried to get out of my comfort zone with colors and style I am not used to... YOU will tell me whether it was a good idea !
I am sorry I forgot to take step by step pictures, I always start taking some, then I add this and that, and at the end I realize I have not taken other pics ! 
Anyway, I will try to explain a bit the way I made it, not really difficult actually...

I first glued some thin tissue on the canvas to make texture, gessoed it and added some paint with my fingers. I darkened a book page I had first folded here and there and wiped my gessoed fingers on to, with Vintage photo Distress ink on a piece of cut n'dry (not sure my explanation is really clear ?).


From the  A Stitch in Time plate, I stamped the thread card on kraft paper and the tape measure on drawing paper :


And this Gibson Girl I love so much on drawing paper as well, edges distressed :


I then glued lace, buttons and flowers among other stuff, and tadaaaaam, here it is :


Sooo boyz'n'gals, I hope you like my canvas,

thanks for stopping by, 

I am looking forward to reading your comments! 

A la prochaine !


Tuesday, 13 August 2013

Enjoy the Journey Shabby Chic style...

Hello everyone and thank you for dropping by  today. Astrid here with a little Shabby Chic wall plaque:
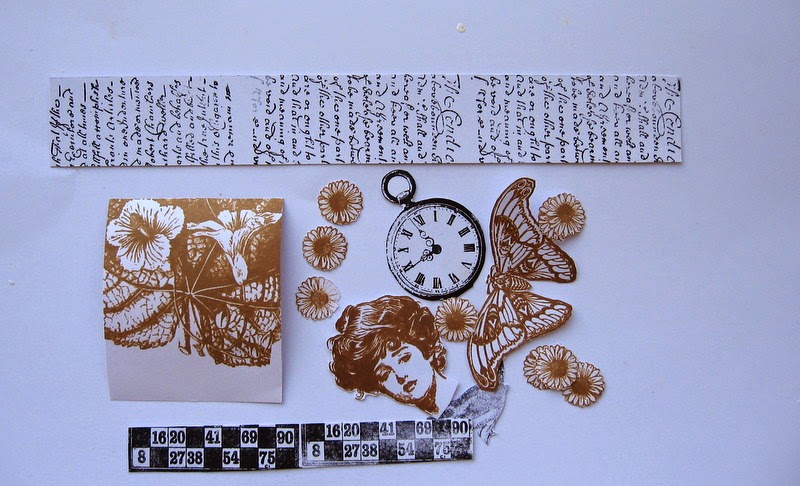
These are the stamps and products I used:
Gibson Girls Plate 1
Calligraphic Mat 12
Labels
Tim Holtz Simple Sayings
Distress Inks in Vintage Linen, Victorian Velvet, Tattered Rose,Weathered Wood, Frayed Burlap
Archival Ink Jet Black
Tim Holtz Rock Candy Crackle Paint
Distress Stain in Vintage Photo
And from my stash:
Tim Holtz Baroque Die
Distressed Doily Die
Spellbinders Flower dies
Some Lace
Perfect Pearl pen
Mount board
Titan Buff Acrylic Paint
Treasure Gold in White Fire
Scrapbook papers (Prima)
Grey Charcoal pencil
Sewing machine

I started by cutting a Baroque frame out of mount board ( I bought a huge bag of off cuts from my local frame shop for £5 but have heard some frame shops even give it away for free, well worth checking out) I cut the baroque label die once more out of paper and inked it with my chosen Distress colours. I then stamped some of the labels of the labels set in Weathered Wood to add some more interest to the background.painted the frame with Titan Buff paint and when dry covered it in a fairly thin layer of Rock Candy Crackle paint. I dried it with my heat gun to make it bubble a bit. When it had dried and crackled I swiped the Distress Stain over it (Like Tim describes in his July Tag) and then rubbed some Treasure Gold over the raised bits .
Next I stamped one of the ladies from the Gibson Girls set and paper pieced her by stamping once on smooth card and once on a scrap of Prima paper. I cut them out, coloured her body with tattered Rose,  pieced them together and then adhered them to my baroque label. I drew a little bit of a grey shadow around her for extra depth. The baroque label seems to be made to fit this lady just inside it...
I gave the lady a little necklace by adding a pearl with my pearl pen and drew the little chain.
Next came the background, I cut another bit of 6 x 6" scrapbook paper in matching colours, inked around the edges with Weathered Wood and stamped some more of the labels and the Calligraphic Mat 12 all in Weathered Wood. Then I sewed around the edges and distressed them.
Next I created some ephemera to tuck behind the frame. I stamped some labels again in Weathered Wood on bits of  paper, coloured them with Antique Linen, Weathered Wood and Brushed Corduroy, distressed and crumpled them to make them look old and tucked them in behind the frame.
Next I glued some lace around my backing paper, cut a distressed doily out of white card, glued it on top and then the frame and ephemera on top of that.
The final step was to embellish with some home made flowers and leaves I still had lying around from a previous project, and then mounted all of that on a piece of 8 x 8" mount board.
One of the Tim Holtz simple saying mounted on a small strip of mount board finished it all off.
Well, there you have it. In my mind I can think of all sorts of stories about this lady and why she is kneeling there like this, but this post has become long enough as it is already.....

Hope you like my wall plaque, thank you for visiting and I hope you are having a creative week!