Showing posts with label Splats & Swirl mask. Show all posts

Monday, 4 February 2019

I'm lovesick for you!!!

Hi Guys, Jane here, it's my turn to do a bit of inspiration, and with Valentines Day just around the corner, I thought I would crack on with mine...even tho my idea went a little on a tangent, I have to say that I wont be sending my partner this card!!!!..he is the sentimental, mushy, long meaningful verses type of guy, bless him!!...the exact opposite of me!!!


Soooo, this card was pretty quick and easy to do, a piece of craft card, scrubbed a bit of gesso on, then stencilled using the SMALL DOTS mask, then using one of the splats from the SPLATS AND SWIRLS mask, I used a mixture of texture paste and paint to try mimic a puddle of sick.....then added a die cut heart on the top, and voila!!...not the mushiest of valentines cards, but it made me giggle!!
Hope you can join in with this months challenge, which is "Heart It"


Tuesday, 22 March 2016

Kiki By Dee

Hi everyone I hope you are all well and being very crafty.
I have a variant on KiKi for you this month
I hope you all like it.
I started by using distress ink off my craft matt then splashed 
water droplets over it.
Once happy with the results I then took the Neil Walker 
Alphabet soup stamp and stamped it randomly
over the card and clear embossed it.
Nect I used the splats mask and used black modelling paste
through the circle images and dried.
I then took a white gel pen and drew a circle in the middle
and a squiggle I repeated with black pen.
Next I brushed with gold Gulding wax.
I coloured a piece of lint with black paint and placed to the side.
I stamped Kiki onto white card and coloured in.
Next I cust her face out and the upper part of
her cloak.
I used some gold ink to scribble on and three gold brads
finished it off.
Well I hope you all like my Kiki please feel free to let 
me know what you think.
PRODUCTS USED
  1. Artistic Stamper.s Neil Walker Kiki stamp & Splats & Swirl Mask.
  2. Distress inks in the following colours:- Rusty hinge, Stormy sky & barn door.

Sunday, 10 January 2016

Anything Goes Journal Page By Debs

Happy New Year everyone, Debs here with a slightly different Journal Page for you.


I used Dylusions paints In Vibrant Turqoise, Bubblegum Pink and Fresh Lime and a Ranger blending tool! I started with the Vibrant Turquoise.  Dylusions goes on really beautifully using a blending tool, giving a lovely smooth finish


Then Added some Bubblegum making sure to overlap with the Teal, because the teal is blue based when you put the pink over the top you get a nice shade of purple


Then I added in Lime overlapping the pink this creates an orangey effect because of the yellow in the lime.


I stamped Anything Goes across the middle with the Decay Alphabet Upper and lower case stamps  and black Archival Ink


And then using the Border Stamps in Archival went around each side of the page I used a piece of paper to mask off the edges so that the border lined up nicely


Once this was all done i used the blending tools to add some masking using the Splats and Swirls Mask using the same paints


Sorry the light wasn't terribly good on this one and I got carried away!! 


After the paint had dried i used my white Uniball Signo white pen to go around the outside of everything on the page including the letters, I also went over the border with a black marker to make it more prominent.

Now this was where i got really carried away and I am really sorry but the photo taking went out of the window.  Next i took Chevron 6x6 Mask and using a black micron pen i drew around all of the lines, using the mask as a template.

Once i had completed the whole of the mask I then took out the white pen and doodled in each line as you can see, white dots in the thinner rows and loops in the wider.  I also used a dot stencil and added circles around the outside edge and then drew white lines in each of them.  I also added black dots to the splats and swirls, using the micron pen. 

As always do let us know what you think, we do read all of your comments
Take care Debs


Friday, 10 July 2015

Make me live tag by Debs

Hi All

I had a bit of fun with sprays and stencils on this tag.


I started with a large craft tag and covered it with gesso

Then out came the ink sprays, I used Dylusions and Distress ink sprays and stencils.  I started by putting a layer of just ink down, waited for that to dry off and then sprayed more ink through stencils until I was happy with the background.  Whilst I waited for it all to dry I stamped one of the Gibson girls onto plain white card with brown archival and coloured her in with distress markers.


Once the ink was dry, I then stamped the swirly stamp from the Decay Journaling stamp set in Peacock Feathers and Salty Ocean, after these were dry i also did a couple in Archival black.  The words were stamped as a block onto white card with Archival and then cut out the words that I wanted.  I used grunge paste with the swirls and splodges stencil, one of the nice things about grunge paste is its ability to soak up the ink that is underneath it, meaning in. This instance I didn't need to colour it.  I made a large paper flower with a die, some book pages and stuck a wooden bead in the middle.  Then re-arranged the words and stuck them down.

Hope you are all enjoying this months challenge.  See you all soon

Debs

Products used

Artistic stamper Masks


Wednesday, 10 September 2014

Measured Time.


Hi Everyone Dee here again with my passion clocks, this is actually 
a two piece blog as it started out as a tag and I wasn't 
happy with it but loved the colours, So it developed
 into two pieces. So here it is
 Part 1


I love paint splats and had seen a lovely tag that just had paint or ink 
splats on it & was very effective. So I started by flicking 
water colour paint across the tag.


I wasn't happy with this so I got my distress inks out and blended 
spiced marmalade and broken china across the tag.


I stamped the numbers from the Numerical plate in fired brick distress ink,
down one side and at the bottom of the Tag. 


I stamped the Tape measure from the Ephemera Plate down the bottom in 
black versa fine and clear embossed, I also stamped it on the opposite
 side to the numbers and gold embossed it. 


The centre was stamped with the Clock of the Tick Tock plate and 
gold embossed. I stamped the graph  paper stamp in dove grey 
so it only hinted that it was there.


Texture crackle paste was put through the Artistic stamper mask The large
splat & swirl at the top and the bottle top at the bottom.
I then cut the top third of the Tag off.


On scrap card coloured with distress inks I stamped clocks from
The Time and keys plate also the tick tock 
plate I cut them out.


I then layered the clocks and embossed some of the edges with
gold and placed others on top.


I placed glass embellishments on them, along with cogs
and I also used distress crackle paint rock candy
on one of the faces. of coarse a little bit
of gilding wax, to highlight.


I backed it all onto black card. I hope you like this piece 
and come back to view part two. Please feel free to 
let me know what you think.
Cheers Dee x


Thursday, 6 March 2014

A Thank-You card by Titbelsoeur

Salut les patouilleurs et les patouilleuses,

I made this card  the same way/day I made the Hugs & Kisses one I showed you last month.

I started with a light coat of gesso on the cart, then I added a thicker coat through magic mesh (sort of), let it dry and then sprayed diluted acrylic paint here and there. 


I then sprayed paint through the Splats & Swirl Mask and  stamped the dictionary page from the Encyclopaedia Botanica plate on the background with Broken China Distress ink.
After that, I stamped the words With Love and Thank You from the Grungy Greetings plate with blue Archival ink and highlighted them with white Posca.


And the butterfly from from the Encyclopaedia Botanica plate with some Posca lines, and here it is :


I would be very happy if my card does inspire you, 
thank you so much for stopping by, 
I am looking forward to reading your comments !

A tout bientôt,

Friday, 24 January 2014

Lots of Love

Hello everyone, Alison (butterfly) here with a folded tag which I made as my mother's birthday card (these people with birthdays so close to Christmas...). I'm writing this before the birthday (though it will all be over by the time you're reading this) and I'm guessing that her complaint will be that there are no fungi amidst the undergrowth - I'll have to get Jennie onto that for the next stamp release! - but I hope she'll like it, nonetheless.

The folded wallet structure comes from Linda Coughlin's brilliant tags offered up as bonuses in her recent Funkie Junkie 12 Tags competition.  I loved making my version so much that I've added it to the repertoire!


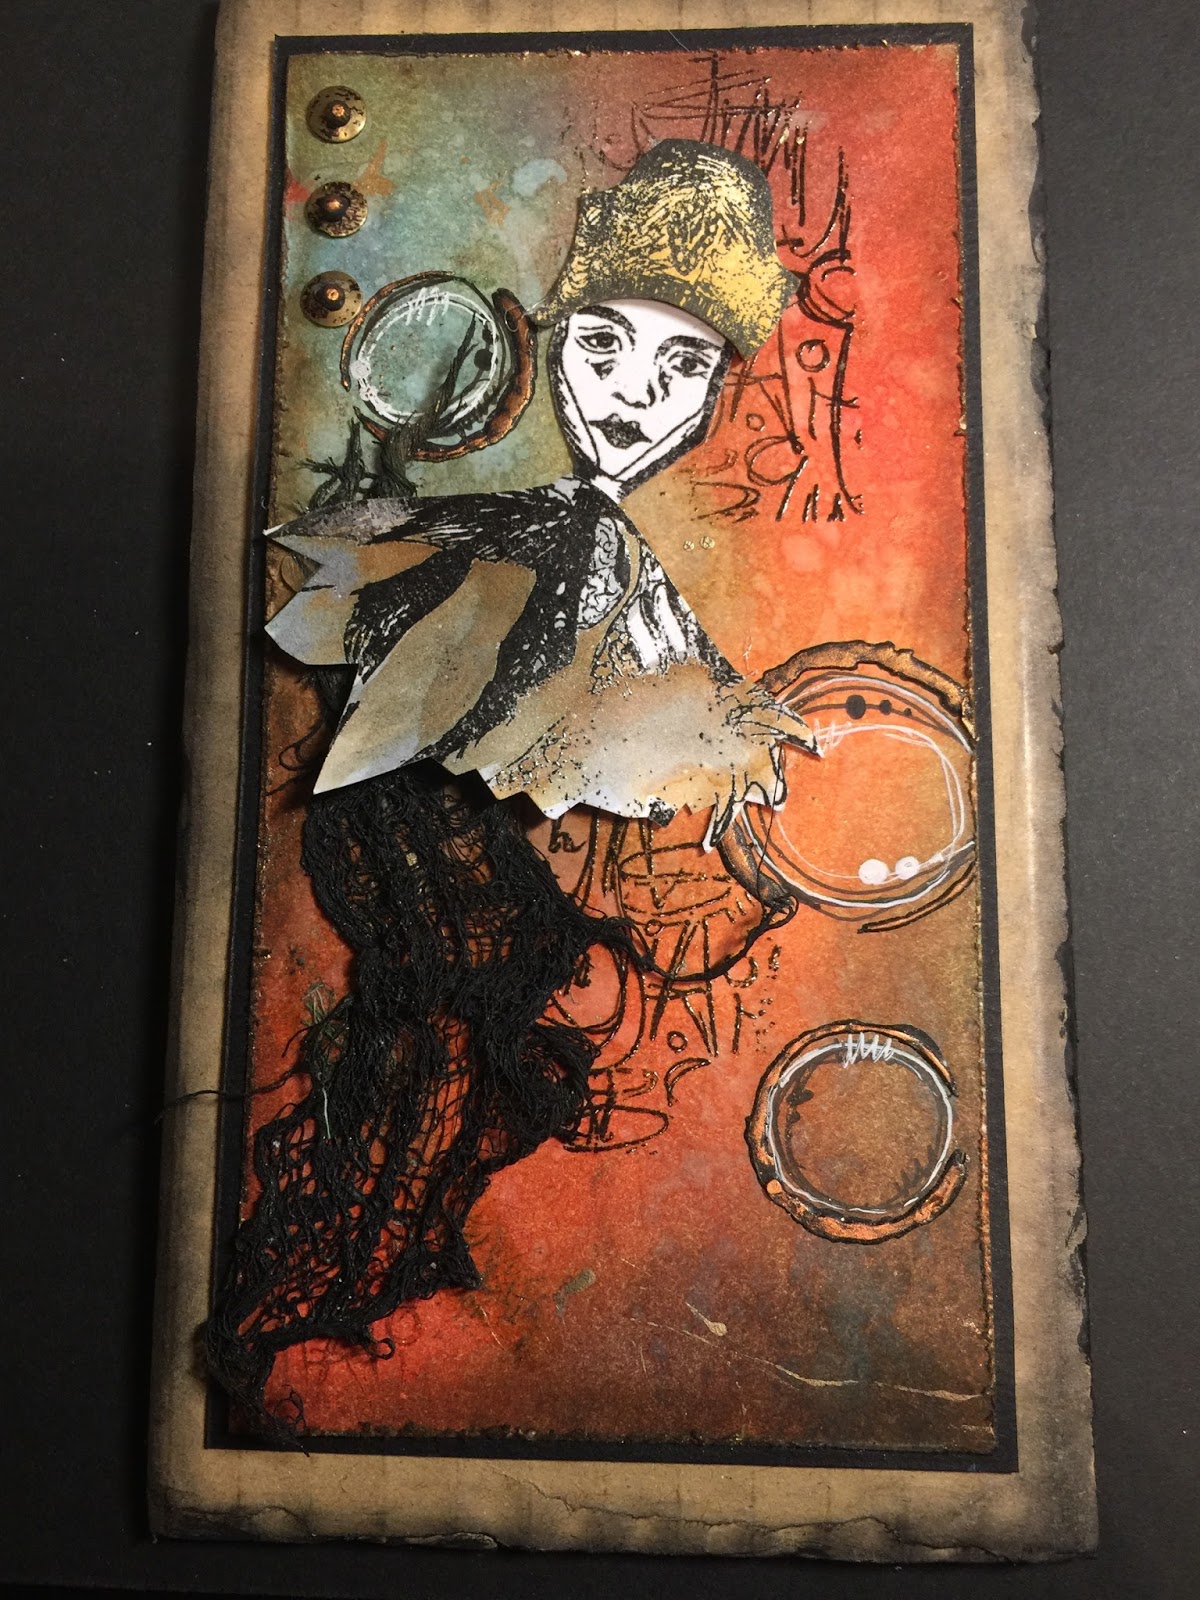
I started with some wrinkle-free distress technique on a large tag - colours, I think, were Evergreen Bough, Broken China, Peacock Feathers, Peeled Paint, inks and stains combined - and I also added a couple of spritzes of Perfect Pearls Blue Patina to the craft mat, so there are lovely touches of shimmer.


I gave the edges a good inking with Walnut Stain - I never tire of how this gives such depth to the colours and draws the eye inwards.  There are a couple of flower stamps on the outside cover: the little one is from Botanical Plate 1, and the larger head is from Katy Fox's Encyclopaedia Botanica set...


... as is the little butterfly on the flap.  All the stamping is done in Archival Potting Soil.


I added some Idea-ology Foliage, positioning them so that the petals of the lower flower actually form the closure to tuck the tag behind (very pleased with this little brainwave - and it works beautifully!).


And then lots of painty splatter - one of my favourite things to do at the moment.  Once you open it up, you're heading into the undergrowth (seems I like it in the undergrowth!)...


Here you get the full version of Katy's large flower...


There's a little bug on the inside of the flap... bugs like to hide under things, I find, don't you?!


The layered background started with mopping up the leftover inks from the front cover's wrinkle-free distress - so you get a paler version of the same shades.


There's some stencilling: Evergreen Bough through the Artistic Stamper Splats and Swirls mask, and Broken China and Walnut Stain through the Tim Holtz Bubbles stencil.


Then I got going with one of the Tim Holtz flourishes to add some detail into the layers.


The gorgeous wording comes from the fairly new Grungy Greetings plate - what a font! - and it's stamped (Potting Soil still) onto kraft card, and layered over an inked book page (and I promise I didn't notice the words surrounding it until I was taking the photos...)


Closed up again, you get a full version of the flourish on the back, and a little butterfly stamp (from Unity) that, with my monogram, seems to be becoming my "signature".

Thanks for stopping by today.  You've still got time to play along in our challenge this month: Love Is In The Air.  With Valentine's Day around the corner, I'm betting you've been working on something that fits the bill.  You don't have to use Artistic Stamper stamps on your project, but if you do you get two entries into the prize draw!!  Hope to see you there...

Ingredients used:
Artistic Stamper Stamps: Botanical Plate 1, Katy Fox's Encyclopaedia Botanica, Grungy Greetings
Artistic Stamper Mask: Splats and Swirls
Distress Inks and Distress Stains: Evergreen Bough, Broken China, Peacock Feathers, Peeled Paint, Walnut Stain
Tim Holtz stencils - I used Bubbles but you could use any of these
White acrylic paint
Idea-ology Foliage
Large Tag - size 10
From my stash: Tim Holtz flourish by Stampers Anonymous (lots of lovely alternative possibilities here), Unity butterfly stamp, book pages,

Tuesday, 22 October 2013

Art journaling with new stamps and stencils

Hey there, this is Titbelsoeur talking to you !

How exciting it was for me to both get back to art journaling and use these awesome Artistic Stamper new stamps and masks ! 

I got the feeling that tonight's gonna be a good night that Jennie created those stamps and masks FOR ME !!! Jennie, tell me : did you ? or what ? anyway, you really rock !!!

I started painting my page with blue and white acrylic paint, and I really  HAD A BALL using this amazing Splats & Swirl mask to make my background !


But it would have been nothing if I hadn't added the Messy Art © Katy Fox stamps to the page : 


among a few other stamps, of course !!!
which are :

Inspiration
Numerical plate 
Dots Background
Age
 

This was really a big pleasure to art journal again, and I hope you feel it when you look at this page I am very proud of !


Thanks for stopping by,

I am looking forward to reading your comments!

A la prochaine !