Friday, 22 May 2015

Pods & Butterflies

Hi everyone I hope you are well and enjoying crafting.
I have been having a play with some new idea's
this is a result.


Firstly I inked up the Neil Walker Stamp with versamark ink and stamped 
it onto black card  & clear embossed it. I used Deco art
 antiquing cream over the embossed image (you can use fresco finish).
 I took a baby wipe and removed most of it, during the 
process it coloured the margins so that they
 look chalked.


Next I mixed Fresco finish paint on a craft mat and swooshed 
it about then placed the fantasy plate stamp into the 
paint and stamped it onto black card.


I then covered in clear embossing powder and heat set.


I had a die cut clock frame that I rusted up and a large die cut cog that 
I also rusted up. I stamped the small clock off the tick tock plate
onto craft card.


I cut out three of the plumes from the fresco finish embossed image 
and them arranged it amongst the cogs and clock.


I cut out other pieces from the image and  offset them against
the main image.


I stamped the butterfly twice once in gold and then in 
pale blue and gold.


Finally I added gold sequins to the top and bottom.


Backed it all onto craft card and distressed the edge's which I coloured 
with ink. I hope you all enjoyed my post and don't forget to
 let me know what you think.
Cheers Dee x


Tuesday, 19 May 2015

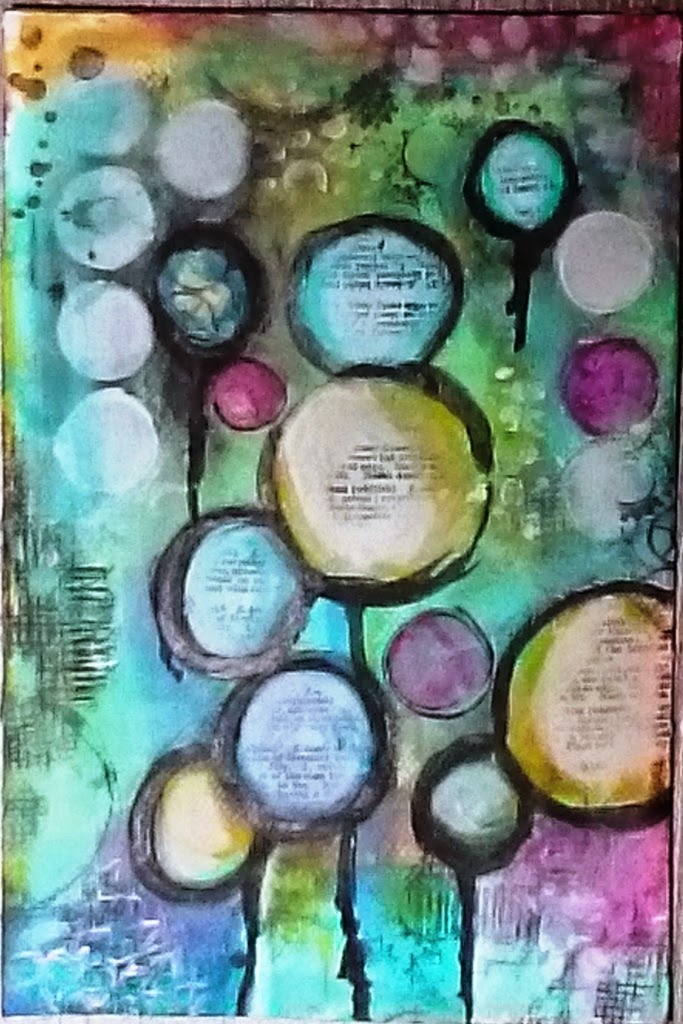
Art journal page project

Hello happy journalers ! 
Do you like art journaling ? I hope so, since our May challenge is  Journaling your heART out!
For those of you who are not at ease with art journaling, I will share this project with you. I got inspiration from Tracy Scott's art.

Materials :
paper or cardboard
acrylic paint
white gesso
black Archival ink
Artistic Stamper Mask : Large Dot 
Artistic Stamper stamps :
Backgrounds : Hessian, Cogs,
Katy Leitch : Messy Art, Encyclopaedia Botanica 
Seaside : Seaside No. 1 # 018
Neil Walker : Alphabet Soup

Start by painting the page with yellow, green and pink acrylics, and then stencil the large dots with gesso :


Stamp Dots Background with gesso and Hessian with black Archival :


Stamp Hessian, Cogs and Messy with black Archival, and again Dots Background with gesso on other places :


Draw circles with black acrylic paint on a thin brush, let it drip here and there, allow it to dry and then fill the circles with acrylic paints. 
Create shadows around the circles with paint or charcoal :


Stamp Alphabet soup with white acrylic, and with black Archival ink blots (from the Messy Art plate) and text (from the Encyclopaedia Botanica one) into the circles :


And here is the final page. Since my pictures from Gil Bruvel were relating to the sea world, I have finished by stamping some shells and starfishs :


Once you’re done with your art journal page, you can post it here to participate in our May challenge to win some fabulous Artistic Stamper stamps !

Thanks so much for stopping by,
your comments are very much appreciated.

Titbelsoeur

Saturday, 16 May 2015

Creating mixed-media card using masking fluid, watercolor and acrylic ink

Hello, dear! 

Hi, it's me, Maria Potapovich (mellpellmell) here for you today)))))

Today we will have fun with colors. 
Well, with the masking fluid.
And with the beads.
And with stamps. 

Oh, do keep your eyes peeled!


Here is my result:


I've used stamps set to make this card: Journaling Mini Words 

I hope you liked my idea.

If you decide to repeat it yourself, then feel free to leave here or in the comments below the video links to your work - I really wonder what will  you get! 

<3

Wednesday, 13 May 2015

Butterfly Hanging

Hello Everyone,
Shilpa  here,
I've small,easy and cute project to share with you today. 


This can be a wall/door hanging which I made with Artistic stamper Neil walker butterfly stamp.

Here is the step by step process:
1. Cut out the Ornamental shape/ any desired shape out of chipboard and watercolor paper. Attach them together.
2. Through any design stencil apply Picket fence distress paint. Let it dry completely.
3. On craft Mat apply Spun sugar, Tumbled glass and  shabby shutters distress stains, spritzed water and smoosh  our base paper into that. It will bring beautiful pastel colors and resist picket fence distress paint.
4. Apply Tumbled glass distress ink at all edges.
5. On Ranger stamping paper stamp butterfly with Archival Forget Me not ink, fussy cut it and stick on the background.
6. Add flowers and all other embellishments.

Hope you liked it, 
Thanks so much for stopping by.

Products used from Artistic stamper:


Sunday, 10 May 2015

ITS FUN TO CREATE! By Debs

Hi All

Debs here, Firstly i would like to thank Jennie for giving me the great honour of being on The Artistic Stamper Design Team, Alison will be a hard act to follow!

This months challenge is Journaling, I use my journal for just creating extra big pieces of art, or trying out paints, inks etc before i use them on smaller projects like cards or tags.  As I have just picked up my new fossilized amber distress inks, paints etc, well lets just say after seeing Jennies tag last week  I thought they would make a great choice to start my first ever DT post!  Having seen the new swirl stencil used to great effect everywhere i had that to try that out as well and as it says on the page.  Its Fun to Create!


I first sprayed the blank pages with the Fossilized (I really want to put an 's' in there) Amber distress stain spray and then spritzed quite lightly with water, dried and then repeated until I had a reasonably full coverage.  I have to say the colour on the lids of this new colour do not really do it justice, It goes on looking quite dark and dull and dries to a beautiful bright yellow.  Using the swirl stencil and just choosing random parts of it lightly sprayed with Abandoned Coral (yes really!!).  After that was dry I used the petal stencil and sprayed it with some more Amber.

The birds and butterflies were all stamped onto a piece of card and coloured using a water brush and the other three new distress ink pens.  The best way to do this is to scribble a bit of distress pen onto your craft mat or a stamping block and pick up with the water brush and just paint on some of the darker areas were applied by putting the pen straight onto the paper and then pulling out with the water brush.

The letters are all from the A4 words stencil.  I made up the words using the letters available the "Its" "To" and the "n" in fun are all taken from "inspiration"! I used the stencil as a template and drew around each letter with a black micro pen and then coloured them in using the same colours as before.  I added some lines in black to make stripes as i had on the border.

The border was done by hand drawing round a wavy shape and then adding in the stripes.  I forgot that adding blue to yellow would make green, lol ,as it was all done with the same four colours but it does make the page pop.  I also drew around each swirl in white pen which really makes the swirls stand out nicely, and also did the same thing on some of the petals.

Well thanks for checking out my first post as a Creative Team member and hopefully i will see you all again soon.

Products used:
The Artistic Stamper  Butterflies stamp mat
The Artistic Stamper Neil Walker Birdz set
The Artistic Stamper Swirl Mask
The Artistic Stamper Petal Mask
The Artistic Stamper Words A4 Mask
Tim Holtz Distress Stain Sprays in Abandoned Coral and Fossilized Amber
Distress Pens in Mermaid Lagoon, Cracked Pistachio, Abandoned Coral and Fossilized Amber

Thursday, 7 May 2015

Let's art journal in May by Titbelsoeur

Hello happy journalers !
You know that the May challenge at the Artistic Stamper is "Journaling your heART out!" and I have decided to make this page for you...

I started by gluing some pieces of "test" pages, this one to test Neil's stamp on to my home-made gelli plate :

or that one that was used to clean my A.S. Sequin mask up :


So here is the 1st layer background :


Some gesso here and there, then brown and green acrylic paint, with a brush or with a baby wipe through A.S. Sequin and Petals masks 


Then stamps as backgrounds : car, alphabet soup, dots with black Archival 


And to end, let's stamp words with black and brown Archival, paint some circles with a bottle cap and write some unreadable words in white and black, and here it is :


To make this page, I have used :
black and brown Archival inks
Large Sequin and Petals Artistic Stamper's masks 
Dots background stamp
Neil Walker's alphabet soup and fantasy background
Debbie Cotton's Linington's automotive Sales
Journaling Words #5, Imagine 4.5 cm, Creative 4.5 cm and Journaling Words 3 

Thanks so much for stopping by,
your comments are very much appreciated.
I hope you will participate in our May challenge
 to win some fabulous Artistic Stamper stamps.

Titbelsoeur

Monday, 4 May 2015

Time Birdz

Hi everyone I have for you today Neil Walkers Birdz stamp Steampunked up. 
I started with an old page from a book unfortunately it is a medical
journal (so some of the text is a bit weird).


I started by stamping the birdz stamp onto the page and the clock at the bottom.
Next I painted the inside of the bird and the clock's with 
cream/buff acrylic paint. 


I then touched up the base of the beak with Quinacridone Gold and a bit of grey/blue
on the top of the head and wing. I then did a wash around the entire image 
with the blue/grey.


I then followed up with a wash of very diluted Prussian blue. For the base of the main clock I used a
 technique that was used by Jennie Atkinson on this blog back in 
may 2012 click here to go to it > Time Flies . 


I assembled it all together gave a final wash of really watered down red/brown
a coat of matt varnish to seal it all.


Around the edges I used the blending technique of a craft mat with
Vintage photo and Walnut stain.


A close up of the clocks the lower one was stamped onto grunge paper
I would use card/grey board next time as I found 
grunge paper buckles.


I added a fuse and four bolts plus the clock die cut this was painted with
burnt umber then while wet sprinkled with UTEE then heat set. 
Final touch a bit of gilding wax.
Products Used
  1. The following Artistic stamper stamps Neil Walker Birdz, Tick Tock plate.
  2. Distress inks Vintage photo & Walnut Stain.
  3. Distress stain spray in wild honey
  4. UTEE
  5. Deco Art Media fluid acrylic Titan Buff, Prussian Blue, Quinacridone Gold, Burnt umber & Paynes grey.
  6. Gilding wax.

That's it for today folks! let me know what you think.
Cheers Dee x